
User manual

FastTrak TX2000™ Series User Manual
12
You would use this method if you wish to use a drive that already contains data and/or is the
bootable system drive in your system. You will need another drive of identical or larger storage
capacity.
WARNING: Backup any necessary data before proceeding. Failure to follow this
accepted PC practice could result in data loss.
WARNING: If you wish to include your current bootable drive using the Windows
NT 4.x, Windows 2000, or Windows XP operating system as part of a bootable
Mirrored (RAID 1) array on your FastTrak TX2000, do NOT connect the hard
drive to the FastTrak TX2000 controller yet. You MUST install the Windows NT4,
2000, or XP driver software first (see page 30) to this drive while it is still attached
to your existing hard drive controller.
Follow these steps:
1. Using the Spacebar, choose “Security” under the Optimize Array for section.
2. Press <Ctrl-Y> keys to Save your selection. The window below will appear.
Do you want the disk image to be duplicated to another? (Yes/No)
Y - Create and Duplicate
N - Create Only
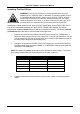
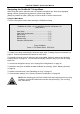
3. Press “Y” for the Create and Duplicate option. The window below will appear
asking you to select the Source drive to use. FastBuild will copy all data from the
Source drive to the Target drive.
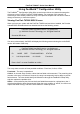
Source Disk
Channel:ID Drive Model Capacity (MB)
Target Disk
Channel:ID Drive Model Capacity (MB)
[Please Select A Source Disk]
Channel:ID Drive Model Capacity (MB)
1 :Master QUANTUMCR8.4A 8063
2 :Master QUANTUMCR8.4A 8063
[↑] Up [↓] [ESC] Exit [Ctrl-Y] Save
4. Use the arrow keys to choose which drive contains the existing data to be copied.
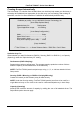
5. Press [Ctrl-Y] keys to Save selection and start duplication. The following progress
screen will appear.
Start to duplicate the image . . .
Do you want to continue? (Yes/No)
Y – Continue N - Abort
6. Select “Y” to continue. If you choose “N”, you will be returned to step 1.