
User manual

FastTrak TX2000™ Series User Manual
15
Navigating the FastBuild™ Setup Menu
When using the menus, these are some of the basic navigation tips: Arrow keys highlights
through choices; [Space] bar key allows to cycle through options;
[Enter] key selects an option; [ESC] key is used to abort or exit the current menu.
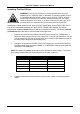
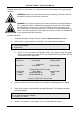
Using the Main Menu
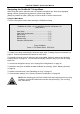
This is the first option screen when entering the FastBuild
TM
Setup.
FastBuild (tm) Utility 1.xx (c) 1995-2001 Promise Technology, Inc.
[ Main Menu ]
Auto Setup ...................................................... [ 1 ]
View Drive Assignments.................................. [ 2 ]
Define Array.................................................... [ 3 ]
Delete Array.................................................... [ 4 ]
Rebuild Array .................................................. [ 5 ]
Controller Configuration................................... [ 6 ]
[ Keys Available ]
Press 1...6 to Select Option [ESC] Exit
To create a new array automatically, follow the steps under “Creating Arrays Automatically” on
page 16. Promise recommends this option for most users.
To manually create an array or define an array as bootable, follow the steps under “Manually
Creating Arrays” on page 19. You will need to manually create an array if you wish to modify
block size.
To view drives assigned to arrays, see “Viewing Drive Assignments” on page 18.
To delete an array (but not delete the data contained on the array), select “Deleting An Array”
on page 26.
To rebuild a mirrored array, see “Rebuilding an Array” on page 27.
To view controller settings, see “Viewing Controller Configuration” on page 29.
NOTE: After installing the FastTrak TX2000 card and configuring an array using
FastBuild, you should FDISK and format the arrayed drive(s) if you are using
new, blank drives