
User manual

FastTrak TX2000™ Series User Manual
33
Installing Driver in Existing Windows 2000 System
WARNING: If you will be moving the boot drive containing the existing Windows
2000 operating system to a mirrored RAID 1 array on the FastTrak TX2000 card,
the FastTrak TX2000 driver MUST be loaded to the hard drive while it is still
attached to your existing hard drive controller. Do not attach this drive or any other
hard drive to the FastTrak TX2000 controller card before completing this step.
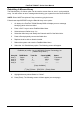
1. After installing the FastTrak TX2000 card and rebooting your system, Windows 2000
setup will show a “New Hardware Found” dialog box. Under Windows 2000, the “PCI
RAID Controller” will be displayed. Click on “Next”.
2. Choose “Display a list of known drivers for this device so that I can choose a specific
driver”. Click on “Next”.
3. In the “Install Drivers” dialog box, press “Have disk…”
4. When the “Install From Disk” appears, insert the Promise Technology FastTrak
TX2000 diskette in drive A:.
5. Type “A:\Win2000” in the text box. Press “Enter”.
6. Choose “Win2000 Promise FastTrak TX2000 (tm) Series Controller” from the list that
appears on screen, and then press the “Enter” key.
7. When the "System Settings Change" dialog box appears, remove the floppy diskette
and click on “Yes” to restart the system. Windows 2000 will then restart for the driver
installation to take effect.
Confirming Windows 2000 Installation
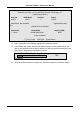
1. From Windows 2000, open the Control Panel from “My Computer” followed by the
System icon.
2. Choose the “Hardware” tab, and then click the “Device Manager” tab.
3. Click the “+” in front of “SCSI & RAID Controllers hardware type.” The driver
“Win2000 Promise FastTrak TX2000 (tm) Series Controller” should appear.