
User manual


Promise Array Manager
28
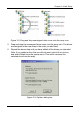
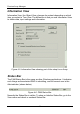
7. Click the Commit button in the Information View. The Options dialog box
appears. Check the box to enable:
Initialization ― Data on all drives is set to zero, effectively erasing any
data on the disks.
Gigabyte Boundary ― The Gigabyte Boundary feature is designed for
fault tolerant arrays (RAID 1, 0+1, 3 and 5) in which a drive has failed
and the user cannot replace the drive with the same capacity or larger.
Instead, the Gigabyte Boundary feature permits the installation of a
replacement drive that is slightly smaller (within 1 gigabyte) than the
remaining working drive (for example, an 80.5GB drive would be
rounded down to 80GB). This can be helpful in the event that a drive fails
and an exact replacement model is no longer available. Without this
feature enabled, a Promise RAID product will NOT permit the use of a
replacement drive that is slightly smaller than the remaining working
drive.
For the Gigabyte Boundary feature to work, the Gigabyte Boundary
feature must be set to ON when the original array is created. When
enabled, the Gigabyte Boundary feature rounds the drive capacity of all
drives to the common whole GB drive size. For example, with the
Gigabyte Boundary feature enabled, the remaining working drives can
be 80.5GB and the replacement drive can be 80.3, since all are rounded
down to 80GB. This permits the smaller drive to be used. Please note
that users will lose a small amount of available storage capacity from
each drives in order to arrive at a common drive size.
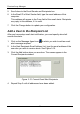
8. When you have made your selection,
click the Commit button on the
Options dialog box.
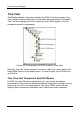
The Array Status field in the
Information View will show that the
array is synchronizing (right).
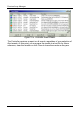
9. When the Array Status field shows
Functional (right), reboot your
computer.
Once rebooted, the new Array is ready.