
FastTrak TX Series User Manual


FastTrak TX2200, TX2300 User Manual
120
Step 3: Install the Software Drivers
Windows Server 2003, XP and 2000
1. Insert the FastTrak Driver diskette in the A: drive.
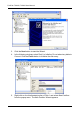
2. In the Start Menu, go to Settings > Control Panel. Double-click on the
System icon. Click on the Hardware tab. Click on the Device Manager
button.
3. At the Device Manager, click on the “+” icon to the left of SCSI and RAID
Controllers to expand the list.
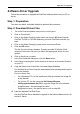
4. Right-click on Promise FastTrak TX [2200, 2300] (tm) Controller and select
Update Driver...
5. In the Hardware Update Wizard, select No, not this time and click Next.
6. In the Hardware Update Wizard, select Install from a list or specific location
(Advanced) and click Next.
7. Under Please choose your search and installation options, select Don’t
search. I will choose the driver to install and click Next.
8. Under Select the device driver you want to install, click Have Disk...
9. Under Install from Disk, type A:\ and click OK.
10. Under Select the device driver you want to install, click Next.
If a warning about Digital Signature appears, click Continue Anyway.
11. Under Completing the Hardware Update Wizard, click Finish.
12. Click Yes to restart your PC.
13. Remove the FastTrak Driver diskette.
Red Hat Enterprise Linux 4.0
1. Insert FastTrak Driver diskette into the floppy drive.
2. Log in as root.
3. Run mount -r /dev/fd0 /media/floppy.
4. Run cd /media/floppy.
5. Run sh ./install.
6. When the Installer asks, You are installing a driver on an existing OS. Is it
true (y/n)?, type Y and press Enter.
7. Run cd; umount /media/floppy.
8. Remove the FastTrak Driver diskette.
9. Run reboot to restart the system.