
Product SMARTSTOR NS4300N Product Manual

SmartStor NS4300N Product Manual
30
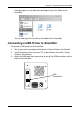
Setting up the Print Server on SmartStor
To set up the SmartStor’s print server:
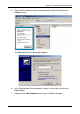
1. Start PASM.
See “PASM in your Browser” on page 16 or “PASM in SmartNAVI” on
page 17.
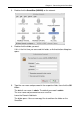
2. In the Tree, on the left side of the PASM screen, click the + beside the File &
Print icon to expand the Tree.
3. Click the Protocol Control icon, then click the Printer Server tab.
4. Click the Enable option button beside Printer Server.
5. Click the OK button to save your settings.
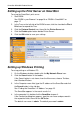
Setting up Windows Printing
To set up printing on a Windows PC:
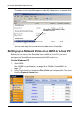
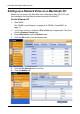
1. On the Windows desktop, double-click the My Network Places icon.
2. Click the Search button in the toolbar.
If the Search button is not shown, from the View menu, choose Toolbars,
then Standard Buttons.
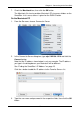
3. In the Computer name field, type the IP address of the SmartStor and click
the Search button in the side bar.
See “Finding the SmartStor’s IP Address” on page 15.
The SmartStor appears in the search results list.
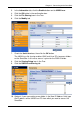
4. In the computer list, double-click the SmartStor to open it.
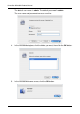
If the Connect to dialog box appears, type the user name and password in
the respective fields, then click the OK button.
The default user name is admin. The default password is admin.