
User manual
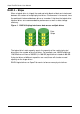
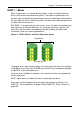
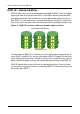
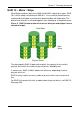

Table Of Contents
- SuperTrak User Manual
- Contents
- Chapter 1: Introduction
- Chapter 2: Installation
- Unpacking the SuperTrak Card
- Installing the SuperTrak Card
- Choosing the Physical Drives
- Creating a Logical Drive
- Installing the CLI
- Installing WebPAM PRO
- Logging into WebPAM PRO
- Setting up WebPAM PRO
- Chapter 3: Installing Drivers
- Chapter 4: SuperBuild™ Utility
- Chapter 5: Management with WebPAM PRO
- Logging into WebPAM PRO
- Accessing the Interface
- Managing Users
- Working with Subsystem/Host Management
- Managing Software Services
- Managing the Host
- Managing the Subsystem
- Viewing Subsystem Information
- Clearing Statistical Data
- Setting an Alias for the Subsystem
- Updating the Firmware
- Checking Subsystem Health
- Viewing the Runtime Event Log
- Saving the Runtime Event Log
- Clearing the Runtime Event Log
- Viewing the NVRAM Event Log
- Saving the NVRAM Event Log
- Clearing the NVRAM Event Log
- Viewing Current Background Activities
- Making Background Activity Settings
- Running Background Activities
- Running Media Patrol
- Running PDM
- Viewing Scheduled Activities
- Scheduling an Activity
- Deleting a Scheduled Activity
- Viewing System Configuration
- Managing the Controller
- Managing Enclosures
- Managing Physical Drives
- Viewing a List of Physical Drives
- Locating a Physical Drive
- Making Global Physical Drive Settings
- Viewing Physical Drive Information
- Viewing Physical Drive Statistics
- Making Physical Drive Settings
- Clearing Stale and PFA Conditions
- Viewing the SMART Log
- Viewing Advanced SMART Log Information
- Saving Advanced SMART Log Information
- Making SMART Log Settings
- Managing Disk Arrays
- Viewing Disk Arrays
- Locating a Disk Array
- Creating a Disk Array
- Creating a Disk Array - Automatic Configuration
- Creating a Disk Array - Express Configuration
- Creating a Disk Array - Advanced Configuration
- Deleting a Disk Array
- Viewing Disk Array Information
- Making Disk Array Settings
- Creating a Logical Drive
- Deleting a Logical Drive
- Migrating a Disk Array
- Rebuilding a Disk Array
- Running Media Patrol on a Disk Array
- Running PDM on a Disk Array
- Transitioning a Disk Array
- Preparing a Disk Array for Transport
- Managing Logical Drives
- Managing Spare Drives
- Working with the Logical Drive Summary
- Chapter 6: Management with the CLI
- Opening the CLI on Windows
- Opening the CLI on Linux, FreeBSD, and VMware
- Table of Supported Commands
- Notes and Conventions
- List of Supported Commands
- Chapter 7: Technology Background
- Chapter 8: Troubleshooting
- Chapter 9: Support
- Appendix A: Partition and Format
- Appendix B: Upgrades
- Appendix C: Battery Backup Unit
- Appendix D: LED Backplane Connections
- Index
SuperTrak EX Series User Manual
232
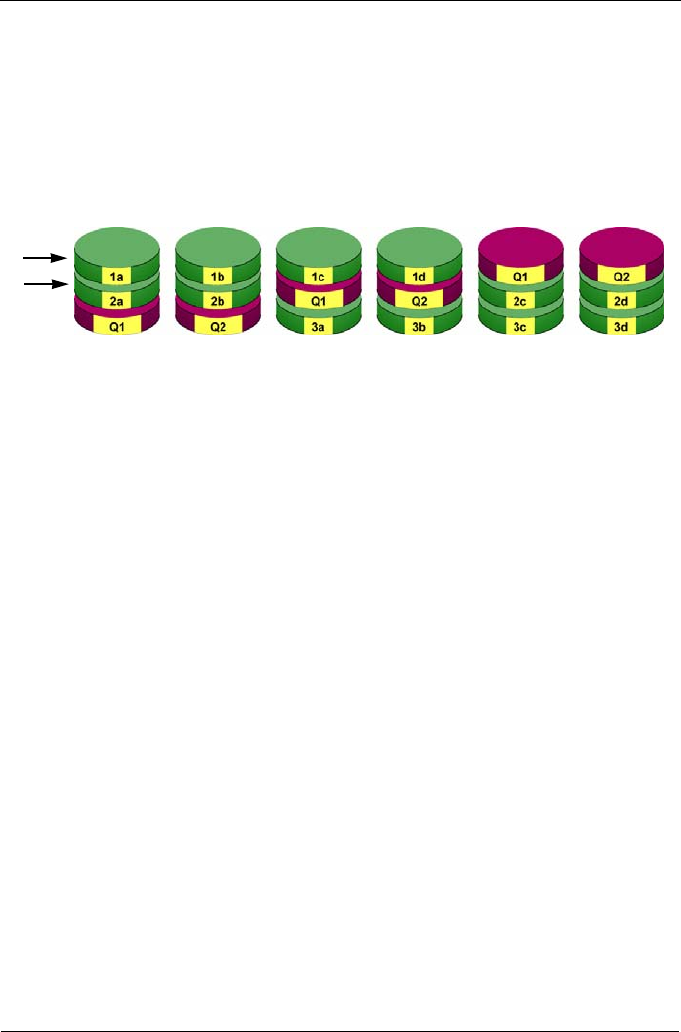
RAID 6 – Block and Double Parity Stripe
RAID level 6 stores dual parity data is rotated across the physical drives along
with the block data. A RAID 6 logical drive can continue to accept I/O requests
when any two physical drives fail.
Figure 5. RAID 6 stripes all drives with data and dual parity
The total capacity of a RAID 6 logical drive is the smallest physical drive times
the number of physical drives, minus two.
Hence, a RAID 6 logical drive with (7) 100 GB physical drives will have a capacity
of 500 GB. A RAID 6 logical drive with (4) 100 GB physical drives will have a
capacity of 200 GB.
RAID 6 becomes more capacity efficient in terms of physical drives as the
number of physical drives increases.
RAID 6 provides double fault tolerance. Your logical drive remains available
when up to two physical drives fail.
RAID 6 is generally considered to be the safest RAID level.
A RAID 6 on SuperTrak consists of 4 to 16 physical drives.
Double Distributed (P and Q) Parity
physical drives
Data
Blocks