
User manual
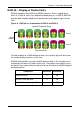
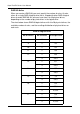


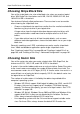

Table Of Contents
- SuperTrak User Manual
- Contents
- Chapter 1: Introduction
- Chapter 2: Installation
- Unpacking the SuperTrak Card
- Installing the SuperTrak Card
- Choosing the Physical Drives
- Creating a Logical Drive
- Installing the CLI
- Installing WebPAM PRO
- Logging into WebPAM PRO
- Setting up WebPAM PRO
- Chapter 3: Installing Drivers
- Chapter 4: SuperBuild™ Utility
- Chapter 5: Management with WebPAM PRO
- Logging into WebPAM PRO
- Accessing the Interface
- Managing Users
- Working with Subsystem/Host Management
- Managing Software Services
- Managing the Host
- Managing the Subsystem
- Viewing Subsystem Information
- Clearing Statistical Data
- Setting an Alias for the Subsystem
- Updating the Firmware
- Checking Subsystem Health
- Viewing the Runtime Event Log
- Saving the Runtime Event Log
- Clearing the Runtime Event Log
- Viewing the NVRAM Event Log
- Saving the NVRAM Event Log
- Clearing the NVRAM Event Log
- Viewing Current Background Activities
- Making Background Activity Settings
- Running Background Activities
- Running Media Patrol
- Running PDM
- Viewing Scheduled Activities
- Scheduling an Activity
- Deleting a Scheduled Activity
- Viewing System Configuration
- Managing the Controller
- Managing Enclosures
- Managing Physical Drives
- Viewing a List of Physical Drives
- Locating a Physical Drive
- Making Global Physical Drive Settings
- Viewing Physical Drive Information
- Viewing Physical Drive Statistics
- Making Physical Drive Settings
- Clearing Stale and PFA Conditions
- Viewing the SMART Log
- Viewing Advanced SMART Log Information
- Saving Advanced SMART Log Information
- Making SMART Log Settings
- Managing Disk Arrays
- Viewing Disk Arrays
- Locating a Disk Array
- Creating a Disk Array
- Creating a Disk Array - Automatic Configuration
- Creating a Disk Array - Express Configuration
- Creating a Disk Array - Advanced Configuration
- Deleting a Disk Array
- Viewing Disk Array Information
- Making Disk Array Settings
- Creating a Logical Drive
- Deleting a Logical Drive
- Migrating a Disk Array
- Rebuilding a Disk Array
- Running Media Patrol on a Disk Array
- Running PDM on a Disk Array
- Transitioning a Disk Array
- Preparing a Disk Array for Transport
- Managing Logical Drives
- Managing Spare Drives
- Working with the Logical Drive Summary
- Chapter 6: Management with the CLI
- Opening the CLI on Windows
- Opening the CLI on Linux, FreeBSD, and VMware
- Table of Supported Commands
- Notes and Conventions
- List of Supported Commands
- Chapter 7: Technology Background
- Chapter 8: Troubleshooting
- Chapter 9: Support
- Appendix A: Partition and Format
- Appendix B: Upgrades
- Appendix C: Battery Backup Unit
- Appendix D: LED Backplane Connections
- Index

SuperTrak EX Series User Manual
240
Choosing a RAID Level
There are several issues to consider when choosing the RAID Level for your
logical drive. The following discussion summarizes some advantages,
disadvantages and applications for each choice.
RAID 0
Recommended applications for RAID 0:
•Image Editing
• Pre-Press Applications
• Any application requiring high bandwidth
RAID 1
Recommended applications for RAID 1:
• Accounting/Financial
•Payroll
• Any application requiring very high availability
Advantages Disadvantages
Implements a striped logical drive, the
data is broken down into blocks and
each block is written to a separate
physical drive
I/O performance is greatly improved by
spreading the I/O load across many
channels and drives
No parity calculation overhead is
involved
Not a true RAID because it is not fault-
tolerant
The failure of just one drive will result
in all data in an logical drive being lost
Should not be used in mission critical
environments
Advantages Disadvantages
Simplest RAID storage subsystem
design
Can increase read performance by
processing data requests in parallel
since the same data resides on two
different drives
Very high physical drive overhead –
uses only 50% of total capacity