
User manual
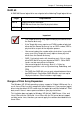
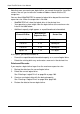
Table Of Contents
- SuperTrak User Manual
- Contents
- Chapter 1: Introduction
- Chapter 2: Installation
- Unpacking the SuperTrak Card
- Installing the SuperTrak Card
- Choosing the Physical Drives
- Creating a Logical Drive
- Installing the CLI
- Installing WebPAM PRO
- Logging into WebPAM PRO
- Setting up WebPAM PRO
- Chapter 3: Installing Drivers
- Chapter 4: SuperBuild™ Utility
- Chapter 5: Management with WebPAM PRO
- Logging into WebPAM PRO
- Accessing the Interface
- Managing Users
- Working with Subsystem/Host Management
- Managing Software Services
- Managing the Host
- Managing the Subsystem
- Viewing Subsystem Information
- Clearing Statistical Data
- Setting an Alias for the Subsystem
- Updating the Firmware
- Checking Subsystem Health
- Viewing the Runtime Event Log
- Saving the Runtime Event Log
- Clearing the Runtime Event Log
- Viewing the NVRAM Event Log
- Saving the NVRAM Event Log
- Clearing the NVRAM Event Log
- Viewing Current Background Activities
- Making Background Activity Settings
- Running Background Activities
- Running Media Patrol
- Running PDM
- Viewing Scheduled Activities
- Scheduling an Activity
- Deleting a Scheduled Activity
- Viewing System Configuration
- Managing the Controller
- Managing Enclosures
- Managing Physical Drives
- Viewing a List of Physical Drives
- Locating a Physical Drive
- Making Global Physical Drive Settings
- Viewing Physical Drive Information
- Viewing Physical Drive Statistics
- Making Physical Drive Settings
- Clearing Stale and PFA Conditions
- Viewing the SMART Log
- Viewing Advanced SMART Log Information
- Saving Advanced SMART Log Information
- Making SMART Log Settings
- Managing Disk Arrays
- Viewing Disk Arrays
- Locating a Disk Array
- Creating a Disk Array
- Creating a Disk Array - Automatic Configuration
- Creating a Disk Array - Express Configuration
- Creating a Disk Array - Advanced Configuration
- Deleting a Disk Array
- Viewing Disk Array Information
- Making Disk Array Settings
- Creating a Logical Drive
- Deleting a Logical Drive
- Migrating a Disk Array
- Rebuilding a Disk Array
- Running Media Patrol on a Disk Array
- Running PDM on a Disk Array
- Transitioning a Disk Array
- Preparing a Disk Array for Transport
- Managing Logical Drives
- Managing Spare Drives
- Working with the Logical Drive Summary
- Chapter 6: Management with the CLI
- Opening the CLI on Windows
- Opening the CLI on Linux, FreeBSD, and VMware
- Table of Supported Commands
- Notes and Conventions
- List of Supported Commands
- Chapter 7: Technology Background
- Chapter 8: Troubleshooting
- Chapter 9: Support
- Appendix A: Partition and Format
- Appendix B: Upgrades
- Appendix C: Battery Backup Unit
- Appendix D: LED Backplane Connections
- Index

SuperTrak EX Series User Manual
256
the bad sector remapping table, which has a capacity of 512 reassigned blocks
and 1024 error blocks.
When the table fills to a specified percentage of its capacity, PDM triggers a
migration of data from the suspect drive (the physical drive with the bad sectors)
to a spare drive.
During data migration, you will have access to the logical drive but it will respond
more slowly to read/write tasks because of the additional operation. The time
required for data migration depends on the size of the physical drive.
See “Making Background Activity Settings” on page 137.
Transition
The Transition feature enables you to specify “permanent” spare drives for your
SuperTrak controller. Transition is the process of replacing a revertible spare
drive that is currently part of a disk array with an unconfigured physical drive or a
non-revertible spare. The revertible spare drive returns to its original status.
Transition happens automatically when the following sequence of events takes
place:
• You create a revertible spare drive. “Creating a Spare Drive” on page 179.
• One of the physical drives assigned to your disk array fails and the array
becomes degraded and the logical drive goes critical.
• The SuperTrak controller automatically rebuilds your array to the revertible
spare drive and the array becomes functional again.
• You replace the failed physical drive with a new physical drive of equal or
greater capacity.
• The SuperTrak controller automatically transitions (moves) the data from the
revertible spare to the new physical drive.
• The new physical drive becomes part of the array and the revertible spare
drive returns to its original spare status.
Transition happens manually when you specify a different unconfigured physical
drive to transition (move) the data from the revertible spare drive.
Drive Failure and Automatic Rebuild
In the example below, there is a two-drive RAID 1 disk array.
• The physical drives in channels 1 and 2 belong to the disk array.
• The physical drive in channel 3 is unconfigured.