
User manual
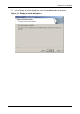
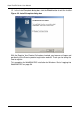
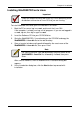
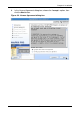
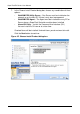
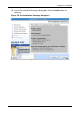
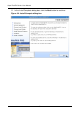
Table Of Contents
- SuperTrak User Manual
- Contents
- Chapter 1: Introduction
- Chapter 2: Installation
- Unpacking the SuperTrak Card
- Installing the SuperTrak Card
- Choosing the Physical Drives
- Creating a Logical Drive
- Installing the CLI
- Installing WebPAM PRO
- Logging into WebPAM PRO
- Setting up WebPAM PRO
- Chapter 3: Installing Drivers
- Chapter 4: SuperBuild™ Utility
- Chapter 5: Management with WebPAM PRO
- Logging into WebPAM PRO
- Accessing the Interface
- Managing Users
- Working with Subsystem/Host Management
- Managing Software Services
- Managing the Host
- Managing the Subsystem
- Viewing Subsystem Information
- Clearing Statistical Data
- Setting an Alias for the Subsystem
- Updating the Firmware
- Checking Subsystem Health
- Viewing the Runtime Event Log
- Saving the Runtime Event Log
- Clearing the Runtime Event Log
- Viewing the NVRAM Event Log
- Saving the NVRAM Event Log
- Clearing the NVRAM Event Log
- Viewing Current Background Activities
- Making Background Activity Settings
- Running Background Activities
- Running Media Patrol
- Running PDM
- Viewing Scheduled Activities
- Scheduling an Activity
- Deleting a Scheduled Activity
- Viewing System Configuration
- Managing the Controller
- Managing Enclosures
- Managing Physical Drives
- Viewing a List of Physical Drives
- Locating a Physical Drive
- Making Global Physical Drive Settings
- Viewing Physical Drive Information
- Viewing Physical Drive Statistics
- Making Physical Drive Settings
- Clearing Stale and PFA Conditions
- Viewing the SMART Log
- Viewing Advanced SMART Log Information
- Saving Advanced SMART Log Information
- Making SMART Log Settings
- Managing Disk Arrays
- Viewing Disk Arrays
- Locating a Disk Array
- Creating a Disk Array
- Creating a Disk Array - Automatic Configuration
- Creating a Disk Array - Express Configuration
- Creating a Disk Array - Advanced Configuration
- Deleting a Disk Array
- Viewing Disk Array Information
- Making Disk Array Settings
- Creating a Logical Drive
- Deleting a Logical Drive
- Migrating a Disk Array
- Rebuilding a Disk Array
- Running Media Patrol on a Disk Array
- Running PDM on a Disk Array
- Transitioning a Disk Array
- Preparing a Disk Array for Transport
- Managing Logical Drives
- Managing Spare Drives
- Working with the Logical Drive Summary
- Chapter 6: Management with the CLI
- Opening the CLI on Windows
- Opening the CLI on Linux, FreeBSD, and VMware
- Table of Supported Commands
- Notes and Conventions
- List of Supported Commands
- Chapter 7: Technology Background
- Chapter 8: Troubleshooting
- Chapter 9: Support
- Appendix A: Partition and Format
- Appendix B: Upgrades
- Appendix C: Battery Backup Unit
- Appendix D: LED Backplane Connections
- Index
Chapter 2: Installation
49
Installing WebPAM PRO onto Linux
To install WebPAM PRO onto your Linux-based PC or server:
1. Boot the PC or server, log in as root, and launch the Linux GUI.
If the computer is already running, exit all programs. If you are not logged in
as root, log out, then log in again as root.
2. Insert the Software CD into your CD-ROM drive.
3. Go to the WebPAM PRO / Linux directory on the CD-ROM and copy the
WebPAMPRO...Linux.bin file to the root directory.
4. Open a terminal window and type sh followed by the exact name of the
WebPAMPRO...Linux.bin file, then press Enter.
After several moments, the first WebPAM PRO installation dialog box
appears.
5. In the Introduction dialog box, click the Next button to proceed with
installation.
Important
Check the SuperTrak Read Me file for any issues pertaining to the
distribution and version of Linux OS that you are running.
Note
For silent installation, type sh followed by the exact name of the
WebPAMPRO...linux.bin file, followed by -i silent, then press
Enter.