
VTRAK M-CLASS Product Manual


Chapter 5: Management with the CLU
193
Port Settings
1. Highlight Fibre Channel Port Settings and press Enter.
2. Highlight the following parameters and press the spacebar to toggle though
the choices:
• Configured Link Speed – 1GB, 2GB or Automatic selection
• Configured Topology – NL-Port (Arbitrated Loop), N-Port (Point to Point)
or Automatic selection
3. Highlight Hard ALPA and press the backspace key to erase the current
value, then type the new value.
The range is 0 to 255. 255 disables this feature.
4. Press Ctrl-A to save your settings.
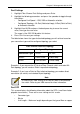
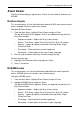
The table below shows the type of attached topology you will achieve based on
your connection type and the configured topology you select:
Example 1: If you connect the VTrak to a Fibre Channel switch and select NL-
Port topology, you will create a Public Loop attached topology.
Example 2: If you have a Point to Point attached topology, you made a direct
connection (no switch) and selected N-port topology.
Port SFP
This screen displays the following information about the SFPs (small form-factor
plugable transceivers). There are no user settings on this screen.
• Connector type
•Bitrate
• Link Length – Maximum length depending on the type of fiber or copper
Fibre Channel Attached Topology
Configured Topology
Connection Type N-Port NL-Port
Switch Fabric Direct Public Loop
Direct Point to Point Private Loop
Note
In some cases, HBA settings to N-Port only work if connected to
the switch. Refer to your HBA manual for more information.