
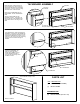
Instructions / Assembly


K
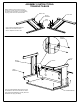
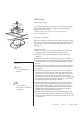
Lay the BACK in position, with small offset over TOP, and
large offset over SHELF (See Detail K). Holes should line
up!! Fasten back with (8) BLACK SCREWS.
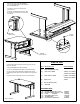
Note the Double-faced Tape on the ends of the SIDES.
Turn Overshelf upright, and place on Desk.
CAUTION- THE DOUBLE-FACED TAPE IS
STRONG!! USE CARE IN POSITIONING
THE OVERSHELF! If you wish, you can
leave the backer on the tape, and use it as
a pad, instead. Note that the Overshelf will
not be as stable if used this way.
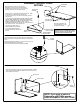
See Detail M. The four WIRE GUIDES (2 in each
SIDE) that cover the Wire Troughs are removable.
Remove the "half-moon" in the WIRE GUIDE to
allow the electrical cord to fit into the trough. Cover
with the WIRE GUIDE.
Double Faced Tape
Double Faced Tape
DETAIL K
SCALE 1 : 6
SHORT FLANGE IS
TOWARD TOP!!
LONG FLANGE IS
TOWARD SHELF!!
BLACK SCREW
(8 req'd)
M
DETAIL M
SCALE 1 : 4
Remove "Half-moon" to
allow wire through trough.
Wire trough- covered by
Wire Guide
wire
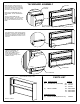
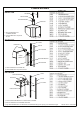
QTY
DESCRIPTION
PART #
(2) SIDE (NON HANDED) MG772881
(1) BACK PANEL 48"- MG772877
60"- MG772878
72"- MG772879
(1) SHELF 48"- MG772882
60"- MG772883
72"- MG772884
QTY
DESCRIPTION
PART #
(1) TOP 48"- MG772893
60"- MG772894
72"- MG772895
(1) WIRE GUIDE MG772850
(Already assembled to Legs)
HARDWARE BAG:
(24) BLACK SCREW (#10-24 X 1/2) F09542
PARTS LIST
R05104 12/06/06