
Instructions / Assembly
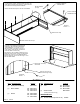

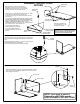


A
SHOULDER
SCREWS
Pedestal holes
are toward front
RIGHT side
LEFT side (remember- the
top is upside-down, so left
and right are reversed!
This instruction sheet shows a
"RIGHT-HAND" return assembly.
For a "LEFT HAND" assembly,
screw the shoulder screws into the
left side.
DETAIL A
SCALE 1 : 4
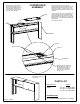
Place the TOP on a smooth flat surface, face down. Make
sure nothing is underneath to scratch the top!
A carpet is best, but you can also use the carton that the
desk came in.
IF YOU WANT THE RETURN TO BE ON THE LEFT SIDE
OF THE DESK, INSERT THE SHOULDER SCREWS IN
THE LEFT SIDE (SEE NOTE!) IF ON THE RIGHT, THEN
INSERT THEM INTO THE RIGHT SIDE. Insert (2)
SHOULDER SCREWS into the inner two of the (4) inserts in
each side of the TOP. Hand tighten only!
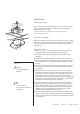
ASSEMBLY INSTRUCTIONS-
RETURN
SHOULDER
SCREW
INNER INSERT-
USE THIS ONE
OUTER INSERT-
DO NOT USE!
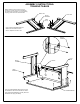
First: Place keyhole in leg over Shoulder Screw. (See Detail)
NOTE- the holes in the leg should be toward the inside of the
return.
Slide leg forward until holes line up. Fix leg in place using (2)
SILVER SCREWS per leg. (See Detail).
Yes, the leg will feel loose until the back is installed.
NOTE: IMPORTANT!! Make sure the
Shoulder Screws are HAND TIGHT ONLY!
Then the keyhole in the leg will slip over
the head of these Shoulder Screws.
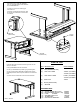
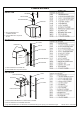
wire channel
BACK PANEL
NOTE; If you want to attach a
Pedestal to a RETURN, see the
DESK ASSEMBLY INSTRUCTIONS.
SILVER
SCREW
SILVER
SCREW
BLACK
SCREW
Attach BACK PANEL to LEG using (2) BLACK SCREWS. Attach to
TOP using (2) SILVER SCREWS. Make sure wire channel on the
BACK is away from the top.
Before assembly, make sure that you have
everything you need- check your parts against
the parts list on the last page. If you are missing
anything, please call us at 1-800-621-8846.