PROOX SINGLE-HANDLE BATH FAUCET Questions, problems, missing parts? Before returning to your retailer, contact us at prooxus@gmail.
PACKAGE CONTENTS A B AA C BB D CC E DD G F PART A Faucet body B C D E F G DESCRIPTION Deck plate Putty plate Rubber washer Metal washer Water supply line Lock nut QUANTITY 1 1 1 1 1 1 1 DRAIN ASSEMBLY COMPONENTS AA BB CC DD Main plunger Rubber washer Lock nut Drain assembly 1 1 1 1 2
SAFETY INFORMATION Please read and understand this entire manual before attempting to assemble, operate or install the product. WARNING • The product should be installed by a locally licensed plumber. • Please do not use plumber’s putty on plastic components. Use silicone caulk if sealant is required. • When installing the flexible hose, please note there should be no torsion or deformation. Do not fold it into a V or L shape, and do not use it if there is any cracks or damage.
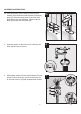
1 ASSEMBLY INSTRUCTIONS 1. Turn off water supply. Remove existing faucet if necessary. 1 2 2. Unscrew lock nut (G) from shank of faucet body (A). Remove lock nut (G), metal washer (E) and rubber washer (D) from shank of faucet body (A). 2 A 3a 3a. Without deck plate installation: Install faucet body (A) through top of sink (not included).
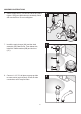
3b ASSEMBLY INSTRUCTIONS 3b. With deck plate: Place a bead of clear silicone sealant (not included) around the base of the putty plate (C). Place the putty plate (C) and the deck plate (B) on sink (not included). Insert the faucet body (A) through the deck plate (B). 3b B A C 4 4. Unscrew screws on the lock nut (G) until they are flush with the face of the nut. 2 1 4 G 4 5 5. Slide rubber washer (D) and metal washer (E) onto shank of faucet body (A).
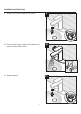
ASSEMBLY INSTRUCTIONS 6. Attach supply lines (F) to shut-off valves and hand tighten. Using two wrenches (not included), finish with one-half turn. Do not overtighten. 6 F F Red line Blue line 1 1 1 7 7. Install the main plunger (AA) and the drain assembly (DD) above sink. From below sink, install the rubber washer (BB) and lock nut (CC). 2 8 8. Connect 1-1/4” I.D. tail piece on pop-up drain to waste outlet (not included). Check all drain connections and P trap for leaks.
2 ASSEMBLY INSTRUCTIONS 9 9. Using a coin, remove aerator from faucet. 3 1 2 1 10 10. Turn on water supply. Flush out any debris and check for leaks around drain. 1 4 11 11. Replace aerator.
CARE AND MAINTENANCE • Clean periodically with a soft cloth. Avoid abrasive cleaners, steel wool and harsh chemicals as these will dull the finish and void your warranty. TROUBLESHOOTING PROBLEM Leaks underneath handle. Aerator leaks or has an inconsistent water flow pattern. POSSIBLE CAUSE Locking nut has come loose. O-ring on cartridge is dirty or damaged. Aerator is dirty or misfitted. 8 CORRECTIVE ACTION Tighten the locking nut. Clean or replace O-ring.