Trampolines Assembly Manual This manual contains assembly instructions & the parts required for each trampoline PLEASE NOTE: Basketball hoop and skirt are for display purposes only and are optional extras
ATTENTION SAFETY INFORMATION, INSTALLATION, CARE & MAINTAINENCE INSTRUCTIONS. MUST READ PRIOR TO ASSEMBLING & USING TRAMPOLINE Before you begin to use this trampoline, be sure to read all the information in this manual. Just like any other type of physical recreational activity. Participants can be injured. To reduce the risk of injury you must be sure to follow appropriate safety rules and tips.
INFORMATION ON USE OF THE TRAMPOLINE Initially, you should get accustomed to feel and bounce of the trampoline. The focus must be on the fundamentals of your body position an you should practice each bounce (the basic bounces) until you can do each skill with ease and control. To brake a bounce, all you need to do is flex your knees sharply before they come in contact with the mat of the trampoline! This technique should be practiced while you are learning each of the basic bounces.
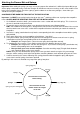
Supervisor's Role in Accident Prevention Supervisor y o u to need to understand and enforce all safety rules and guidelines! It is the responsiblity of supervisor to provide knowledgeable advice and guidance to all jumpers of the trampoline! If supervision is unavailable or inadequate, the trampoline could be stored in a secure place, disassembled to prevent unauthorized use, or covered with a heavy tarpaulin that can be locked or secured with lock or chains.
ASSEMBLY INSTRUCTIONS Please note: You will need 2 or 3 people to set up the trampoline - We would suggest setting aside 1 – 3 hours for assembly - You will need an adjustable wrench/spanner to hold one of the Safety Netting screws in place whilst it is tightened. All other parts are included in the Trampoline Kit. IMPORTANT Please read the assembly instructions before beginning to assemble the product.
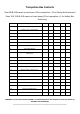
Trampoline Box Contents Sizes 8ft & 10ft come in two boxes (1 for trampoline + 1 for Safety Net Enclosure) Sizes 12ft, 14ft & 16ft come in three boxes (2 for trampoline + 1 for Safety Net Enclosure) Part No Description Trampoline Parts 8ft 10ft 12ft 14ft 16ft 1 Base Legs (W Shape) 3 4 4 4 6 2 Leg Extension / Upright Tube 6 8 8 8 12 3 T Piece (Connect Tube) 6 8 8 8 12 4 Trampoline Frame (U Shape) 6 8 8 8 12 5 Bounce Mat (Triangles Attached) 1 1 1 1 1 6 Springs 48
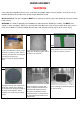
FRAME ASSEMBLY WARNING If you move the trampoline you must use a minimum of 2 people. Make sure the ground is level at the set up location otherwise the tension of the springs might deform the frame. We Recommend: That the Trampoline MUST be set up on grassed area only. Not suitable on concrete or other hard surfaces. WARNING: 2-3 adults in good physical condition are required for the following assembly. You MUST wear closed in shoes and gloves.
Attaching the Bounce Mat and Springs Important: When adding the springs you must ensure you prepare first otherwise it is difficult (or impossible) to get all the springs connected evenly. Count the Triangles on the bounce mat to ensure they are the same number as the holes in the trampoline frame. Check the (springs) part list above to see how many triangles / frame holes you should have for your trampoline.
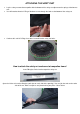
IMPORTANT: Spring MUST be attached to the Bounce Mat triangle before you pull towards the frame! 1. 2. 3. 4. Place a spring in the triangle of the bounce mat Place the claw of the tool into the other end/hook of the spring. Hold the tool with the “T’ section Pull spring and mat toward the frame and insert into corresponding hole in the frame. HINT: If the spring tool is missing you can use one of the springs to do the same thing.
ATTACHING THE SAFETY NET • • Lay the safety net onto the trampoline with the bottom of the safety net adjacent to the springs of the bounce mat. You will need to thread a V-Ring of the bounce mat through the holes at the bottom of the safety net. • Continue this until all V-Rings have been inserted into the safety net holes.
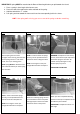
Attach safety net base piece to trampoline frame (as per picture below) Attach foam & insert lower safety net pole (below) into the Upper safety Net pole Attach foam & insert upper safety net pole (below) into lower safety net pole Slide Black PVC cover over Safety Net Enclosure Pole Attach frame padding as per picture below. Insert Completed Enclosure poles into the enclosure base piece. Once you have completed this part it should look like the picture below.
Insert Top of safety net (fibreglass) into top cap of upper enclosure pole (As per picture below) When you have completed all poles you will need to attach the screws so the upper part of the safety net does not come loose.
ATTENTION More information in the safe us of this trampoline! Do not bounce on the trampoline for extended periods of time because fatigue can increase your chances of becoming injured. Bounce for a brief period of time and then allow others to join in on the fun! Never have more than one person bouncing on the trampoline. This will increase your chances of getting injured. Jumpers should wear t-shirt, shorts or sweats, and regulation gymnastics shoes, heavy socks, or be barefoot.
• DO NOT jump or step onto the frame pad directly since it was not intended to support the weight of one person. Loss of Control: • DO NOT try difficult manoeuvres, of any manoeuvres until you have mastered the previous manoeuvre, or if you are just learning how to jump on a trampoline. If you do, you will increase your risk of getting injured by landing on the frame, springs, or off the trampoline completely because you might lose control of your jump.
If you do not follow these guidelines, you increase the risk of someone getting injured. LESSON PLAN The following lessons are suggested in order to learn basic steps and bounces before moving onto more difficult, complicated bounces. Before actually getting on and using the trampoline, you should read and understand all safety instructions. A complete discussion and demonstration of body mechanics and trampoline guidelines should occur between the supervisor and student as well.
Lesson 4 A. Review and practice skill and techniques learned in previous lessons B. Half-Turn Start from front drop position and as you make contact with the mat, push off with arms in either the right or left direction turning head and shoulders in same direction. During turn, be sure to keep back parallel to mat and head up. After completing turn, land in front drop position After completing this lesson, the student now has a basic foundation of trampoline bounces.