
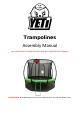
Instruction manual
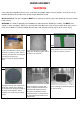
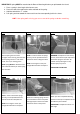

IMPORTANT: Spring MUST be attached to the Bounce Mat triangle before you pull towards the frame!
1. Place a spring in the triangle of the bounce mat
2. Place the claw of the tool into the other end/hook of the spring.
3. Hold the tool with the “T’ section
4. Pull spring and mat toward the frame and insert into corresponding hole in the frame.
HINT: If the spring tool is missing you can use one of the springs to do the same thing.
Step7
Attach a spring into one of the
triangles on the bounce mat and insert
the 1st spring into the 1
st
hole of the
frame. This is your starting point!
NOTE: Spring MUST be attached to the
mat at all times before you insert spring
into the frame.
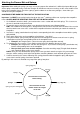
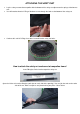
Step 8
NOTE: In order to attach the springs
securely, use the provided tool and
proceed as shown in diagram above
NOTE: Don’t forget to count your
triangles & frame holes correspond
Step 9
WARNING: Trampoline is under heavy
tension, more effort may be required to
attach the springs to the frame. Be
careful not to pinch fingers or slip.
Serious injury may occur!
IMPORTANT: USE GLOVES
Step 10
Note: In order to attach the springs
securely, use the provided tool and
proceed as shown in Step 8 and 9.
NOTE: Don’t forget to count your
triangles & frame holes correspond
Step 11
Attach the remaining springs around
the circumference of the trampoline.
This might require some more effort.
Proceed as shown in the picture.
Step 12
When you have completed attaching
the bounce mat your trampoline should
look like the picture above.
IMPORTANT: Trampoline must be at a
90º angle.