
Getting Started Guide


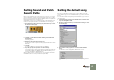
Table Of Contents

SETTING UP
16
About Latency and other Audio Settings
In the audio page, you will find a number of additional settings for audio. The
most important ones are Buffer Size and the corresponding readout for Output
Latency.
Latency is the delay between when audio is “sent” from the program and when
you actually hear it. The latency in an audio system depends on the audio hard-
ware, its drivers and their settings.
If the latency is large, you will notice that the sound is delayed when you play a
device from a MIDI keyboard. You may also notice that reactions are delayed
when adjusting controls on the device panels (for example, if you lower the vol-
ume of a device, you will not hear this immediately but after the latency time).
If you experience high latency values, you will need to make adjustments to your
configuration.
• If available, use the Buffer Size slider to lower the latency.
• If this is greyed out, you may be able to lower the buffer size in the control
panel for the audio hardware - click the Control Panel button to open this.
For more information, please consult the electronic documentation.
Setting up MIDI Input
Reason has a very wide-ranging MIDI support, allowing you to make use of up to
seven different MIDI inputs on a multi-port MIDI interface or similar. This makes it
possible to use several different MIDI controllers and play and tweak each de-
vice in the rack independently, or to play the devices in Reason from an external
sequencer, etc. See the electronic documentation.
However, in this book we will stick with the standard way of playing Reason via
MIDI: by connecting a MIDI controller to a single MIDI input and routing this to
different devices in the rack via Reason’s sequencer. With this method you will
be able to play and control one device at a time. Proceed as follows:
1. Open the Preferences dialog from the Edit menu (or Reason menu,
if you are running Mac OS X).
2. Use the pop-up menu at the top of the Preferences dialog to select
the MIDI page.
3. Pull down the Port pop-up menu in the Sequencer section and se-
lect the MIDI input to which your MIDI controller is connected.
4. Check on which MIDI channel your MIDI controller transmits, and
set the Channel pop-up menu to this value.
The sequencer will only accept MIDI data on one channel at a time. This
makes it possible to play via the sequencer and use MIDI Remote Control at
the same time, even if you have a MIDI interface with a single input only (see
the electronic documentation).
5. For now, also select the Advanced MIDI page from the pop-up menu
and make sure the pop-up menus on this page are set to “No MIDI
Input”.
Now, the Reason sequencer will receive MIDI data on the specified input port
and MIDI channel. You may want to leave the Preferences dialog open for the
following settings.