C Model " 19LA20QW L
CAUTION: To reduce the dsk of elecfric shock, do nol remove cover or back. No user- serviceable pads inside, Refer Servicing 1o qualified service personnel. CAUTION: Changes or modifications expressly approved responsible not by the party for compliance with the FCC Rules could avoid the users' authority CAUTION: to operate The monitor dripping this equipment. shall not be exposed or splashing.
WARNING: TO REDUCE THE RISK OF FiRE OR ELECTRIC SHOCK, DO NOT EXPOSE THIS APPLIANCE TO RAIN OR MOISTURE. DANGEROUS HiGH VOLTAGES ARE PRESENT iNSiDE THE ENCLOSURE.DO NOT OPEN THE CABINET. REFER SERViCiNG TO QUALIFIED PERSONNEL ONLY. WARNING: THE APPARATUS SHALL NOT BE EXPOSED TO DRiPPiNG OR SPLASHING AND THAT NO OBJECTS FILLED WITH LIQUIDS, SUCH AS VASES SHALL BE PLACED ON THE APPARATUS. CAUTION: TO PREVENT ELECTRIC SHOCK, MATCH WiDE BLADE OF PLUG TO WiDE SLOT.
1 READ THESE INSTRUCTIONS OR PINCHED 2 KEEP THESE INSTRUCTIONS RECEPTACLES, 3 HEED ALL WARNINGS 4 FOLLOW 5 DO NOT USE THIS APPARATUS 11. NEAR WATER exposed 12. do not use near a ONLY USE ATTACHMENTS/ACCESSORIES WITH THE APPARATUS. pool, and the like. The TV set shall not be CAUTION BY INJURY WHEN A CART IS USED, USE COMBINATION TO AVOID FROM TIP-OVER.
surface is dry. The front of the display panel has been specially treated. cleaning Wipe the panel surface cloth or a soft, gently using only a Do not scratch or hit the surface of the panel with fingernails lint-free cloth. or other hard objects. Furthermore, If the surface is particularly avoid contact with dirty, soak a soft, lint-free cloth volatile substances such as insect sprays, solvents and in a weak detergent solution and then remove excess liquid.
CAUTION AND WARNING .......................................................................................... 1 IMPORTANT SAFTY INSTRUCTIONS ........................................................................... 3 CLEANING AND MAINTENANCE ................................................................................ 4 DEAR PROSCAN CUSTOMER ................................................................................... 4 SAFETY PRECAUTIONS .................................................
_WARNING KEEP UNNEEDED SMALL PARTS AND OTHER OBJECTS OUT OF THE REACH OF SMALL CHILDREN. THESE OBJECTS CAN BE ACCIDENTALLY SWALLOWED. ALSO, BE CAREFUL ABOUT PACKAGING MATERIALS AND PLASTIC SHEETS. Set up Do not place the TV set on sloped or unstable surfaces. Do not place any objects on top of the TV set. If water spills onto the TV set or foreign objects get inside it, short-circuiting may occur which could result in fire or electric shock.
When using the TV set Do not bring your hands, face or objects close to the ventilation due to the high temperature holes of the TV set. Top of the TV set is usually very hot of exhaust air being released through the Ventilation holes. Burns or personal injuries can happen if any body parts are brought too close. Placing any object near the top of the TV could also result in heat damage to the object as well as to the TV if its ventilation Be sure to disconnect holes are blocked.
Familiarizing Yourself with the Main Hardware (The picture of the product may vary depending on the model) ®®@®®®® a. Select signal input and change b. Main Menu Display and return to previous c. Channel Up d. Channel Down e. Volume Up f. Volume Down g.
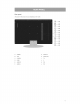
Rear panel (The picture of the product may vary depending on the model) --® --® --© --@ --® --@ --@ --@ --@ --@ --® --® A. POWER G. AUDIO IN B. VGA H. AUDIO OUT C. S-VIDEO I. TV D. CVBS J. Y. E. AUDIO R K. PB F. AUDIO L L.
--0 AUTOISLEEP 1. MUTE: Press to remove/recover 2. POWER: Power on/off the sound 3. Numerical buttons: Press to change the channel directly using the numeric buttons 4. 5. -/--:Press to change the channel between 10"199 Recall: Press to select between current channel and the last channel. 6. DISP: Press to display to your current channel or the current mode 7. AUTO/SLEEP:Press to useAuto Tunefunction and sleeptimer. s. LEFT/RIGHT ARROW: Press to increase or decrease the volume 9.
< Inserting the batteries into the remote control >1 .Push the back of the remote control and pull forward slightly.2.1nsert batteries ensuring the correct polarity (+/-).3.Close Inserting Caution: Use only Alkaline the batteries Batteries.
1: Checking Items before Connecting Please check the list below before connecting < Check items before connecting. Check the instruction 1 the product to other devices. > manual when connecting external devices. External products sometimes Do not connect the power unless every connection is well connected. have different buttons and locations. The product may be damaged if turned on while still in the process of being connected.
Your LCD TV has four different modes, each used for different forms of audio and video input.
Before you can receive television reception you must scan the channels so that they are set into the memory of your new LCD TV/Monitor. 1. Press the power button either on the unit or remote control. A blank screen will appear with the following text box showing: TV NO Note: O SYNC If your unit does not show this screen it may not be set to the TV mode. In this case press the INPUT on the remote control repeatedly until "TV" appears button in the top right corner of the screen. 2.
Whenever AUTO SEARCH forTVchannel isperformed, tuned TVchannel orprograms arestored insequential orderaschannel 0,1,2,etc. Tosetaparticular TVchannel tospecific channel number, follow thestepsbelow: 1. Press the MENU key on the remote control to display 2. Press the DOWN arrow key one time to highlight 3. Press the UP or DOWN arrow key to highlight 4. Under 5. Use the up or down arrow keys to highlight 6. Use the left or right arrow keys to select the channel "CHANNEL", the TV menu.
TVMainMenu - wheninTVmode, press theMENU button ontheremote control toshow themainmenu asshown below: i_! TV SETTING VIDEO OSD _? ADVANCE SETTING RESET INPUT NO IMAGE SETTING - for setting brightness, contrast, SOURCE SYNC color, tint and sharpness of the picture TV SETTING - for scanning into and removing channels from the unit's memory, fine tuning channels VIDEO ADVANCE - for setting the color of the blank screen when there is no reception and adjusting the sound quality.
1. Press the UP and DOWN keys on the remote control or the CH+ and CH- buttons on the cabinet to move channels UP and DOWN respectively. 2. Your remote selections 3. 9 without scrolling "9" and "0" which through every channel higher than channel unit is waiting for you to select the two digits of the channel. can be used to directly to reach your desired 9 press the "-/--" key once and a "--" symbol single digit channel channel.
1. Press MENU and IMAGE SETTING will be highlighted i_! TV SETTING VIDEO OSD _? ADVANCE SETTING RESET INPUT SOURCE NO SYNC 2. Press MENU again to select 3. Scroll using the UP and DOWN arrows 4. Use the LEFT and RIGHT 1. Press MENU and then the down arrow until OSD SETTING 2. Press MENU to select, and LANGUAGE will be highlighted 3. Press MENU to select and scroll through the languages 4.
Ifaparticular channel isnotbeing received clearly onyourunityoumayfine-tune thechannel, which mayimprove thereception. Go the channel that you wish to fine tune, then 1. Press MENU and scroll down to TV SETTING 2. Press MENU to select TV SETTING 3. Scroll down to AUTO 4. Press EXIT to select and the channel by pressing the DOWN key once. FINE and press MENU to select then press RIGHT arrow until YES is shown If this does not result in acceptable will be automatically fine-tuned. reception 1.
3. Press RIGHT arrow totoggle ONandOFF,thenpressEXITtoselect thesetting andEXITagain twice toexitthemenu system. Torestore allsettings tothefactory settings: 1. Press MENU andscrolldown toRESET 2. Press MENU toselect Note:thisaction willnotresetchannel(s) thathavebeenscanned inorremoved. Todothisyoumustrescan allchannels as described above. The switch from TV to AV, PC, S-VIDEO OR YPBPR: 1. Press INPUT 2.
If the AV device is switched if using S-Video on and correctly cable instead When in AV (or S-VIDEO) connected, and the LCD TV/Monitor is set to AV (or S-VIDEO of RGB) then the AV feed will start playing automatically.
thesettings andOKoutofthedialog boxes. Theprocess toresetthemonitor settings inyourcomputer differs between computers. Ifyouhavedifficulty consult yourcomputer technician orourService Centre. 2. Disconnect youroldmonitor andconnect youLCDTV/Monitor. Ifitdoesnotreceive thesignal properly now, turnoff yourcomputer (leave theLCDTV/Monitor powered on). Ifthisdoesnotworktrysetting theScreen Refresh Rateto "65Hertz" or"75Hertz". 3.
{_'} _MAGE r_7°_ v_e_5 {_ O98) _ REeET SETT£NG A_VA_CE S£i_F£Ne INPUT The operation and functions setting to adjust color, of the YPBPR There is four choices menu to are adjust SOURCE identical color to those shown in TV mode as described above, In YPBPR there is color as below: @, 8300/< @SOOk USER Identifying Problems If there are any problems using the product, please first consult the list below.
Check your external input connection cable. A Menu cannot be selected. Check if the menu is grayed out, and if it is, that menu cannot be selected. Screen • Poor picture Is the power cord unplugged? • Make sure the power cable is plugged in correctly, and then press the power of the remote control. Black picture Check if external input mode is selected Press [external input selection] • Lined and flickering and select TV picture. Try to finely adjust the channel.
Channel • The channels are not functioning. Connect the antenna connectors Set to memorize channels in the automatic Query the particular • again. broadcasting A limited number of channels Change the location channel setting again. station. are not functioning. or direction of the antenna. Try to select a few channels using numbers Query the broadcasting • Only UHF (14_69) Channels Check if the antenna and memorize them using the add/delete button. station. are unavailable.