N Model" 42LB45Q UM No.
CAUTION: To reduce the risk of electric shock, do not remove cover or back. No user- serviceable Refer Servicing personnel. CAUTION: parts ]nsTde. to qualified service Changes or modifications not expressly approved by the party responsible for compliance with the FCC Rules could avoid the users' authority to operate this equipment. CAUTION: The monitor shall not be exposed to dripping or splashing.
WARNING: TO REDUCE THE RISK OF FIRE OR ELECTRIC SHOCK, DO NOT EXPOSE THIS APPLIANCE TO RAIN OR MOISTURE. DANGEROUS INSIDE THE ENCLOSURE.DO QUALIFIED PERSONNEL WARNING: THE APPARATUS SPLASHING HIGH VOLTAGES ARE PRESENT NOT OPEN THE CABINET. REFER SERVICING TO ONLY. SHALL NOT BE EXPOSED TO DRIPPING OR AND THAT NO OBJECTS FILLED WITH LIQUIDS, SUCH AS VASES SHALL BE PLACED ON THE APPARATUS. CAUTION: TO PREVENT ELECTRIC SHOCK, MATCH WIDE BLADE OF PLUG TO WIDE SLOT.
1. READ THESE INSTRUCTIONS 10. 2. KEEP THESE INSTRUCTIONS 3. HEED ALL WARNINGS CONVENIENCE 4. FOLLOW ALL INSTRUCTIONS WHERE THEY EXIT FROM THE APPARATUS. 5. DO NOT USE THIS APPARATUS ON OR PINCHED NEAR WATER 11. 6. kitchen sink or laundry tub, in a wet PARTICULARLY RECEPTACLES, AT PLUGS, AND THE POINT ONLY USE ATTACHMENTS/ACCESSORIES SPECIFIED BY THE MANUFACTURER. Do not use this TV near water.
of the same type, until the surface The front of the display panel has been specially treated. Wipe the panel surface using only a cleaning gently Do not scratch or hit the surface cloth or a soft, lint-free fingernails cloth. If the surface is particularly cloth in a weak detergent with volatile sprays, solvents Welcome substances Furthermore, avoid such as insect dirty, soak a soft, lint-free solution and thinner; otherwise, the quality and then remove liquid.
Tableof contents CAUTION AND WARNING ........................................................................... IMPORTANT SAFETY CLEANING DEAR AND MAINTENANCE PROSCAN SAFETY INSTRUCTIONS CUSTOMER PRECAUTIONS ........................................................... ................................................................. ..................................................................... ............................................................................. INSTALLATION .
SafetyPrecautions ,_WARNING KEEP UNNEEDED SMALL PARTS AND OTHER OBJECTS OUT OF THE REACH OF SMALL CHILDREN. THESE OBJECTS CAN BE ACCIDENTALLY BE CAREFUL ABOUT PACKAGING SWALLOWED. ALSO, MATERIALS AND PLASTIC SHEETS. Set up Do not place the TV set on sloped or unstable surfaces. Do not place any objects on top of the TV set. If water spills onto the TV set or foreign objects get inside it, short-circuiting may occur which could result in fire or electric shock.
SafetyPrecautions-Installation When using the TV set Do not bring your hands, face or objects close to the ventilation holes of the TV set. Top of the TV set is usually very hot due to the high temperature of exhaust air being released through the Ventilation holes. Burns or personal injuries can happen if any body parts are brought too close.
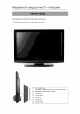
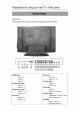
Preparationfor usingyour newTV- Frontpanel Familiarizing Yourself with the Main Hardware (The picture of the product may vary depending A. on the model) Select signal input. (It changes to "ENTER" function when main menu displays ) B. Main Menu display and menu selection C. Channel up D. Channel down E. Volume up F. Volume down G.
Preparationfor usingyour newTV- Rearpanel Rear panel (The picture of the product may vary depending on the model) @@@ HDMI Input Input1: B AV2 Input Video: M1 Audio: N1, O1 Input2: C Input3: D Component S-Video Input 1 Video: H, I, J Audio: K, L Component Input 2 Audio: N, O VGA Input Video: E Video: H1, I1 , J1 Audio: K1 ,L1 Audio: P(3.5m plug) AUDIO Output AV1 Input Video: M Audio: N, O Input Video: G Headphone: Q(3.
Preparationfor usingyour newTV- Antennasetting 1. Checking Items before Connecting Please check the list below before connecting < Check > items before connecting. Check the instruction buttons A. manual when connecting the product external to other devices. devices. External products sometimes have different and locations. Do not connect damaged the power unless every connection if turned on while B. Connect C. Check the terminals 2.
Usingthe remotecontrol- Learningaboutremotecontrol 1. POWER: 2. MUTE: 3. SLEEP: Power on/off Press to temporarily Press automatically to select switch the sound off. a preset time interval shut the TV 4. ASPECT: Press to adjust the screen size. 5. DISPLAY: Press to Check your current 6. INPUT: 7. to Press to Display mode. a menu of all available input sources, Also used to confirm the on-screen menu.
Usingthe remotecontrol- Learningaboutremotecontrol 17. PICTURE: Press to change to a preset picture mode. 18. SOUND: 19. EXIT: Exit the current 20. EPG: One channel 21. Press to change FREEZE: of the to a preset sound mode. menu. signal channel EPG or Multi EPG. Press to freeze the current 22. CC: Press to select Caption. 23. Volume: 24. Channel: Press to increase Press to select or decrease picture. the volume. next or previous active channel.
Usingthe remotecontrol- Remotecontrolinstructions < Inserting the batteries into the remote 1. Push the back of the remote 2. Pull forward 3. Insert two AA 1.5V batteries. 4. Ensuring 5. Close the lid. control > control slightly. the correct polarity (+/-).
Basicoperation- ChoosingTV channel TURN ON LCD TV 1. Connecting to the AC input cable to switch on LCD TV. At this time the TV will enter standby mode and indicator show red. 2. User POWER button or button on the remote control can turn on LCD TV from standby mode. TURN OFF LCD TV 1. Press POWER button or _ 2. Wait 5 seconds after switching off LCD TV then you can turn on LCD TV again. 1. 2. Using the CH A / CH v button on the remote control to enter standby mode. The indicator is red.
Basicoperation- Selectinginputsource Press the INPUT button to select TV, AV, S-Video, Component, VGA, HDMI inputs. Use the A / v to move the cursor and ENTER button to confirm the source. 1. Press VOL+/- to adjust the volume. 2. If you want to switch the sound OFF, press the MUTE. 3.
Setupmenuoperation-Adjust the OSDscreen Press the MENU button to display the main menu. Use _ / _- / A / v buttons to select and adjust the available menus. NOTE: The OSD (On Screen Display) function since it provides enables you to adjust the screen status conveniently graphical presentation. When the cursor stays on a main menu function(Video, use ENTER or =. button to activate it.
Setupmenuoperation- Videomenuoptions NOTE: If you use your LCD TV for the first time, you should select the language for displaying which will be used menus and indications 1. Press MENU to display the main menu. 2. Press A / v 3. Use _- button to select OSD Language. 4. Press _- button to select your favorite language repeatedly to setectthe SETUP MENU. NOTE: In this manual, the OSD (On Screen Display) may be different from your TV's in colors.
Setupmenuoperation- Videomenuoptions Brightness Press _, / • button to select it and then use ,q. / b to adjust the brightness of picture. Contrast Press _, / • button to select it and then use ,q. / b to adjust the contrast of picture. Color Press _, / • button to select it and then use ,q. / b to adjust the color saturation Tint Press _, / • button to select it and then use ,q. / b to adjust the tint of picture. Sharpness Press _, / • button to select it and then use <.
Setupmenuoperation- TV menuoptions Press MENU on the front panel or on the remote control and then use A / T to select the AUDIO menu, press ENTER button to enter it(see the picture below). 1. Use A / T to select what you want to adjust in the AUDIO menu. 2. Press ENTER or _ button to adjust(according 3. When you are satisfied with your adjustment. to the guiding sign in the bottom right corner of the menu). Press MENU to exit. Balance Press A / T button to select it and then use _.
Setupmenuoperation- TV menuoptions Press MENU on the front panel or on the remote control and then use A / T to select the TV menu, press ENTER button to enter it(see the picture below). 1. Use A / T to select what you want to adjust in the TV menu. 2. Press ENTER or b. button to adjust(according 3. When you are satisfied with your adjustment. to the guiding sign in the bottom right corner of the menu). Press MENU to exit. Tuner Mode You can select the signal input mode: Antenna, Cable.
Setupmenuoperation- Setupmenuoptions Press MENU on the front panel or on the remote control and then use A / T to select the SETUP menu. 1. Use ,i, / T to select what you want to adjust in the SETUP menu. 2. Press ENTER or _ button to adjust(according 3. When you are satisfied with your adjustment. to the guiding sign in the bottom right corner of the menu). Press MENU to exit. OSD Language Press _ / b. button to select language of the OSD menu as English, Spanish or French.
Setupmenuoperation- Setupmenuoptions Auto Synchronization Press _ / b. button to set auto synchronization On/Off. Timer Press _ / b. button to set the auto power on and off timer. Sleep Timer To select the sleep timer as 5/10/15/30/45/60/90/120/180 / 240 minutes. Caption Select "Caption", press ENTER button to enter the submenu(digital Analog Closed Caption, functions are only available under DTV signal). Digital Closed Caption To set the analog closed caption and digital closed caption on/off.
Setupmenuoperation- Parentalmenuoptions 0 Caption Style: press to select one of As Broadcast and Custom, when you select broadcast, the others are disable and can not be adjusted. ® Font Size: press o Font Color: press ® Font Opacity: press ,q / _, to select one of the Solid/Transparent/Translucent. o Background Color: press ,i. / _, to select one of the Black / White / Red / Green / Blue / Yellow / Magenta 4 / b to select one of Medium/Large and Small.
Setupmenuoperation- Parentalmenuoptions U.S. TV Ratings Press ENTER button to enter, and use ,4. / D, / A / v • button to select, and press ENTER button to confirm. TV-Y - All children. The themes and elements in this program are specifically designed for a very young audience, includingchildren Q from ages two six. TV-V7 - Directed for older children. Themes and elements in this program may include mild physical or comedic violence, or may frighten children under the age of seven.
Setupmenuoperation- Parentalmenuoptions Canadian English Ratings Press ENTER button to enter, and use < / _. / A / v Q C - Children O C8+ - Viewers should be 8 or order. O G - General Audience. O PG - Parental guidance suggested. O 14+ - Restricted. Viewers should be 14 or older. O 18+ - Restricted. Viewers should be 18 or older. button to select, and press ENTER button to confirm.
Setupmenuoperation- Parentalmenuoptions Open V-Chip Select "V-Chip", press ENTER button to enter, you will see an item "U.S.(50 states + possessions)", then press ENTER button again to enter the Open V-Chip menu(see the picture below). You can select the item you want to set, press ENTER button to enter, and use ,4. / _. button to select, and press ENTER button to confirm. Change Password To change the password of PARENTAL menu(see blow).
Setupmenuoperation- Componentmenuoptions Press MENU on the front panel or on the remote control and then use ,i / _. to select the OSD menu in Component mode. t 1. Use A / v 2. Press ENTER or _, button to adjust(according 3. When you are satisfied with your adjustment. The functions 1 to select what you want to adjust in the each menu. of OSD menu for Component to the guiding sign in the bottom right corner of the menu). Press MENU to exit.
Setupmenuoperation- VGAmenuoptions Press MENU on the front panel or on the remote control and then use < 1. Use A / T to select what you want to adjust in the Video menu. 2. Press ENTER button to select it and then use ,t 3. When you are satisfied with your adjustment, / _ to select the Video menu in VGA mode. ! =, to adjust press MENU to exit the mare menu.
Setupmenuoperation- HDMImenuoptions Note: Phase- This function allows you to remove any horizontal noise and clear or sharpen the image of characters. Clock- This function is to minimize any vertical bars or stripes visible on the screen background. And the horizontal screen size also will change. Position- This function is to adjust the picture to Left/Right and Up/Down as you prefer. Press MENU on the front panel or on the remote control and then use < / _ to select the Video menu in HDMI mode. 1.
Appendix-Tr0ublesh00ting Identifying Problems If there are any problems Customer Setup Service using the product, If the list below does not solve the problem, call our Center immediately. and Connection The TV won't turn on. Check your power cable connection. • I can't view the Basic channels. • I want to view cable channels. • I want to view satellite • Digital broadcasting connected The Remote Change Check the connection of the antenna cable.
Appendix-Tr0ublesh00ting Are there any TV waves flowing or cordless radio transmitting stations? Avoid using cordless phones, hairdryers or electrical drills. • Disfunctioning Check if the channel Try changing • channels. has been selected correctly. the position of the antenna. Picture with white and black dots. Check if your antenna is damaged or any connections are broken. Replace your antenna.
Appendix-Tr0ublesh00ting Monitor • The PC Screen continually Check the connection • appears between the TV and the computer A "There is no signal "message This happens maximum and disappears. or frequency The screen looks like there is water flowing Check • the connector The screen is unclear Change • Unstable and flickering or frequency of the TV. Try to set the is deactivated when any key is pressed or the mouse is moved) on it. to the TV.
Appendix-Removing TV Stand If you decide to install the wall mount your LCD TV, always use a VESA standard wall mount appropriate for the size and weight of the LCD TV. CAUTION • Be sure to follow TV falling • Before • Unplug the instructions. Incorrect installation of the stand/wall mount may result in the over. attaching (or detaching) and remove any cables the stand, and/or unplug the AC cord from the AC input terminal. other component connectors from the rear of the TV.
Appendix-WallMountingUnit Specification Unit Dimension(unit: mm) Screw Diameter 600x400 M5 Remark: The specification NOTE: instructions mm) 14 of screw is just used on the back cabinet.
Appendix-SafetyWarnings 1. Do not set up the wall mount by yourself. Please contact qualified professionals 2. The TV should not be mounted on walls or surfaces which have an angle more than 10 degrees with vertical direction. 3. Otherwise The walls for mounting for installtion. the TV set may fall. must have enough strength to hold the whole weight of TV set. For example, concrete wall and brickwork are eligible. Do not place the mount on soft walls such as earth walls and plasterboard. 4.
Appendix-TVSpecification Model 42LB45Q Diagonal display size 42 inches Television system American TV standard ATSC/NTSC Audio system MTS/SAP VHF: 2~13 Channel coverage UHF: 14~69 system CATV: 1~125 Digital Terrestrial Broadcast(8VSB): 2~69 Digital cable (64/256 QAM): 1~135 PC mode 640x480/60Hz, YPbPr/YCbCr mode 800x600/60Hz, 1024x768/60Hz 480i/60Hz, 480p/60Hz, 720p/60Hz, 1080i/60Hz, 1080p/60Hz HDMI Mode 480i/60Hz, 480p/60Hz, 720p/60Hz, 1080i/60Hz, 1080p/60Hz Max Resolution 1920xl 08