PROSCAN _ USER'S MANUAL Before using the TV, please read this manual and retain it for future reference. 3 7 LC 30 S5 7 thoroughly, _,,,_,o.
Federal Communications Commission Statement NOTE The manufacturer is not responsible for any radio or tv interference unauthorized modifications to this equipment. Such modifications authority. caused by could void the user's NOTE This equipment has been tested and found to comply with the limits for a class B digital Device, pursuant to part 15 of the FCC Rules. These limits are designed to provide reasonable protection against harmful interference in a residential installation.
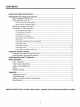
CONTENTS Important safety instructions ........................................................................................................... 3 Preparation for using your new "iV................................................................................................. s Base installation instruction............................................................................................................ s Learning about your IV ...............................................................
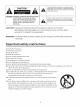
The lightning flash symbol with an arrowhead inside a triangle alerts the user about an uninsulated dangerous voltage that may be of sufficient magnitude to constitute a risk of electric shock. CAUTION CAUTION; TO REDUCE THE RISK OF AN ELECTRIC SHOCK, DO NOT REMOVE THE COVER (OR BACK). THERE ARE NO USER SERVICEABLE PARTS INSIDE.FOR ANY REQUIRED SERVICING, PLEASE CONTACT QUALIFIED SERVICE PERSONNEL.
ImPortant 15. POWER safety SOURCE: instructions This TV should be operated label. If you are not sure of the type of power company. For TVs intended only from the type of power source indicated power supply to your home, consult to operate from battery on the marking your appliance power, or other sources, dealer or local refer to the operating instructions. 16.
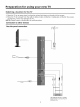
Pre ration Base installation for usi r new TV instruction 1. Lay a cloth or other soft material that can afford adequate weight on a flat table to avoid damage to the LCD screen. 2. Put the TV back upward and the LCD screen downward and keep it flat on the table-board. 3. Take out the base and insert it into the installing slot in the lower part of the TV in the arrow direction as illustrated in the figure. 4. Fasten the base and the TV set together with the 4 screws provided.
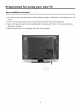
Preparation Learning about for using your your new TV TV Operate your TVvia the buttons located on the front or side of cabinet or use the remote control, terminals located on back of TV provides all the connections from other equipment to TV.
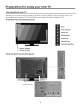
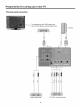
Preparation Selecting for using your new TV a location for the 1. Place the TV on an open stand in 2. Place the TV far enough from the overheating, which may damage NOTE: Please contact a local dealer TV a location where light does not directly hit the screen. walls to allow proper ventilation. Inadequate ventilation the TV. for wall mounting. Connection to other devices The side panel connection COAXIAL The equipment with AV or S-Video output function ( such as DVD, settop boxes, etc.).
Preparation for using your new TV The back pane| connection I:_ The equipment with HDMI output jack ( such as DVD players, set=top boxes, etc.).
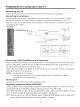
Preparation Connecting Caution: for using your your new TV Do not plug in the TV until you have finished Connecting connecting all of your equipment, to an antenna To enjoy the televison antenna TV program (not supplied). transmitted An outdoor antenna subscriber of your local cable network equipment as shown below. by your local TV station, is necessary net, the outdoor you need an indoor or outdoor for superior picture or indoor antenna quality. If you are a is not needed.
Preparation Connecting for using your new TV HDMI Supports digital connections between HDMI = enabled AV devices such as (DVRs, DVD, BluRay, HDDVD, AV receivers and digital devices). No sound connection is needed for an HDMI to HDMI connection. NOTE: Some devices such as a DVR or DVD players require a HDMI signal to be set via the output in the devices' settings. Please consult your device user manual for instructions.
Preparation for using your new TV For subscribers to Basic Cable TV Service For basic cable service not requiring a Converter/Descrambler box, connect the CATV 75 ohm Coaxial Cable directly into the Antenna Jack on the back of the television, For subscribers to Scrambled Cable "IV Service If you subscribe to a cable service which requires the use of a Converter/Descrambler cable to the Converter/Descrambler box, connect the incoming box and connect the output of the box to the Antenna Jack on the
Using the remote Preparing Znstalling 1, Open the the control remote remote the battery cover control control on the back for use batteries of the remote control, I 2, InstalltwoAAAsize(1,5V) battery 3, Close batteries, Matchthe+ and = signs on the batteries to the signs on the compartment, the battery cover, Note: 1,Disposeofyourbatteries 2,Do not mix battery 3,Remove dead inadesignateddisposalarea, types batteries or combine used immediately Do not throw batteries to
Using Learning the remote about the control remote centre[ Power indicator Power ON/OFF ............................................... Select Switch among TV, Video, S-Video, Component, HDMI and VGA Return to previous channel digital SOUND: Select the sound mode DISPLAY: Display current Status information PICTURE: Select the picture Volume Channel up Mute MENU: Call up the main menu EXIT: On Screen Display (OSD) menu exit OSD menu Up arrow ...................................
Understanding • • the TV features Hultimedia - All in one TV receiver, Video Honitor and PC display, Wider viewing angle for 16:9 and 4:3 display screens = over a 160 degree viewing angle and a 16:9 display panel, • Digital display device - Irrespective of magnetic or geomagnetic effects, this device accurately • reproduces images without any distortion or blur, Closed caption decoder - You may view specially labeled (co) TV programs, • prerecorded tapes, etc, with either a dia|ogue caption or
Basic operation Use [Hute] Press the [Mute] Select picture button button to mute the sound. Pressthe [Mute] button again to resume the sound, modes Press the [PICTURE] button to select the picture mode from four options: Standard, Movie, User and Vivid. In the "User" mode you can adjust the picture mode based upon your personal preference. Select sound modes Press the [sound] button to select sound modes from Standard, Speech, User, and Music.
Basic operation Use [GUIDE] button Pressthe [GUIDE] button to display features of the ATSC program and the EPG function. Use [DISPLAY] button Pressthe [DISPLAY] Use [EXIT] button to view current source information. button Press the [EXIT] button to exit the OSD menu. Select channels by numbers To select a channel: Press the channel number you would like to go to. For example, to select channel number 120, press buttons 1, 2 and 0, respectively.
Basic operation Video mode adjustment 1. Press HENU to open the OSD option 2. Press A or Y to highlight Video, then press I_ to enter the Video menu"Refer to page 12 "Select picture mode . Press A or Y to highlight an option, then press _ or I_ to adjust the option. You can adjust: • Picture Mode = Adjusts the Picture Mode. You can select Standard, Movie, User, or Vivid. • Brightness =You can increase or decrease the brightness of the picture.
Basic operation • Balance - Adjusts the volume of the left and right speakers. , Equalizer-You , Surround • Auto Volume can select the frequency you want to adjust and change its value. Sound -Turns the surround sound effect on or off. Control - Turns automatic volume control on or off. The option keeps the audio in a preset range to eliminate large spikes in volume. - SPDIF Type = Selects the SPDIF type. You can select PCM, Dolby Digital, or Off.
Basic operation Parental Control 1, Press MENU to open On Screen Display (OSD) option 2, Press A or Y to highlight Parental, then press i_ to enter the Parental menu, When you first use this function, the default password is [0000], Once you input this password, you can enter, , Press A or V to highlight an option, then press _ or I_ to adjust the option, You can adjust: . Channel Block =This function will let you block any channel you want. • Program Block - A. Rating Enable is on B. U.S.
Basic operation About HPAA Rating: The Motion Picture Association of America(MPAA) uses a rating system to qualify motion picture content. Television broadcasters employ a rating system to qualify the content of televison programs as well. The MPAA and TV ratings work with the V-CHIP feature and allow you to block out programming above the rating limits you determine.
Basic operation • Input Block - You can block the input source with this function. For example, if you want to block AV input, just highlight [AV] and press [ENTER].The • AV input will not be seen in the screen. Change Password = The first time you use this function, use the default password, If you want to change it, first enter the new password then enter the same password again, .
Appendix Troubleshooting Before calling a service technician, solutions. Customer source, important notice: please check the following table for a possible cause of the problem and some If the TV functions cannot be operated, unplug the AC cord from AC power wait at least 1 minute, then re-plug AC cord. This will reset the TV settings and should restore TV to normal operation.
Appendix Wall-mounting Bracket Unit Dimension(unit: Installation mm) Screw Diameter 200x200 Remark: The specification NOTE: Screw Length(unit: M6 12 of screw is just used on the back cabinet. Wall mount bracket is not included with TV and mounting vary depending instructions Removing mm) on brand and size of bracket, Customer that came with wall mount for specific of wall mount bracket to wall may should consult bracket mounting information on how to mount bracket to wall, TV Stand 1.
Appendix Specifications IModei 37LC30S57 Diagonal display Television size system 37Inches American Audio multiplex TV standard coverage Digital Digital PC mode UHF: 14N69 mode mode 800×600/60Hz, 1024x768/60Hz 480P/60Hz, 720P/60Hz, 10801/60Hz 4801/60Hz, 480P/60Hz, 720P/60Hz, 10801/60Hz 1366X 768 Power AC !20 V, 60 Hz Power consumption 170W Audio power 7W+7W RF input 2_69 4801/60Hz, Resolution source CATV:lN125 Terrestrial Broadcast (8VSB): cable (64/256 QAM): 1_135 640×4