First-Time Operation First-Time Operation Detailed Operating Instructions 4 8 10 11 12 13 14 15 16 17 Remote Control (TV Functions) Picture in Picture (PIP) Operation Front Panel Controls Video Menu Audio Menu Stereo and SAP Broadcasts Expanded Stereo Setup Menu Closed Captioning Sleep Timer 18 19 20 21 23 24 25 26 28 30 Alarm Labeling Channels Parental Control Programming Channel Memory Setting up VCR Channels Changing Antenna Input Setting up Cable Box Channel Programming Remote to Control VCRs Progra
® So advanced. Yet so simple.TM We’re building our reputation on products that are so advanced, they’re simple. If you want all the benefits of the latest technology, without the complexity, we have a very simple solution. It’s called ProScan. State-of-the-art technology that real people can use. Thank you for choosing ProScan. And welcome to our company-wide commitment to your complete satisfaction and viewing enjoyment.
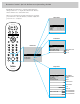
Remote Control Quick Reference Operating Guide Repeatedly press MENU•PROG to select from main menu and then press MOVE + or – to display the selected menu. Remote must be in TV mode to activate TV menu. When one of the menus shown at the right appears, repeatedly press MENU•PROG to select the function you want to adjust, then press MOVE + or – to adjust it. • VCR1 DSS CABLE TV POWER Color Tint Contrast Bright Sharp • VCR2 LD AUDIO REW PLAY FF REC STOP PAUSE DISPLAY CHAN Video Menu –.........
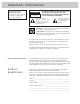
Important Information WARNING To reduce risk of fire or shock hazard, do not expose this TV to rain or moisture. WARNING RISK OF ELECTRIC SHOCK DO NOT OPEN TO REDUCE THE RISK OF ELECTRIC SHOCK, DO NOT REMOVE COVER (OR BACK). NO USER SERVICEABLE PARTS INSIDE. REFER SERVICING TO QUALIFIED SERVICE PERSONNEL. This symbol indicates “dangerous voltage” inside the product that presents a risk of electric shock or personal injury. This symbol indicates important instructions accompanying the product.
S o A d v a n c e d . Ye t S o S i m p l e . Improving Your Image • A Cleaner Picture: The Digital Comb Filter extends resolution and minimizes color interference patterns for greater detail. • No Glare™ Picture: Anti-Glare Lithium Silicate Faceplate virtually eliminates glare while enhancing contrast. • Increased Clarity: Up to 560 lines of horizontal resolution,* surpassing the capabilities of all available signal sources. * through S-VIDEO connector.
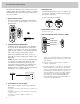
F i r s t - Ti m e O p e r a t i o n The steps below will help you get your TV connected and working quickly. The page numbers on which you can find detailed instructions for each of these steps are also listed for your convenience. 4 Attach power cord. First attach the flat end of the power cord completely into the connector on the back of your TV, and then plug the other end into a wall outlet. Be sure to insert the plug completely. 1 Unpack TV and accessories.
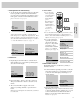
R i g h t P a g e Te x t Mute Video Menu Audio Menu Setup Menu Chan Label Parental Ctrl: Off Chan Ctrl: Normal Autoprogram Chan Mem: Stored 8 Set the clock. 1 Repeatedly press the MENU button to select the SETUP and then press +. Press MENU repeatedly again to select the CLOCK SET display.
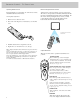
Remote Control: TV Functions Operating Remote Control Effective Range of Remote Controls Before attempting to operate either one of the remote controls, install the batteries as shown below. Aim the remote control at your TV’s remote control sensor. The remote control produces an invisible (infrared) beam that travels in a straight line much as the beam of a flashlight.
Remote Control: TV Functions Basic Operation Theory Step 1: Component Buttons First press one of these five component buttons to tell remote which component you want to control. You can program many of these buttons to control your brand of equipment.
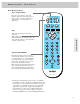
Remote Controls: TV Functions continued The ProScan universal remote that came packed with your TV also controls an RCA DSS® receiver, most brands of VCRs, cable-TV boxes, and selected RCA audio equipment. The remote is easy to use. The buttons shown below can be used to operate your TV. The rest of the buttons are used to control VCRs and cable boxes and are explained on pages 26-27, 30-31 and 41.
7 INPUT BUTTON lets you quickly view signals from the jacks. Pressing this button switches the TV from its current channel directly to channel 90, then channel 91, then channel 92. Channel 90 lets you see the signals coming from a device that is connected to the S-VIDEO connector. Channel 91 accesses the INPUT 1 jacks, and channel 92 accesses the INPUT 2 jacks. INPUT 8 CLEAR BUTTON Pressing CLEAR quickly clears the screen of all on-screen display messages (except mute and parental control).
Picture-in-Picture (PIP) After you connect another video source (like a VCR) to your TV, you’ll be able to display two different programs on the TV at the same time. For example, two different football games as shown below. You can also connect a video camera or camcorder to use as a surveillance system for a baby’s room.
R i g h t P a g e Te x t Whenever you have the picture-in-picture (PIP) feature activated as described on the previous page, you can move, freeze, or switch the big and little pictures as desired.
Front Panel Controls TIME AND CHANNEL NUMBER DISPLAYS show the current time (once set) and channel number whenever you turn on the TV, change channels, or press the remote’s DISPLAY button. These displays also appear whenever you change volume with the VOLUME buttons on the front of the TV. REMOTE CONTROL SENSOR receives commands from the 10:23 AM remote control. When using the remote control, point it toward this sensor. 13 POWER INDICATOR lights whenever the TV is turned on.
Video Menu: Basic Functions COLOR 1. Repeatedly press MENU to select VIDEO MENU. adjusts the amount of color in the picture. Press + to increase color or press – to decrease color. Mute Video Menu Audio Menu Setup Menu 2. Then press + or – to display the video menu. TINT adjusts the color of flesh tones. Press + to add more red tint or press – to add more green tint. CONTRAST 3. Repeatedly press MENU to select a function, then press + or – to adjust it.
Audio Menu: Basic Functions TREBLE adjusts the high frequency audio. Press + to increase treble, or press – to decrease treble. 1. Repeatedly press MENU to select AUDIO MENU. Mute Video Menu Audio Menu Setup Menu 2. Then press + or – to display the audio menu. BASS adjusts the low frequency audio. Press + to increase bass, or press – to decrease bass. BALANCE adjusts the left/right balance of sound from the speakers. 3. Repeatedly press MENU to select a function, then press + or – to adjust it.
Remote Audio Menu: Basic Functions continued Receiving Stereo Broadcasts Receiving SAP Broadcasts Your TV is fully capable of reproducing stereo sound from TV stations transmitting stereo sound in your area. All you have to do to enjoy stereo sound is to make sure the TV’s STEREO/SAP function is set to STEREO so the TV can receive stereo broadcasts. Some TV stations that broadcast stereo also broadcast another audio program called SAP.
Audio Menu: Basic Functions Remote continued Expanded Stereo Your TV includes an Expanded Stereo feature which adds greater depth and dimension to stereo broadcasts. Your TV electronically increases the audio separation perception of the speakers so you perceive an “expanded” more spacious stereo sound effect. Although you can easily turn the expanded stereo feature on and off as desired, you may prefer to leave it turned on.
Setup Menu: 1. Repeatedly press MENU to select SETUP MENU. Basic Functions Mute Video Menu Audio Menu Setup Menu 3. Repeatedly press MENU to select a function, then press + or – to adjust it. Captioning: Off Sleep Timer 0:00 Set Alarm Chan Label Parental Ctrl: Off 2. Then press + or – to display the setup menu. MENU Chan Ctrl: Normal Autoprogram Chan Mem: Stored The PARENTAL CONTROL feature lets you lock out any channels between 1 and 99 that you don’t want your children to watch.
Setup Menu: Basic Functions continued Using Closed Captioning The CAPTIONING feature lets you display the audio portion of a program as text on the TV screen. This is useful to the hearing impaired or anyone who wants to watch a program without the sound. Four types of closed captioning are available: CAPTIONS 1, Select CAPTIONS 1 for complete text of the primary language in your area; select CAPTIONS 2 for secondary language translation or alternate service, such as simplified English.
Setting the Sleep Timer With the Sleep Timer, you can program your TV to turn itself off after a period of up to four hours. This is useful when you want to watch TV for a selected length of time before going to sleep. 5 The Sleep Timer will begin to count down to zero. The word SLEEP will appear on the screen whenever you change channels or press the TV button to let you know the Sleep Timer is activated.
Setup Menu: Basic Functions continued Setting the Alarm 3 When the first ALARM function By setting the alarm, you can program the TV to turn on and/or off by itself. After the ON TIME is set and the ALARM ON/OFF function is set to ON, the TV will automatically turn on each day at the time you selected and remain on until the OFF TIME is reached. If no OFF TIME has been programmed, the TV will remain on until you turn it off. is selected, pressing + or – will switch the setting between ON and OFF.
Labeling Channels The labeling feature lets you program names (or labels) for the channel numbers. The name you programmed will then appear on the screen below the channel number whenever the channel number is displayed. Each name can contain up to four characters, and you’ll be able to assign up to 64 names. 4 Select the channel number you want to label by pressing the CHANNEL up or down button (or by pressing two number buttons).
Setup Menu: Basic Functions continued Parental Control The PARENTAL CTRL and CHAN CTRL functions let you lock out any channels between 1 and 99 that you choose so they cannot be viewed by your children. Channels that have been locked out can be viewed only when the PARENTAL CTRL function is set to OFF. This can only be done with the remote control–it can not be changed with the buttons on the front of the TV.
Programming Channel Memory The TV first programs all channels for ANT A input and The quickest way to program the Channel Memory is to use the AUTOPROGRAM function. Your TV automatically cycles through and places active channels into Channel Memory. then all channels for ANT B input (even with one antenna input connected). 10:44 18 10:46 17 Follow the instructions below to autoprogram channels, then add or erase individual channels as desired.
Setup Menu: Basic Functions continued Erasing/Adding Channels in Channel Memory with or without remote Adding Video Input Channels to Channel Memory with or without remote 1 Repeatedly press the MENU button to select SETUP MENU and As an added convenience, you can also add video input channels (90, 91, and 92) to memory. If you have a video then press + to display the setup functions. device such as a VCR, camcorder, laserdisc player, etc.
Remote Control Functions VCR Channel Setup 3 Enter the channel number you The VCR 1 CHAN function lets you program to which channel the TV will automatically tune when you press the VCR1 button on the remote. This is handy if you connect a VCR to your TV. You will no longer have to remember to which input jacks the VCR is connected because the TV will remember for you.
Basic Functions continued Setup Menu: Changing Antenna Input Your TV has two separate antenna inputs on the back (labeled ANT A and ANT B) that allow you to connect two different signal sources if desired. For example, you can connect a cable-TV system to one input and a home antenna to the other input. Remote Changing Antenna Input without remote 1 Repeatedly press the MENU button to select SETUP MENU and then press + to display the setup functions.
Remote Control Functions Cable Box Channel Setup The CABLE CHAN function lets you program to which channel the TV will automatically tune when you press the DSS•CABLE button on the remote. This is handy if you have to connect a cable box to your TV. You will no longer have to remember the output channel of the cable box because the TV will remember for you.
Controlling ProScan VCRs with Remote determine if it will be controlled by VCR1 or VCR2•LD. Some older VCRs have a NORM/UNIFIED switch that can also respond to either the VCR1 or VCR2•LD button on the remote. Place this switch in the UNIFIED position for the VCR to respond to the VCR1 button or in the NORM position for the VCR2•LD button. In the NORM position, you must program the VCR2•LD button to respond to code number 05.
Controlling Other Brands of VCRs with Remote To program the remote to control another brand of VCR, just press and hold VCR1 (or VCR2•LD), and enter the two-digit code number for your brand of VCR. Depending on the age, brand, model, and type of VCR, some models may not be able to respond to the remote control. 1 PRESS AND HOLD VCR1 (OR VCR2•LD). • VCR1 DSS CABLE TV POWER • VCR2 LD AUDIO REW PLAY FF REC STOP PAUSE DISPLAY CHAN VOL VOL SKIP CH A N MUTE 2 PRESS TWO NUMBER BUTTONS.
Controlling a VCR with Simple Remote 4 Press the CHAN down button to verify the code. If the channel changes on the VCR, the code is valid. Press MENU to complete the search. The simple remote can control your TV and a compatible VCR. The simple remote is preprogrammed to control a compatible GE, ProScan or RCA VCR. You can program the remote to control many of the other brands of VCRs listed on the next page.
VCR Brands 06 03,17,22,23,63,66 14,16 02 0 07,09,13,44,45,46,52 08,53 01 07,09,13,44,45,46,52 14 07,12 00,07,08,14,15,44,46,53,64,67 13,45,52 14,16 00 15 27 08,09,10,13,15,20,23,27,34,41,42,47,49,57,62,65,67,68,70 02,12,18,19,43,48,58 15 00,07,08,32,37,53 09,14,46,60 14 05,15,35,36 08 08 02,05,07,08,14,16,30,35,51,53 02,14,16,30,46 02,14,16,30,44,46 15 31 08,29,53,56 02,08,14,16,29,30,44,46,61 09 08 08,09,12,15 04,27 32 05,35 04,05,27,35,40 06 07,15 07,15,31,32 02,14,16,30,44,46,59,61,64 08,53 05,35,44 46
Programming Remote to Control Audio Equipment The digital remote control that came packed with your TV is capable of controlling some audio equipment, such as a radio, CD player, tape player, turntable or amplifier. The remote may need to be programmed for your equipment. This remote may not operate all models or brands listed. To program the remote just press and hold the AUDIO button, then enter the two-digit code number for your brand of audio equipment from the chart below.
Remote Buttons that Control Audio Equipment After the AUDIO button is programmed, the buttons described below will operate the basic functions of the audio equipment. Depending on the age, brand, model, and type of audio equipment, some models may not be able to respond to all the function buttons listed. You will want to experiment with each button to determine the exact function for your component. Remote Buttons That Control Audio Equipment POWER BUTTON Press to turn on component.
Accessory Cables General Cable Information Antenna (or cable-TV) connections are made with either coaxial antenna cable or twin-lead cable. Coaxial cables are shielded so they are less susceptible to hum or interference from adjacent cables. The following accessories are available from most ProScan dealers and electronics supply stores in case you want to position your components farther apart or need additional cables.
Accessory Order Form Audio/Video Cables continued Accessory Order Form For ProScan TV Models Description Stereo Audio Cable Double gold-tipped cable generally used for connecting stereo audio components. S-Video Cable has multipin connectors on each end for connecting S-Video components to your TV.
Accessory Order Form To order accessories, contact your local ProScan Dealer. If a dealer is not nearby, you can also follow the instructions below to order by telephone. Charge your order on your VISA or MasterCard by filling in below United States and Canadian Orders USE YOUR CREDIT CARD ® To place your order by phone, have your Visa or MasterCard ready and call the toll-free number listed below between 8AM and 8PM Eastern Standard Time.
Tips to Read Before Connecting Components Compatible Components Plugging in Power Cords A wide variety of compatible Video Cassette Recorders (VCRs), camcorders, laserdisc players, and audio components are available. Check with your dealer for details. Do not plug any power cord into a wall outlet until you are finished making connections. Other brands of components can also be connected to your TV. Refer to the component’s owner’s manual for the manufacturer’s recommended hookup instructions.
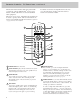
Monitor Panel HI-FI OUT AUDIO JACKS 1 2A AUDIO R/ MONO HI–FI OUT SELECT OUT L R/ MONO CAUTION TO AVOID DAMAGE: 1. DO NOT CONNECT SPEAKER OUTPUT TO A SEPARATE AMPLIFIER OR TO SPEAKERS CONNECTED TO ANOTHER PRODUCT. 2. DO NOT CONNECT LEFT AND RIGHT SPEAKER OUTPUTS TOGETHER.
R i g h t P a g e Te x t 3A 3B INPUT 1 JACKS provide for direct connection of video devices (like VCRs, camcorders, and laser disc players) or compatible home computers and TV games with video/audio outputs. To see the signals from a device connected to the INPUT 1 jacks, select TV channel 91.
Home Antenna Connections Follow one of the steps below to connect an indoor or outdoor antenna to your TV if you do not have a cable-TV system. A. If your home antenna cable is a 75-ohm, round, coaxial cable that carries only VHF (channels 2-13), only UHF (channels 14-69), or VHF and UHF channels, connect it to your set like this: Back of TV CABLE / ANTENNA ANT A Incoming Cable from Home Antenna ANT B CONVERTER B.
Cable TV Connections Follow one of these steps to connect a cable-TV system to your TV instead of a home antenna. Since cable-TV systems vary, you may wish to consult your local cable-TV company for additional information. A. Follow this diagram if your cable company does not require a converter/decoder box (no scrambled channels): Back of TV CABLE / ANTENNA ANT A Incoming Cable ANT B CONVERTER B.
D. Follow this diagram if your cable company requires a converter/decoder box for premium channels and you also want to connect a VCR. Back of TV Coaxial Antenna Cables* (such as AH037 or AH065G) CABLE / ANTENNA ANT A ANT B Incoming Incoming Cable Cable CONVERTER See note below 2-Way SignalSplitter* Splitter* 2-way Signal (such as AHO47) (such as AH047) IN OUT Convertor / Decoder Box Converter/Decoder Box Remember to tune the VCR to the output channel of the converter box (usually 3 or 4).
Programming Remote to Control a Cable Box or an RCA DSS® Receiver If your cable box has its own remote to change channels, you will probably be able to program the TV’s remote to control both the TV and the device. To program the remote, just press and hold the DSS•CABLE button, then enter the two-digit code number for your brand of cable box. Refer to the chart below to find the code number for your cable box. Press the POWER button next to confirm operation.
Cable-TV Operation Your new TV is designed to receive up to 181 channels in the U.S.A. including 125 non-scrambled cable channels (see chart at lower right). To use this TV with a cable-TV system, confirm that the cable-TV system is properly connected to your TV. Since cable systems vary, you may wish to consult your local cable-TV company for additional information.
VCR Connections Standard VHS VCR (Not S-VHS) These connections allow you to record TV programs and play back tapes. For picture-in-picture viewing, use the preferred method. Preferred Method Audio/Video Cables* Audio/Video Cables* (such as (such asAH069G) AH002 or AH007G) AUDIO R/ MONO HI-FI OUT SELECT OUT Coaxial Antenna Cables* (such as AH037 or AH065G) 2–Way Signal Splitter* Note: A second audio/ video device can be connected to the INPUT 2 jacks in a similar manner.
VCR Connections Back of TV AUDIO R Back of VCR R/ MONO HI-FI OUT VIDEO IN L V SELECT OUT L AUDIO IN L R L R/ MONO Audio R INPUT 1 L CABLE/ANTENNA ANT A R/ MONO INPUT 2 ANT B L Audio/Video Cables* Audio/Video Cables* (such as (such asAH077G) AH077G) VIDEO INPUT • S-VIDEO CONVERTER 1 SELECT OUT 2 V Special Recording onto VCR This connection only allows you to record on the VCR whatever is currently being displayed on the TV screen except for menus and special effects.
Camcorder Connections Back of TV AUDIO R/ MONO HI-FI OUT SELECT OUT L Audio R/ MONO A INPUT 1 AV OUT Jack (Audio/Video Out) L Output Adapter Video S-VHS or Standard VHS Camcorder This connection allows you to play back tapes in the camcorder and watch them on the TV. Operation: If the camcorder is connected to the VIDEO INPUT 1 jack (instead of the S-VIDEO connector), select TV channel 91 to view whatever the camcorder is playing.
Component Connections Audio Amplifier If your amplifier is not part of a “system” that has its own remote, connect it to the TV as shown here. (If the amplifier is part of a system that has its own remote, you may choose to connect it to the TV as shown below using the SELECT OUT jacks.) With the connection shown here, you’ll be able to change and mute volume with the TV’s remote control. You’ll also be able to remotely control bass and treble functions.
RA iugdhi to /PVai gd ee oT eCxotn n e c t i o n s Laserdisc Players, Computers, and Other Equipment with Audio/Video Outputs Your TV can also be used as a display device for many laserdisc players, video games, and home computers. If your game or computer has a normal NTSC (American Standard) video output, it can be connected directly to either the INPUT 1 or INPUT 2 jacks on the TV as shown here.
Connecting External Speakers Connecting Speakers to Back of TV If you connect an Amplifier or Receiver to your TV, you can connect the speakers to the Amplifier/Receiver instead of the TV. If you do not connect an Amplifier or Receiver to your TV, you can connect external speakers to the back of the TV to enhance sound from the TV.
R i g h t P a g e Te x t Connecting Speakers to Back of Amplifier or Receiver If you connect an amplifier or receiver to your TV as described on page 46, connect the speakers to the amplifier/receiver instead of the TV. Sound from the TV will then come through the amplifier/receiver and the TV’s internal speakers. If desired, you can turn off the TV’s internal speakers with the SPEAKERS ON/OFF function described on page 12.
Tr o u b l e C h e c k s Troubles sometimes are caused by simple “faults” that you can easily correct without the help of a service technician by first checking a few basic remedies. Before you call or take your unit to an Authorized ProScan TV Servicenter, look below for the type of trouble you are experiencing. Then perform the simple checks and adjustments listed for that trouble. • Electronic protection circuit may have been activated because of a power surge. Wait 30 seconds and then turn on again.
R i g h t P a g e Te x t Noisy stereo reception • May be a weak station. Use AUDIO button to change STEREO/SAP function to MONO mode instead of STEREO. No picture, no sound but power light is on • Maybe someone changed CABLE/AIR function to wrong position. • Maybe a vacant channel is tuned. • For Channels 90, 91, and 92, make sure the component connected to those INPUT jacks is turned on in order to see picture.
Warranty Information Limited Warranty What your warranty covers: • Any defect in material or workmanship. For how long after your purchase: • One year for labor charges. • One year for parts. • Two years for picture tube. Cleaning and Care Cleaning and Care Dust the TV as required, using a soft cloth or the dusting attachment for your vacuum cleaner. Be sure to occasionally vacuum the ventilation slots in the cabinet to help assure adequate ventilation. Take care not to scratch the plastic surfaces.
IRnedmeoxt e C o n t r o l F u n c t i o n s Laserdisc Player.........................................26 Locking Out Channels...............................20 MENU Button..............................3,7,10,12,14 Monaural Audio.........................................13 Monitor Panel ............................................36 MUTE Button ................................................6 NORM/UNIFIED Switch ................................26 OFF TIME Function .....................................
Quick-Reference Operating Guide SETUP MENU 3 Follow instructions below for desired function. Mute Video Menu Audio Menu Setup Menu 2 Select function by repeatedly pressing MENU to move down the screen. 1 Repeatedly press MENU•PROG to select SETUP MENU and then press MOVE + to display the functions in the SETUP MENU. To set the SLEEP TIMER, repeatedly press + or – to select the length of time you want the TV to stay on. To cancel, press + or – to change the setting to 0:00. Details are on page 17.
R eu m Q i cokt -eR e C foenrter no cl eF uOnpcet ri ao tni sn g G u i d e Adjusting for a Color Picture that Pleases You Video Menu Mute Video Menu Audio Menu Setup Menu 2 Select function by repeatedly pressing MENU•PROG 1 Decrease color to minimum. This will leave a black-and-white image on the screen. 1 Repeatedly press MENU•PROG to select VIDEO MENU and then press MOVE + to display the functions in the VIDEO MENU. MENU to move down the screen. Color Tint Contrast Bright Sharp –........|.......
® We are committed to your complete satisfaction and viewing enjoyment. Any time you have a question or want information about your ProScan product, call our friendly toll-free number listed below. 1-800-ProScan (1-800-776-7226) An RCA Entertainment Product 10330 N. Meridian St. Indianapolis, IN 46290 ©1995 Thomson Consumer Electronics, Inc. Trademark(s)® Registered Marca(s) Registrada(s) Printed in U.S.A.