
Warranty


295 D, boul. Industriel, Châteauguay (QC) J6J 4Z2
proslat.com 1-888-691-2944 // 450-691-2944 info@proslat.com
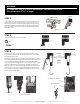
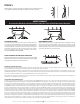
Verify which way your ceiling joists are. Hoist brackets can be
mounted parallel or perpendicular. Use two wood screws each to
mount the back pulley and the front pulley to the ceiling, ensuring
the distance between the two matches the measurement made in
step 1. Pre-drilling 1/8” pilot holes in the ceiling will make mounting
the pulleys easier.
Attach pulley brackets to ceiling mounts.
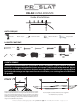
Untangle your rope. Each end of the rope will be tied to a ceiling
bracket on the hoist. The left side will be used for one set of pulleys,
the right side for the other.
Start by threading the left side rope through the brake device as shown
in picture below. The left side rope will go through the rst pulley, then
to the second pulley, down around the second hook and up to the
ceiling bracket. Once through the hole in the ceiling mount, tie a gure
eight knot right after the hole and then a double knot around bolt.
Thread the other end of the rope through the right side, down around
the rst hook and up to the ceiling bracket. Once through the hole in
the ceiling mount, tie a gure eight knot right after the hole and then a
double knot around the bolt.
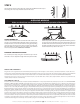
WARNING
It is important that your hoist is attached to a solid wood ceiling joist.
The joist must be 2” x 4” or larger.
PERPENDICULAR
PARALLEL
STEP 3
STEP 4
STEP 2
4 x
4 x
4 x
Le side rope
Le side rope
Right side rope
Right side rope
Le side rope
First pulley
Double knot around bolt
Figure eight knot
Second pulley
Proper rope
placement in brake
Tie double knot
around bolt
Tie double knot
around the bolt