5″ TFT LCD TV & DVD COMBO TFD-1501 Instruction Manual
Dear Customers Thanks for purchasing this TFT-LCD TV/Monitor. We strongly recommend that you carefully read the safety and operation instructions before operating your TV/Monitor. FOLLOW INSTRUCTIONS AND HEED ALL WARNINGS on your TFT-LCD TV/Monitor and in this manual. Safety information __________________________________________________ Note: Before connecting the AC power cord to the DC adapter outlet, make sure that the voltage designation of the DC adapter corresponds to the local electrical supply.
Precautions ________________________________________________________ Please read the below precautions carefully before operating the unit. Power cord protection: 1. Never use your LCD TV/Monitor if the power cord has been damaged. Do not put anything on the power cord, and keep the power cord away from where people can easily trip over it. 2. Be sure to hold the plug , do not pull the cord when disconnecting the 3. Locate your LCD TV/Monitor near an easy accessible AC outlet.
Keep away from water/magnetic fields: 1. Do not expose the LCD TV/Monitor to rain or use it near water source. If the LCD TV/Monitor got wet, unplug it and contact an authorized dealer immediately. 2. Do not clean the front panel with Ketone-type materials, ethyl alcohol, toluene, acid, methyl, or chloride since they may cause damage on panel. 3. Keep the unit away from flower vases, tubs, sinks etc. if liquids spill into the unit, serious damage will occur. 4.
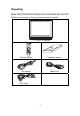
Unpacking ____________________________________________ Please make sure that the following items are included with your LCD TV/Monitor. If any item is missing, please contact your dealer.
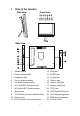
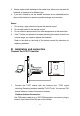
I. View of the monitor Side view Front view Back view 1. Remote sensor 12. VGA jack 2. Power indication light 13. SCART jack 3. Headphone jack 14. S-video jack 4. CH+/up direction button 15. Video in jack 5. CH-/down direction button 16. Audio in (left) jack 6. VOL up/RIGHT direction button 17. Audio in (right) jack 7. VOL down/LEFT direction button 18. TVRF jack 8. Menu button 19. DVD Play/Pause button 9. TV/AV button (Function switch button) 20. DVD Stop playing button 10.
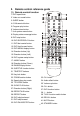
II. Remote control reference guide (1) Remote control function 1. DVD open/close 2. Video out mode button 3. SLEEP button 4. 0-9 Numerical button 5. Program play button 6. Volume down button 7. Unit system menu button 8. Display status message button 9. DVD stop button 10. DVD ENTER/PLAY button 11. DVD fast rewind button 12. DVD fast forward button 13. DVD MENU display button 14. Direction button (Up) 15. Direction button (Left) 16. DVD system setup button 17. ANGLE button 18. Direction button (Down) 19.
● TELETEXT BUTTONS (If TV has teletext function.
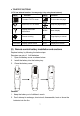
3. Always replace both batteries at the same time. Never mix new and old batteries or batteries of a different type. 4. If you don’t intend to use the remote controller for an extended period, remove the batteries to prevent possible leakage and corrosion. Notes: 1. Do not drop, apply shock or step on the remote control. 2. Do not spill water on the remote control. 3. Do not use the remote control for other equipments at the same time 4.
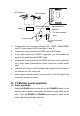
VHF antenna UHF antenna 75ΩCo-axis cable Mixer Input terminal of antenna Co-axis antenna plug Antenna in jack 75ΩCo-axis cable 2. Connect the audio sources (Including DVD, VCDR, CAMCORDER 3. Connect the video source to the VIDEO jack by RCA cable. 4. If the video source has a SCART output jack, you can connect the 5. Connect the video source to the S-VIDEO input jack of the monitor by and PC) to the proper AUDIO input jacks ‘L’ and ‘R’. signal to the monitor by the SCART cable.
2. The Picture setup, Sound setup, Previous channel can be memorized before you switch off the TV/Monitor. The TV/Monitor will re-start under the previous state when you switch on it again. 3. If you unplug the power cord to cut off the power supply completely, all previous setting will be lost. 4. Press the V - or V + button to adjust the volume output. Press the V button repeatedly to decrease the volume; press the V + button repeatedly to increase the volume from 0 to 100. 5.
Select the suitable input to pickup the AV signal. Press P+ or P- button to select source, then press V + button to confirm your selection. Or press DVD Button on the remote control to select DVD source directly. TV AV SVideo DVD SCART PC Note: When no disc in the DVD mechanism,if you want to change the mode from DVD to TV, please wait several seconds until the LCD screen shows "No Disc". (4) View the TELETEXT program (Optional. If TV has this function.) 1. Press the TV/AV button to select the TV mode.
V. Menu setting and adjustment 1. PICTURE SETTING Press the MENU button on the remote control, there will be a menu displayed on the screen as below: On this menu, the Picture setting icon of is in red frame. (1). Use the V+ button firstly, the cursor will be on the line of “Picture Mode: Vivid”. And then, press the V+ or V - button repeatedly to select the picture mode from Vivid, User, Normal or User. (2).
On this menu, the Audio setting icon of is in red frame. (1). Use the V+ button firstly, the cursor will be on the line of “Sound Mode: Normal”. And then, press the V+ or V - button repeatedly to select the picture mode from Normal, News,Movie or User. (2). After select the Sound Mode, you can use the P- or P+ button to select the item of Volume, Bass,Treble and Balance. And then use the V- or V+ button to adjust the value of each item respectively from 0~100.
On this menu, the Channelsetting icon of (1). Auto Tune is in red frame. Use the V+ button firstly, the cursor will be on the line of “Auto Tune ”. And then, press the V+ button again, a menu will be displayed as followed: As shown on the menu, the TV will automatically search stations. When searching, press the MENU button to cancel searching. After the searching, the TV will begin to play the station 1. (2).
Setting to “On”, the channel will not be selected by Channel Up/Down keys. (5).Sound SYS. Press the P- or P+ button to select the Sound SYS. setting, and press the Vor V+ button repeatedly to select .You could choose D/K,L,LL ,B/G or I according to your local TV sound system. After setting, press the MENU button to return to the root menu or exit the setting menu. 4.
press the V+ or V - button repeatedly to select the WEST,RUSSIAN,ARABIC,FARSI or EAST according to your meaning. (4).Color Temp. Move the cursor to the line of “Color Temp. Normal ”. And then, press the V+ or V - button , a menu will be displsyed as followed: Press the V+ or V - button repeatly, you could select User, Normal, Warm or Cool according to your request. Note: Only the item of User-R , User-G or User-B could be adjusted from 0 ~100 in the Color Temp User . (5).
5. PC SETTING ( FOR PC SIGNAL SOURCE ONLY) Press the MENU button on the remote control to display the menu, and then press the P- button to select the PC setting, and the menu will be shown on the screen as below: On this menu, the Channel setting icon of is in red frame. You can use the P- or P+ button to select the item of Clock, Phase,H-Position or V-Position. And then use the V- or V+ button to adjust the value of each item respectively from 0~100.
VI. DVD PLAYER OPERATION a. Basic play 1. Press the TV/AV button on the unit or the remote control to select the DVD function mode. Or press DVD button of the remote control directly. 2. Insert a disc into the slot of DVD player and it will be read automatically. 3. Press ”OPEN/CLOSE” button of remote control or the button on the unit ,the disc will be ejected automatically Note: Insert disc with reflective data side facing the front of the TV.
or 32X speed. Press ENTER/PLAY button to return to normal play. SKIP NEXT/ PREVIOUS Press the or / button to select the next track or the previous track. b. SLOW PLAY Press SLOW PLAY button when playing, you can play the disc at 1/2, 1/4, 1/8, 1/16 of the normal speed. If you want to stop it, you can press ENTER/PLAY button to play normally again. c. ZOOM PICTURE This DVD video player allows you to zoom in/ out a picture as well as shift the zoom point.
e. STEP When the PAUSE/STEP button on the remote control is pressed 1st time, the picture will become still on the screen. By pressing this button again and again, the picture will advance picture by picture (frame by frame). To return to normal play, press the ENTER/PLAY button. Please note that the sound is cut off, and the picture becomes silent while playing in this mode. f. MUTE Press the MUTE button on the remote control to suppress the sound while a disc is playing.
favorite order. HOW TO SET TITLES, CHAPTERS, OR TRACKS IN A FAVORITE ORDER The program playback function will automatically playback titles, chapters or tracks in the order preprogrammed. 1.
NOTE: z The angle function will not work on DVD video discs that do not contain recorded multiple angles. z During still playback, you are able to change the camera angle. However, when you resume to normal playback, the camera angle changes to the new settings. z The angle icon indicator will illuminate while playing back a title that contains at least one scene recorded with multiple angles. l.
3. Press the ENTER/PLAY button to play the MP3 file. Press or during playback to skip the tracks. If you need to return to the main directory (folder), press STOP. NOTE: z The left column on the TV screen is a list showing the name of the folder. The right column on the TV screen is a list showing the name of the song and the sub-folder. z “MP3” sign in front of a file name indicates that this is a MP3 file. z During MP3 playback, you cannot access to “PLAY MODE” folder or songs. n.
2. AUDIO SETUP You could choose AUDIO OUT mode as SPEAKER SETUP, AUDIO SETUP, could setup to get the best sound as followed: 3. PREFERENCE PAGE SETUP You could choose PREFERENCE PAGE mode as followed menu. Note: Preference Page Setup fun. is only useful to set as followed status: a. disc stop playing completely or b. disc is opened or c. Without disc in the disc mechanism.
4 PASSWORD SETUP 25
VII. Other Operation a. Earphone operation This unit possesses earphone jack. Connect the earphone with the socket and adjust the volume to what you want. Once plugged in, the speaker output will be cut off automatically. b. AUDIO effect Press the AUDIO/ST/D/I/II button on the remote control frequently to select Mono Left, Mono Right , Mix-Mono or Stereo effect. Whether this function should be active or not depend on your disc. VIII.
b. TV/Monitor Symptom Remedy 1. Check whether the power plug is connected to the power supply. No power 2. Pull out the plug and wait for 60 seconds, and then insert the power plug again and switch on the TV/monitor. No picture 1. Check whether the antenna is connected properly. 2. Adjust to another channel. 3. Change the length and the contrast setting. 4. Make sure that the AV picture input cable is connected properly. No sound 1. Increase the volume value. 2.
IX. Notes (1) Please read these operating instructions carefully before you operate this unit. (2) When you want to cut off the electricity supply of the whole unit’s power, please press the POWER button on the unit. And take out the plug from wall outlet. (3) Don’t press any button if you are not using the unit. Set the POWER button to “OFF”, and take out the battery from remote control before long time non usage. (4) Be cautious of the safe mark .
X. Maintenance 1). Cleaning the cabinet Use a soft cloth slightly moistened with a mild detergent solution. Do not use a solution containing alcohol, spirits, ammonia or abrasives. 2). Cleaning discs When a disc becomes dirty, clean it with a cleaning cloth. Wipe the disc from the centre outwards. Do not use solvents such as benzine, thinners, commercially available cleaners, or antistatic spray intended for analogue records.
XI. Specifications Screen size, visible 15 inch Screen format 4:3 Resolution 1024 * 768 Minimum contrast ratio 450:1 Minimum brightness 250 cd/m² Display colors 16.2M Minimum viewing angle 120° (horizontal) / 100° (vertical) Maximum response Time 16 ms Minimum lifetime background light 50,000 hours Video color systems PAL/NTSC3.58/NTSC4.
XII. Display modes Resolution 1. Horizontal Freq. (KHz) Vertical Freq. (Hz) 720x400 31.5 70 640x400 31.5 70 640x480(VGA) 31.5 60 640x480(VGA) 37.9 72 640x480(VGA) 37.5 75 800x600(SVGA) 37.9 60 800x600(SVGA) 47.2 72 800x600(SVGA) 46.9 75 1024x768(XGA) 48.4 60 1024x768(XGA) 56.5 70 1024x768(XGA) 60.0 75 1280x1024(SXGA) 63.5 60 1280x1024(SXGA) 80.0 75 Modes, which are not listed in the above table, may not be supported.
“ ELIMINATION OF RESIDUES OF ELECTRIC AND ELECTRONIC APPLIANCES BY CONSUMERS RESIDENT IN THE EUROPEAN UNION.” This symbol on the product or in its packaging indicates that it must not be disposed off with other household waste produced in the user`s residence. It is the responsibility of the user to dispose off these types of appliances by depositing in a “recycling plant” or at a collection point for the recycling plant so that its electrical and electronic parts can be recycled.