
Photo Printer User Manual
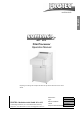

COMPACT 2
TM
7
Installation
English
®
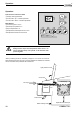
3. Connecting the processor
Water connection: Fit water-inlet hose (grey) at the rear of the machine and connect
to the prepared fresh water supply.
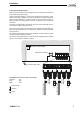
All other hoses (see diagram ): Connect the enclosed hoses according to colour
system to backside of machine. Put hose clip (enclosed in accessory bag) over
hose end, before attaching to connection. Warm up hose end (with hot water or
lighter) and push onto the respective connection. Finally push clip over hose and
connection.
Cut hoses to required length. Integrate the stop cocks into the drainage hoses in
such a position, that they are easy to reach.
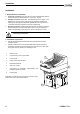
Connect the suction pipes to the hose ends for the replenishment tanks using hose
clips. Put suction pipes through cover opening into respective replenishment tanks
and snap them in.
The overflow and drainage hoses from the developer and fixer should be guided
into their respective collecting containers.
The overflow and the drainage of the water can either be guided into the drainage
syphon or into respective collection containers.
Pay attention to the correct colour connections:
Developer: red;
Fixer: blue;
Water: clear
Replenishment
Overflow
Outlet
Replenishment tanks
Overflow
Overflow
Outlet
Outlet
Developer (red)
Fixer (blue)
Replenishment tanks
Connection water drainage
Fresh water connection
Connection water outlet