
Instruction Manual


ENGLISH
3
• Over torque (exceeding stated maximum capacity by
130% can result in damage, breakage or affect accuracy).
• Avoid use of solvents, chemicals, liquids.
• Do not attempt to disassemble or repair. Refer to an
authorised servicecenter.
• Guard against snagging of clothing, hair, jewellery or
anything that could impair movement of the product or
workpiece and lead to damage or injury.
!
CAUTION:
• Hard impacts or dropping the wrench may impair accuracy
of the wrench. If the wrench is dropped or receives a sharp
impact have the wrench accuracychecked.
• To ensure correct operation and accuracy this product
must be calibrated periodically in line withstandards.
Additional Safety Information
!
WARNING: Never modify the wrench. Damage or
personal injury couldresult.
!
WARNING: ALWAYS use safety glasses. Everyday
eyeglasses are NOT safety glasses. Also use face or
dust mask if cutting operation is dusty. ALWAYS WEAR
CERTIFIED SAFETYEQUIPMENT:
• ANSI Z87.1 eye protection (CAN/CSA Z94.3),
• ANSI S12.6 (S3.19) hearing protection,
• NIOSH/OSHA/MSHA respiratoryprotection.
FCC Compliance Statement
5IJTEFWJDFDPNQMJFTXJUI1BSUPGUIF'$$3VMFT
0QFSBUJPOJTTVCKFDUUPUIFGPMMPXJOHUXPDPOEJUJPOT
UIJTEFWJDFNBZOPUDBVTFIBSNGVMJOUFSGFSFODFBOE
UIJTEFWJDFNVTUBDDFQUBOZJOUFSGFSFODFSFDFJWFE
JODMVEJOHJOUFSGFSFODFUIBUNBZDBVTFVOEFTJSFE
PQFSBUJPO
$IBOHFTPSNPEJGJDBUJPOTOPUFYQSFTTMZBQQSPWFECZ
UIFQBSUZSFTQPOTJCMFGPSDPNQMJBODFDPVMEWPJEUIF
VTFShTBVUIPSJUZUPPQFSBUFUIFFRVJQNFOU
5IJTEFWJDFIBTCFFOEFTJHOFEBOEDPNQMJFTXJUIUIF
TBGFUZSFRVJSFNFOUTGPSQPSUBCMF3'FYQPTVSFJO
BDDPSEBODFXJUI'$$SVMFQBSUfBOE,%#
%
I4&%$BOBEB Compliance Statement
This device contains license-exempt transmitter(s)/
receiver(s) that comply with Innovation, Science and
Economic Development Canada’s license-exempt RSS(s).
Operation is subject to the following two conditions:
1 . This device may not cause interference.
2 . This device must accept any interference, including
5IJTEFWJDFDPNQMJFTXJUIUIFTBGFUZSFRVJSFNFOUT
GPS3'FYQPTVSFJOBDDPSEBODFXJUI344*TTVF
GPSQPSUBCMFVTFDPOEJUJPOT
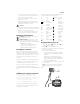
The label on your wrench may include the following symbols.
The symbols and their definitions are asfollows:
V ......................... volts
Hz .......................hertz
min ..................... minutes
or DC ...... direct current
...................... Class I Construction
(grounded)
…/min ..............per minute
BPM .................... beats per minute
IPM ..................... impacts per minute
RPM .................... revolutions per
minute
sfpm ................... surface feet per
minute
SPM .................... strokes per minute
A .........................amperes
W ........................watts
or AC ...........alternating current
or AC/DC .... alternating or
direct current
...................... Class II
Construction
(double insulated)
n
o
....................... no load speed
n .........................rated speed
...................... earthing terminal
.....................safety alert symbol
.....................visible radiation
..................... wear respiratory
protection
..................... wear eye
protection
..................... wear hearing
protection
..................... read all
documentation
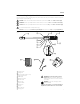
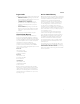
Charging the Battery (Fig. B–D)
1. Connect the USB cable
12
to charging dock
13
and
charger
11
as shown in Fig.B.
2. Plug the charger into an appropriateoutlet.
3. Place the wrench in the dock, making sure the wrench is
fully seated in thecharger.
4. Fully charge the wrench for 4 hours.
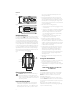
- Fig. C shows the screen when battery is charging:
LEDs will be off and the OLED display will blink the
chargelevel.
- Fig. D shows the screen when battery is fully
charged: LEDs will be off and the OLED display will
display a white background. The charge level will
display fully charged batteryicon.
5. To remove the wrench from the charger, pull the wrench
out of thecharger.
NOTE: To ensure maximum performance and life of
lithium-ion battery charge the battery fully before
firstuse.
12
Fig. B
11
13