
Instruction Manual


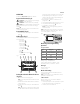


ENGLISH
6
Online Mode
In online mode, the wrench is paired to a device. The APP is
open andconnected.
1. This mode accesses the advanced functionality of
thewrench.
2. Follow instructions on the APP to set and control
thewrench.
Function Availability
Function Manual (Offline) APP (Online)
Set
NO
(can perform the last
sequence set online)
Device
Angle YES YES
Haptic YES YES
Target YES YES
Record YES (up to 500 cycles) YES
Find Me NO YES
Tightening
!
WARNING: Torque continues to climb during the
application of angle. It is possible to exceed the
maximum rated torque capacity of the wrench during
angle. Ensure the wrench has sufficientcapacity.
!
WARNING: Failure to follow the warnings and
instructions listed below may result in electric shock,
fire and/or seriousinjury.
!
WARNING: Do not position the wrench so that it is
difficult to operate the ratchetaccessory.
!
SHOCK HAZARD. To protect against risk of electrical
shock, do not expose wrench to water or otherliquids.
1. Set the desired target torque either using offline or
online mode
2. Apply torque in the specified direction ofrotation.
3. Refer to the Torque Status table for details on the
feedback provided
NOTE : For single pass torque and angle sequences, the
target is only achieved after the completion of the angle
phase. Once the target torque is achieved the wrench
automatically switches to angle. Angle count only
increments when torque is applied. The wrench will click to
indicate angle phase iscomplete.
Applying Torque
!
WARNING : Familiarise yourself with operation and
feedback beforeuse.
1. Ensure the socket is firmly and securely connected to
the fastener and wrench.
2. Hold the grip with one hand. Do not use accessories or
anextension.
3. Using smooth effort, pull the wrench at 90 degrees to
the handle.
4. Pay attention to the target torque and status lights.
NOTE :
Haptic vibrate will warn when approaching target.
Stage 1 is soft. Stage 2 is insistent and indicates target is close.
5. The wrench will click at 100% of the target value.
6. Stoptightening.
Cleaning
!
WARNING: Never use solvents or other harsh
chemicals for cleaning the non-metallic parts of
the tool. These chemicals may weaken the plastic
materials used in these parts. Use a cloth dampened
only with water and mild soap. Never let any liquid
get inside the tool; never immerse any part of the tool
into aliquid.
Accessories
!
WARNING: Since accessories, other than those offered
by PROTO, have not been tested with this product, use
of such accessories with this tool could be hazardous.
To reduce the risk of injury, only PROTO recommended
accessories should be used with thisproduct.
Recommended accessories for use with your tool are available
at extra cost from your local dealer or authorized service
center. If you need assistance in locating any accessory, please
contact PROTO Industrial Tool Co., 701East Joppa Road,
Towson, MD 21286, call 1-800-800-8665 or visit our website:
www.protoindustrial.com.
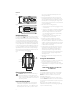
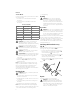
Interchangeable Ratchet Accessory
(Fig.H)
The interchangeable ratchet accessory
3
can be removed
for storage or to change to a different drivesize.
1. To remove the interchangeable ratchet accessory
3
from the wrench, use a small pick or screwdriver to
release the detent pin
25
as shown in Fig.H.
2. Remove the interchangeable ratchet accessory
3
and
replace it with a different drive size interchangeable
ratchet accessory (sold separately).
3. Ensure the detent pin
25
is fully engaged in the detent
slot
26
before using thewrench.
Fig. H
25
26
3
Repairs
The charger and battery are notserviceable.
!
WARNING: To assure product SAFETY and
RELIABILITY, repairs, maintenance and adjustment
(including brush inspection and replacement, when
applicable) should be performed by a PROTO factory
service center or a PROTO authorized service center.
Always use identical replacementparts.