
Installation Instructions

11
preparing your home
Proper surface preparation is one of the most important parts of your siding installation job.
All exterior wall surfaces must be even, so that your new vinyl siding will be straight, and look sharp.
1. Remove all shutters, downspouts and fixtures. On older homes, replace any rotten wood and
securely nail all loose boards, siding and wood trim. Tie back all shrubbery and trees when
plantings are close to the house. Remove any old caulking around windows and doors.
2. Flashing: Use aluminum trim coil or other material which will not absorb water. Apply
flashing below, on the sides of, and above (in that order) any openings where water might
penetrate. This will help in directing water away from the opening.
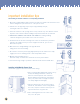
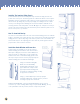
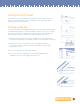
3. Installing Furring: Furring or strapping must be applied to create an even base for siding.
Apply 1" x 3" (minimum size) wood furring, not more than 6" on centers. Shim low spots
to create an even surface. For horizontal vinyl siding, install furring vertically (shown at
above right). For vertical siding, install furring horizontally (shown at below right). Place
furring along all sides of door and window frames, corners, and top and bottom of areas to
be sided. As an alternative, solid sheathing can be applied directly over the old surface to
create a smooth base, or over furring to provide even support for the vinyl siding.
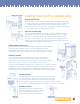
4. Building paper: If required by building codes, apply a weather-resistant barrier over the
sheathing. We recommend an approved breather-type sheathing paper.
5. Insulation: The ideal time to increase the insulation value of the sidewall is before
installing siding. Simply install insulating sheathing over existing siding, over or between
the furring strips.
6. Laying the groundwork: Determine a starting point for your siding — it should be the lowest
point. Measure at corners, and pull a chalk line across the wall to ensure a level starting
position. Plumb corners, and shim if necessary, to ensure they are vertical.