VECODER ULTRA IP SERIES H264 ENCODER USER MANUAL
Pro Video instruments VECODER ULTRA IP SERIES H.264 PRODUCT SPECS & FEATURES Power – 220V/110V AC Encoding - Latest H.264 Encoding Technology (Depending on Model) HD 720P/ 1080I/1080P @ 60 Hz Ultra Low Latency. Standard Baseline/Main/High Profile Support. HDMI 2.0 and HDCP compliant. Supports ACC/Mpeg1L2 Audio CBR/VBR (constant & Variable) Bitrates option available with up to 12mphs bitrate. Four Stream Encoders for support of multiple styles of formats and encoding preferences to different servers.
Pro Video instruments POWERING THE DEVICE. – QUICK GUDIE – FIRST MODULE IP - 192.168.1.168 a) Connect your included Power cord to the unit. b) Once the unit is powered on insert your valid HDMI Video Signals into the HDMI port c) Set your computer to a static IP as 192.168.1.100 ( see below on how to set your local static IP connection) d) Connect your PC ETHERNET PORT to the VeCoder’s First Module ETHERNET PORT using a patch cord.
Pro Video instruments MANUALS & TECH SUPPORT Latest Manuals & Software are always available on our specific website www.quickinstallnow.com to access, use the 3 letters prefix + the UPC number on the serial number label on the product. You can also scan the QR Code on the label to access directly. Free Unlimited Tech support over the phone is always available Mon-Fri 9 am / 4 pm EST US. For troubleshooting or questions please open a Ticket on our site pvisupport.
Pro Video instruments DIRECT STREAMING & REPEATER SERVERS Each unit has a built-in 1 Gigabit streaming server capable of handling up to 400+ connections depending on the bitrate you have set.
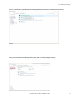
Pro Video instruments PVI - PC CONNECTION GUIDE On Windows open your control panel VeCoder Ultra IP Series H264 Encoder 5
Pro Video instruments Once on control panel, open Network and Sharing (Network and Internet for Windows 8 and above) Once you have Network and Sharing Center open, Click on “Change adapter settings.
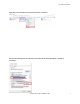
Pro Video instruments Right Click on your Local Ethernet connection and click on “properties.” Once the Ethernet Properties are open click on, “Internet Protocol Version 4(TCP/IPv4),” and click on, “Properties.
Pro Video instruments In the Properties change your IP address from auto to Static and Change the IP address to the required setting to connect to your unit which will be listed in the manual of your Product. Click ok once you are done and close everything. You are now ready to connect to the Web interface of your Unit.
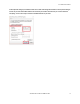
Pro Video instruments WEB INTERFACE Once you have logged into the unit you will see the STATUS page. This will display all your enabled formats for all streams and Video Input resolution as well as status of the current unit.
Pro Video instruments VeCoder Ultra IP Series H264 Encoder 10
Pro Video instruments VeCoder Ultra IP Series H264 Encoder 11
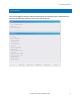
Pro Video instruments NAVIGATION PANEL This is at the bottom of the web interface. Here you can change between your different HDMI Inputs, streams, Network settings, Audio settings, and Advance system menu. Your main focus would be on HDMI 1-4 and SYSTEM NETWORK.
Pro Video instruments HDMI INPUT 1-4 Here you can set your settings for the Main Stream of your HDMI input. You can enable and disable different formats you wish to use as well as Bitrate, FPS, Encoding Size, and Compression Profile. You may adjust these settings to your needs. Below are our recommend defaults. Please set your unit all up and then power cycle the unit to ensure the settings take effect.
Pro Video instruments ON SCREEN DISPLAY (OSD) Here you can set your Logo to display (overlay) over the incoming HDMI video such as your company logo or Text. The unit has 5 different CG Generators giving you many options from many different logos to text. The logo requires to be named logo1.bmp. It must be a BMP format picture. Depending on the zone you wish to use the logo results in the required name. Example: Logo1.bmp – ZONE 1 Logo2.bmp – ZONE 2 Logo3.bmp – ZONE 3 Logo4.
Pro Video instruments TEXT SETTINGS : TEXT X: [0-1920] – Left and Right position of the Text TEXT Y: [0-1080] – Up and down position of the Text FONT: [8-72] – Size of Text ALPHA: Opacity of the Text [0-128] COLOR: Color of the Text BG: Background color of the text if you wish TEXT: type the text here that you wish to display VeCoder Ultra IP Series H264 Encoder 15
Pro Video instruments PICTURE SETTINGS : Picture: Disable/Enable Picture X: [0-1920] – Left and Right position of the Picture Picture Y: [0-1080] – Up and down position of the Picture ALPHA: Opacity of the Picture [0-128] NETWORK Here you can adjust the network settings to match your needs of your specific network or switch.
Pro Video instruments AUDIO ENCODING SETTINGS Here you can adjust your Audio Format and Volume for the Streams to suit your needs. The settings by default work just fine.
Pro Video instruments SYSTEM – ADVANCE Here you can change the Advance settings for the encoder. At the bottom of the page you can soft-reboot the device as well as Factory reset the unit if required. You can also set up an Automatic Restart of the unit to ensure the unit’s stream restarts and refreshes itself daily during off-hours. This is optional.
Pro Video instruments VeCoder Ultra IP Series H264 Encoder 19
Pro Video instruments TECH SUPPORT Please read carefully all this manual as it covers ALL and EVERY aspect to set this product as per your needs, using pictures and examples. Should you need any additional support please go to pvisupport.com and open a quick ticket. Remote locations that you require support please can Schedule a time at least 24-48 hours in advance that works best for everyone.