AHD Series DVR User Manual (Version 3.4.
AHD DVR User Manual PROVISION-ISR AHD DVR User Manual For H.
AHD DVR User Manual CAUTION Please read this user manual carefully to ensure that you can use the device correctly and safely. There may be several technically incorrect places or printing errors in this manual. The updates will be added into the new version of this manual. The contents of this manual are subject to change without notice. This device should be operated only from the type of power source indicated on the marking label. The voltage of the power must be verified before using.
AHD DVR User Manual Table of Contents 1 Introduction....................................................................................... 1 1.1 DVR Introduction ....................................................................................................................... 1 1.2 Main Features ............................................................................................................................ 1 2 Hardware Installation.........................................................
AHD DVR User Manual 5.5.1 Motion Alarm ........................................................................................................ 23 5.5.2 Video Loss .............................................................................................................. 25 5.5.3 Other Alarm ........................................................................................................... 25 5.5.4 Alarm Out ........................................................................................
AHD DVR User Manual 8.3 Remote Surveillance through Apple PC .................................................................................. 49 8.3.1 Via LAN ................................................................................................................... 49 8.3.2 Via WAN ................................................................................................................. 50 8.4 The Remote Live Preview ........................................................................
AHD DVR User Manual Introduction 1 1.1 DVR Introduction This model is standard 720P/960H high resolution AHD DVR (Analog High Definition Digital Video Recorder), which adopts high performance video processing chips and embedded Linux system. Meanwhile, it utilizes many most advanced technologies, such as standard H.264 with low bit rate, dual stream, SATA interface, VGA output mouse supported, IE browser supported with full remote control, mobile view (by phones), etc.
AHD DVR User Manual ALARM Supports schedule for motion detection Supports pre-recording and post recording PTZ CONTROL Supports various PTZ protocols Supports 128 PTZ presets and 8 auto cruise tracks Supports remote PTZ control through internet SECURITY Customize user right: log search, system setup, two way audio, file management, disk management, remote login, live view, manual record, playback, PTZ control and remote live view Supports 1 administrator and 63 users Supports event l
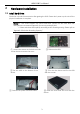
AHD DVR User Manual 2 Hardware Installation 2.1 Install Hard Drive Check the unit and the accessories after getting the DVR. Please don’t power up the unit till the physical installation is complete. Notice: 1. This series support one SATA hard drive. Please use the hard drive the manufacturers recommend specially for security and safe field. 2. Please calculate HDD capacity according to the recording setting. Please refer to “Appendix B Calculate Recording Capacity”.
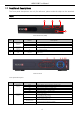
AHD DVR User Manual 2.2 Front Panel Descriptions The front panel descriptions are only for reference; please make the object as the standard. Notice: The front panel descriptions are only for reference; please make the object as the standard.
AHD DVR User Manual Item Type Name SEARCH/ZOOM PLAY /IRIS FF/ P.T.Z. STOP/ESC Input button 3 4 5 6 IR receiver USB External IR Direction button Multi-screen Enter button IR USB port EXT_IR Description 1. Enter search mode 2.ZOOM function enables at PTZ mode. 1. Enter play interface 2. IRIS function enables at PTZ mode 1. Fast forward 2. Enter PTZ mode in live 1. Quit play mode 2.
AHD DVR User Manual Item 1 2 3 4 5 6 Nam e Power Button DVD button Keys 0-9 (0/—) —) Audio/+ P.T.Z./ Input button 7 Work state indicator 8 9 10 11 12 13 Function button Jog dial USB IR port receiver External IR F u Soft switch off to stop firmware running. Do it before power off. n Press this button, user can place the DVD to do backup. c Input number 1-9 or choose camera t i 1. Represents channel number. 2. Indicates digital number 0 1. Control voice 2. Increase the value in setup o 1.
AHD DVR User Manual 2.3 Remote Controller It uses two AAA size batteries. ① Open the battery cover of the remote controller. ② Place batteries. Please take care the polarity (+ and -). ③ Replace the battery cover. The interface of remote controller is shown below. Button REC Search MEUN Exit ENTER Direction button ZOOM PIP Function Record manually. To enter search mode. To enter menu. To exit the current interface. To confirm the choice or setup. To move cursor in setup. Multi Next To zoom in.
AHD DVR User Manual It supports mouse drag. Take setting up motion detection area for example: Click customized, hold down the left button and drag to set motion detection area. In Playback: Click to choose the options. Right click to return to live mode. In Backup: Click to choose the options. Right click to return to previous picture. In PTZ Control: Click left button to choose the buttons to control the PTZ. Click right button to return to live.
AHD DVR User Manual 3.1.2 Power Off You can power off the device by using remote controller, keyboard or mouse. ① Go to Main Menu and then select “Shut Down” icon to pop up the Shut down window. ② Click OK. Then the unit will power off after a while. ③ Disconnect the power. 3.2 Login User can login or log off the DVR system. Once logged off the user cannot do any other operation except changing the multi-screen display.
AHD DVR User Manual Symbol Meaning Green Manual record Yellow Motion detection record Blue Schedule record 3.4 Live Playback Click Playback button to playback the record. Refer to Fig 3-3. User can do complete operation by clicking the buttons on screen.
AHD DVR User Manual 4 Adding IP Cameras (Applicable only for Hybrid Models) This chapter mainly introduces how to connect multiple IP cameras through NVR. Once you finish adding IP cameras, you can see the live images through the monitor of the NVR. To add IP cameras via LAN: Step 1: Please enter MenuIP Camera tab. Refer to Fig 4-1. Click “Search” button to search the devices in the same network. Fig 4-1 Device Management Step 2: Enter into the search tab.
AHD DVR User Manual Fig 4-3 Add Device To add IP cameras via WAN: Step 1: Please enter MenuIP Camera tab. Refer to Fig 4-1. Step 2: Click “Add” button to pop up a window similar to Fig 4-3. You need to check “Enable” box, select channel, manufacturer and product model and manually input IP address, server port, username and password of this device. Note: If the NVR and the IP cameras you want to add are both in WAN, the IP address of the IP camera input here must be WAN IP.
AHD DVR User Manual Audio: Enable sound. PTZ: Click the PTZ button to control rotation position, speed and auto scan of the PTZ. Snap: Click this button to snap the live pictures. These pictures will automatically be saved in the SATA disk. Record: Click this button to start/stop recording. Playback: Click this button to playback the record files. Click the icon beside the playback icon to select playback time.
AHD DVR User Manual 5.1 Basic Configuration Basic configuration includes three sub menus: system, date & time and DST. 5.1.1 System Go to Main MenuSetupBasicSystem interface. Refer to Fig 4-3. Fig 4-3 Basic Configuration-System In this interface you can set up the device name, device ID, video format, max network users, VGA resolution, language and so on. The definitions for every parameters display as below: Device Name: The name of the device.
AHD DVR User Manual 5.1.2 Date & Time ① Go to Main MenuSetupBasicDate & Time interface. Refer to Fig 4-4. Fig 4-4 Basic Configuration-Date & Time ② Set the date format, time format, time zone in this interface; checkmark “Sync Time With NTP Server” to refresh NTP server date. You can also adjust system date manually. ③ Click “Apply” button to save the setting. 5.1.3 DST ① Go to Main MenuSetupBasicDST interface. Refer to Fig 4-5.
AHD DVR User Manual 5.2 Live Configuration Live configuration includes three submenus: live, main monitor and mask. 5.2.1 Live In this interface, you can set up camera name and adjust colors. To set up camera name: ① Go to Main MenuSetupLive. Refer to Fig 4-6. Fig 4-6 Live Configuration-Live ② A software keyboard will pop up by clicking camera name area. Click the letters and (or) digital numbers on the keyboard to input the name you want to display in live image.
AHD DVR User Manual Fig 4-7 Live-Color Adjustment 5.2.2 Main Monitor The main monitor settings allow you to set camera sequence in live display mode. Operate the following steps to set main monitor: ① Go to Main MenuSetupLiveMain Monitor interface. Refer to Fig 4-8. Fig 4-8 Live Configuration-Main Monitor ② Select display mode and channel. ③ Select dwell time. Click Click ④ button to set up the previous channel groups of dwell picture. button to set the latter channel groups of dwell picture.
AHD DVR User Manual To set up mask area: ① Go to Main MenuSetupLiveMask interface. Fig 4-9 Live Configuration-Mask ② Click “Setting” button to go to live image. ③ Press and drag the left mouse button to set mask area as shown below. ④ Right click to exit the mask setting interface. ⑤ Click “Apply” button to save the setting. To delete mask area: ① Click “Setting” button in the mask interface. ② Select a certain masked area and double click to delete that masked area.
AHD DVR User Manual 5.3.1 Enable ① Go to Main MenuSetupRecordEnable interface. Refer to Fig 4-11. Fig 4-11 Record Configuration-Enable Parameter Meaning Record To enable/disable recording for the channel Audio To enable/disable audio recording for the channel ② Checkmark record and audio. ③ Select All to set up the same settings for all channels. 5.3.2 Record Bitrate ① Go to Main MenuSetupRecordRecord Bitrate. Refer to Fig 4-12.
AHD DVR User Manual Parameter Rate Resolution Quality Encode Max bit stream Meaning 720P: 1-15(NTSC)/1-12(PAL); 960H: 1-30(NTSC)/1-25(PAL). This series supports 720P, 960H. The higher the value is, the clearer the recorded image is. Six options: lowest, lower, low, medium, higher and highest. VBR and CBR. You shall adjust it subject to the actual network condition. 5.3.3 Time ① Go to Main MenuSetupRecordTime interface to set recording time. Refer to Fig 413.
AHD DVR User Manual Fig 4-14 Record Configuration-Stamp ② Checkmark camera name and time stamp. Click Setting button to set up the position of the stamp. You can drag the camera name and time stamp at random positions. Refer to below Figures. ③ Select “All” to set up all channels with the same parameters. Before drag After drag 5.3.5 Recycle Record This option is used to recycle the HDD space once it is full.
AHD DVR User Manual 5.4.1 Schedule This tab allows defining schedule for normal recording for seven days of a week, 24 hours of a day. Every row denotes an hourly timeline for a day. Click the grid to do relevant setup. A highlighted area denotes selected timeline. Operate the following steps to set schedule: ① Go to Main MenuSetupSchedule interface. Refer to Fig 4-15. Fig 4-15 Schedule Configuration-Schedule ② Select channel and click “ ” button to add a certain day schedule.
AHD DVR User Manual 5.4.2 Motion Schedule This tab allows to set schedule for motion based recording. The setting steps are as follows: ① Go to Main MenuSetupScheduleMotion tab. ② The setup steps for schedule for motion based recording are similar to normal schedule setup. You can refer to 4.4.1 Schedule for details. Note: The default schedule of motion based recording is 24ⅹ7.
AHD DVR User Manual Fig 4-18 Alarm Configuration-Motion Trigger Buzzer: If selected, the local buzzer would be activated on an alarm. Show Full Screen: If selected, there will pop up the chosen channel on the monitor on an alarm trigger. Email: If selected, the DVR will send an email alert to the preconfigured email address in case of a motion based alarm from the particular input. Snap: If selected, the system will snap images of the checked channels on an alarm and save them in the HDD automatically.
AHD DVR User Manual and time (day or night), you can adjust its value according to the practical conditions. Left click the grid and drag to delete area. Click area. Click icon to set the whole area as detection icon to clear the set detection area. Click icon to test the sensitivity as per the local conditions. Once motion is sensed, it displays a figure icon. Click icon, to save the setting. Click icon to exit the current interface.
AHD DVR User Manual the system will trigger the Disk Full Alarm. ⑤ Click “Apply” to save the setting. Fig 4-21 Other Alarm 5.5.4 Alarm Out To set up alarm out: ① Go to Main MenuSetupAlarmAlarm Out. Refer to Fig 4-22. Fig 4-22 Alarm Out ② Checkmark Buzzer and set buzzer alarm hold time. This would trigger the buzzer when the system is on an alarm.
AHD DVR User Manual 5.6 Network Configuration Network configuration includes Network, Sub Stream, Email, Server, NAT and Other Settings. Network settings must be configured if DVR is used for monitoring over network. 5.6.1 Network To set up network: ① Go to Main MenuSetupNetwork tab. Refer to Fig 4-23. ② Set HTTP port. The default HTTP port is 80. If the value is changed, you shall add the port number when typing IP address in IE address blank. e.g.
AHD DVR User Manual 5.6.2 Sub Stream To set up sub stream: ① Go to Main MenuSetupNetwork Sub Stream interface. Refer to Fig 4-24. ② Select fps, resolution, quality, encode and max bit rate. ③ Select “All” to set the same settings for all channels. Fig 4-24 Network Configuration-Sub Stream Parameter Meaning FPS 1-12/15. Can be higher in some models Resolution Support CIF. Quality The quality of the clients’ image. The higher the value is, the clearer the record image.
AHD DVR User Manual 5.6.3 Email To set up Email: ① Go to Main MenuSetupNetworkEmail interface. Refer to Fig 4-25. Fig 4-25 Network Configuration-Email ② Set SMTP Server and port. SMTP Server/Port: The name and port number of SMTP server. You can set up SSL check (such as Gmail) according to actual needs. ③ Set sender’s address and password. ④ Set receiver’s email address and click “Test” button to test the validity of the mailbox.
AHD DVR User Manual ③ Enable the auto report in the ECMS/NVMS when adding a new device. Then input the remaining information of the device in the ECMS/NVMS and self-define a device ID. ④ Input the above-mentioned server IP, server port and device ID in the server interface. Then click “Apply” button to save the setting. Now, the ECMS/NVMS system will automatically connect this device. 5.6.5 NAT ① Go to Main MenuSetupNetworkNAT interface. Refer to Fig 4-27.
AHD DVR User Manual Fig 4-28 Network Configuration-Other Settings Enable UPnP: Select UPnP here and then enable UPnP function in your router. Therefore, there is no need for you to forward LAN IP address and port in the router in connection of internet. After that, you can check the WAN IP address in the router. Note: The domain name selected by user is a banding domain name of DVR.
AHD DVR User Manual 2) Fill in the registration form, then click "Submit" 3) Fill in the host name you want to apply for and press "Request Domain" (for example "home") 4) If there is no problem with the domain registration you will see the following message: “Your domain was successfully created.” If you do not see this message, the domain name you requested is already in use and you will be requested to provide an alternate domain name (please note: domain name is sometimes called host name).
AHD DVR User Manual 5) The domain name is added at the beginning of your DVR's address, for example the domain "home" will appear as home.provision-isr-dns.com. (b) Setting up your DVR to work with the DDNS server 1) The DDNS server will work only if the three steps are completed; (1) domain registration, (2) correct network configuration with correct preferred/alternate DNS servers, and (3) correct port forwarding configurations are set on the local network (your router).
AHD DVR User Manual Fig 4-29 User Management Configuration ② Click Add button to display a dialog box as Fig 4-30. Fig 4-30 Add-General ③ In General tab, input username, password and select user type. You can also check “Binding PC MAC Address” and input this address. ④ Click “OK” to save the setting. Note: When the default value of binding PC MAC Address is 0, the user is not bound with the specified computer.
AHD DVR User Manual Fig 4-31 Add User-Authority To delete user: ① Go to Main MenuSetupUsers interface. ② Select the added user you want to delete and then click “Delete” button. To modify user: ① Go to Main MenuSetupUsers interface. ② Select the added user you want to modify and then click “Modify” button to do the relevant operation. To change user password: ① Go to Main MenuSetupUsers interface.
AHD DVR User Manual Parameter Address Baud rate Meaning The address of the PTZ device. Baud rate of the PTZ device. Range form: 110, 300, 600, 1200, 2400, 4800, 9600, 19200, 34800, 57600, 115200, 230400, 460800, 921600. Communication protocol of the PTZ device. Range from: NULL, PELCOP, Protocol PELCOD, LILIN, MINKING, NEON, STAR, VIDO, DSCP, VISCA, SAMSUNG, RM110, HY, N-control. Simulative If enabled, no matter whether the PTZ device supports cruise or not, the Cruise presets will cruise.
AHD DVR User Manual Fig 4-34 Advanced-Preset Setting ② In the preset setting tab, enable preset, set the preset name and then click preset “Setting” button. Fig 4-35 Preset Setting ③ Control the dome by rotating up, up left, down, right down, left, left down, right and up right and adjust the rotate speed and the value of zoom, focus and iris of the dome. Note: PTZ must support wiper and light button and these two buttons are just available when selecting PELCOP or PELCOD.
AHD DVR User Manual Fig 4-36 Cruise Setting ② Click Add button to add cruise line in the list box (8 cruise lines can be added at most). ③ Select a cruise line and click “Setup” button to see a dialog box as Fig 4-37. Fig 4-37 Modifying Cruise Line ④ Click Add icon to set the speed and time of preset point. Select a preset point and then click Delete icon to delete that preset point. Click Modify icon to modify the setting of a preset point.
AHD DVR User Manual Fig 4-38 Track Setting 5.9 Advanced Advanced configuration includes three submenus: reset, import/export and block/allow list. 5.9.1 Reset Reset the device to factory default settings. 5.9.2 Import/Export Export the data files into mobile storage devices for backup and then import specified data files from mobile storage device to DVR. 5.9.
AHD DVR User Manual 6 Search, Playback & Backup Search configuration includes four submenus: time search, event search, file management and image. 6.1 Time Search ① Go to Main MenuSearchTime Search. Refer to Fig 5-1. Fig 5-1 Search Configuration-Time Search ② Select date and channels on the right hand side and press the “Search” button. A date with highlighted borderline indicates presence of data.
AHD DVR User Manual 6.2 Event Search ① Go to Main MenuSearchEvent Search button. Refer to Fig 5-2. Fig 5-2 Search Configuration-Event Search ② Select date and channels on the right hand side. A data with highlighted borderline indicates presence of data. ③ Checkmark Motion or All accordingly. ④ Click Search button to display the searched event information in the event list box. ⑤ Double check a certain record file to playback. 6.
AHD DVR User Manual ③ Click Search button to display the searched files in the file list box. ④ Use “All” button to lock/unlock or delete all files in the file management column. ⑤ Double click an unlocked item to play. Lock: Select a file and click Lock button to lock this file, after that, that file will not be deleted or covered. Unlock: Select a locked file and click “Lock” button to unlock this file. Delete: Select an unlocked file and click “Delete” button to delete this file. 6.
AHD DVR User Manual Fig 5-5 Backup Configuration ③ Select a required file or checkmark “All” to select all data files. Click Backup button to display Backup information window. ④ In the backup information interface, you can check the relevant information of backup files, storage type, save file type, etc. Then click Start button to start backup. Note: If the backup files are saved in DVR format, please check backup player. Only this player can play these files in DVR format.
AHD DVR User Manual 7 Manage DVR 7.1 Check System Information Check system information includes seven submenus: system, event, log, network, online users, record and QRCODE. 7.1.1 System Information In this interface, you can check the hardware version, MCU version, kernel version, device ID, etc. 7.1.2 Event Information In this interface, you can search for events like motion and video loss. The utility provides an interface to have a date based and a channel based search.
AHD DVR User Manual Fig 6-2 Information Configuration-QRCODE 7.2 Disk Management To format the disk ① Go to disk management interface. Please format the hard disk before recording. Note: please format the hard disk before record. ② ③ Click Refresh button to refresh the disk information in the list box. Select a hard disk and click Format button to start format. Note: All recorded files in the hard disk will be lost after formatting.
AHD DVR User Manual Note: Please wait for a while when the system reboots. Any power interruption is not allowed during upgrading. 7.4 Logoff A log off dialogue box will pop up by clicking Log off icon. Then click OK button to confirm to log off. If you want to log in again, click Main Menu icon to enter user name and password to relogin.
AHD DVR User Manual 8 Remote Surveillance 8.1 IE Remote Surveillance by NAT 8.1.1 NAT Settings ① ② ③ ④ ⑤ ⑥ The DVR shall be powered on and connected to the network. Go to Main MenuSetupNetworkNetwork. You can obtain the IP address, Subnet Mask and Gateway automatically. You can also manually input them according to the actual network situation. And the IP address shall be in the same network segment as the network which is used. Set the preferred or alternative DNS Server (Please refer to 4.6.
AHD DVR User Manual 8.2 IE Remote Surveillance via LAN & WAN In order to view the DVR from a network it may be connected to a LAN/WAN or internet. The network setup should be done accordingly. Please refer to 4.6 Network Setup. 8.2.1 Via LAN ① ② ③ ④ Go to the DVR’s Main MenuSetupNetwork interface to input IP address, Subnet Mask, etc .If using DHCP, please enable DHCP in both the DVR and the router. Enter Record Setup to set network video parameters like resolution, frame rate etc.
AHD DVR User Manual ② ③ When accessing the remote interface of DVR, user can input WAN IP to access directly (user can go to Main MenuInformationNetwork interface to check IP address). The browser will download Active X control. The following setting steps are as the same as ④ and ⑤ in Point 1. 8.3 Remote Surveillance through Apple PC Note: Because the current plug-in version of client end just only supports 32-bit mode, so the safari browser shall start 32-bit mode.
AHD DVR User Manual ③ After acquiring the IP address, Subnet Mask and so on, please go to the DVR’s Main MenuSetupNetwork interface to manually input IP address, Subnet Mask and Gateway according to the configuration of PC. The network segment should be the same as the PC. If using DHCP, please enable DHCP in the DVR and router. ④ After the above information is completed, you can enter LAN IP and HTTP port in the Safari browser. For example: input http://192.168.1.100:81(here 192.168.1.
AHD DVR User Manual 1. Connect the DVR to internet through router or virtual server. ① The network setups are the same as step one to step four of point 1 on WAN of IE remote surveillance. ② Enter WAN IP and HTTP port in the Safari browser to install the Active control. The concrete steps are the same as step 5 and 6 of Chapter 7.3.1. 2. Connect the DVR to internet directly. ① The network setups are the same as step one of point 2 on WAN of IE remote surveillance.
AHD DVR User Manual Screen display mode: Click the icon beside the screen display mode to select channels. Snap pictures: Click “Snap” icon to automatically capture pictures and save those pictures in the computer. You can set up the save path for those picture in the Remote Preview interface Configuration Local configuration. Color adjustment: Drag the slide bar to adjust Brightness, Contrast, Hue, and Saturation. Click Default to reset them to original value.
AHD DVR User Manual 'Focus' button. Click Click button near 'Focus' button to have long focus. button near 'Focus' button to have short focus. Go to the Preset. Select and do auto cruise. Track Auto scan Wiper button Light button Click the right mouse on the live interface. This will take you to a pull-down menu. Fig 7-2 Right Key Sub Menu Stream: This DVR supports master stream and sub stream.
AHD DVR User Manual Fig 7-3 Play Record File Interface This DVR supports remote time search, event search and file management. By Time Search: ① Go to SearchTime Search. Refer to Fig 7-4. ② The highlight date in the area ② indicates recorded data. Select the date in area ② and record channels in area ③. ③ Click “Search” button. The record data will be displayed in the data information list box. ④ Set the data playing time and display mode in the area ① as required.
AHD DVR User Manual mode, etc. Refer to Fig 7-5. Fig 7-5 Time Search Playback By Event Search: ① Go to SearchEvent Search interface. Refer to Fig 7-6. ② Click the highlight date and select record channels. ③ Checkmark the event type: motion. ④ Click “Search” button. ⑤ Double-click certain item to play. Fig 7-6 Event Search Interface File Management: ① Go to SearchFile Management interface. Refer to Fig 7-7.
AHD DVR User Manual Fig 7-7 File Management Interface ② Select highlighted date and channels. ③ Click “Search” button to search the recorded files. Lock: Select certain file item in the file list box and then click “Lock” button to lock this file that ca not be deleted or overlaid. Unlock: Select a locked file and then click “Unlock” button to unlock this file. Delete: Select an unlock file and then click “Delete” button to delete this file from file list. 8.5.
AHD DVR User Manual ② Select backup files and click “Browse” button to set the save path. Then click “Backup” button to start backup. The backup files will be saved on user’s PC. 8.6 Remote System Configuration You can do remote setup of the device which includes functions like basic configuration, live configuration, record configuration, schedule configuration, alarm configuration, network configuration, PTZ configuration and user configuration.
AHD DVR User Manual 8.9 By Phones with iPhone OS Install through iPhone. Step 1: Open App Store software as shown in the figure on the left. Step2: Search “Provision Cam” and click “Get” button as shown in the figure on the right. Step 3: Click “Install App” button as shown in the figure on the left. Step 4: Input iTunes Store password and then click “OK”. The software will be installed automatically. Install Software through PC Step 1: Install iTunes store in PC and then login.
AHD DVR User Manual Step 2: Connect iPhone and PC. Step 3: Search “Provision Cam” and select it. Step 4: Click “Download” button. Step 5: Input username and password. Step 6: Synchronously apply "Provision Cam" software to iPhone/iPad. "Provision Cam" Instructions 1. Login Step 1: Choose network type. There are two network connection ways: 3G/3G +WIFI, well video quality. This network supports main stream and sub stream. The real-time image will be displayed by using sub stream.
AHD DVR User Manual including local information, device information, network information, etc. :Server list button. Click this button to add server list. :Help button. Help you know about the use of this software quickly. :CMS button. Make you preview the live image of multi-devices. :Log off button. Click this button to return to the login interface. :Screen mode button. You can choose 1,4,6,8,9,13 or 16 screen display mode. :Favorite channel display button.
AHD DVR User Manual 3. Server list Click button to pop up the following picture. Add device: Click “Add” button in the top right corner to pop up a dialog box as shown in the following left picture. Input the relative information of the device and click “Save” button. Delete device: Click button behind the device name to delete this device. Edit device: Click button behind the device name to edit the information of this device.
AHD DVR User Manual these two channels change the position of each other.
AHD DVR User Manual 5. CMS Function This function makes multi-device managements and preview come true. Step 1: Click to enable CMS function. When this icon turns green, it means this function is enabled. Step 2: Click to choose channel as shown in the right picture. After you choose the channel, click “ok”, the system will display the related image automatically. If channels have been added into the group, you can see the images by clicking the group name.
AHD DVR User Manual :Color means the channel or group has been collected. Grey means the channel or group isn’t collected. 7. Playback Interface Click “Playback” button to enter the playback interface. Then click “Search” button to search the file. To play the record by click this file name. 8. Image View Click pictures. 9. button to view the captured Settings Interface In this interface, you can configure the local settings. 10.
AHD DVR User Manual 8.10 By Phones with Android Software Installation Step 1: Run “Play Store” (or Google market) program. Step 2: Search “Provision Cam”. Step 3: Press “Install” button. Step 4: Install the software subject to the notes. Once the downloading is done, the software will install automatically Login Menu Step 1: Choose network type. There are two network connection ways: 3G/3G +WIFI, well video quality. This network supports main stream and sub stream.
AHD DVR User Manual Main Menu PTZ Snap Record Talk Enable/disa ble audio Hide Playing favorite channel Record Playback: The first picture The previous picture Next picture The last picture Zoom in Zoom out Delete 66 Live View
AHD DVR User Manual Click “Playback” in the main menu interface to enter playback interface. Then choose the channel you want to playback. This will take you to see the record file. Click this file to play. Pause/Play Stop Forward Backward Server List: In the main menu interface, click “Server list” to see the above picture on the left hand. Add Server: Click button to pop up a window as shown in the above picture on the right hand.
AHD DVR User Manual Storage: Setup the relevant parameters of mobile video. Information View: view the DVR/NVR basic information as shown in the picture on the right.
AHD DVR User Manual Appendix A: FAQ Q1. Why the DVR doesn’t turn on after connecting to the power? a. b. c. The power adapter could have gone bad. Please change a new power adapter. The power from the adapter may be not enough for operating the DVR. Please use the power adaptor supplied along with the DVR. It could be a hardware problem. Q2. The DVR LED turns on but there is no output, why? a. b. c. The power from the adapter may be not enough for operating the DVR.
AHD DVR User Manual Q7. ActiveX control cannot be downloaded. a. IE browser blocks ActiveX. Please do setup as per the steps mentioned below. ① Open IE browser. Click ToolsInternet Options. ② Select SecurityCustom Level. Refer to Fig 7-1. ③ Enable all the sub options under “ActiveX controls and plug-ins”. Refer to Fig 7-2. ④ b. Then click Ok to finish setup. Other plug-ins or anti-virus blocks ActiveX. Please uninstall or do the required settings.
AHD DVR User Manual the digital keys on the remote controller. Q10: A hard disk is being identified as a new device however it was being used with another DVR of same model. Should it be formatted prior use? It is possible to migrate an HDD from one DVR to another provided that the DVRs are of the same model and that the HDD being migrated would be used as the sole disk in the new DVR. However in cases where the new DVR already contains a HDD, the migrated disk being installed would have to be formatted.
AHD DVR User Manual Q13. How to play the backup file? Insert your USB device where the backup files are saved in the USB port of PC. If your files are saved in DVR format, you must have already downloaded the backup player box before doing backup. Then double click to open your USB disk to find your backup files and backup player. Double click icon to install backup player. After you install it, open this player and click “Open Path” button to open your backup file.
AHD DVR User Manual Appendix B: Calculate Recording Capacity You can calculate the size of hard disk according to the storage time and NVR recording settings. The formula is as follows in full frame rate condition. Used space per hour (MB/h) = Bitrate(kbps) ÷ 8 × 3600 ÷ 1024. The below are the details at different settings.
AHD DVR User Manual 1. Compatible USB drive after test. Brand Capacity SSK 512MB, 1G, 2GB Netac 4GB Kingston 2GB Aigo 2GB Smatter vider 1GB SanDisk 4GB 2. Compatible HDD list Brand Tested Capacities Capacity 80G / 160G / 250G / 320G (From version 3.4.3 and higher) 74 / 1.
Notes: 75