
User's Manual


Page 10 Copyright © 2006 Proxim Wireless
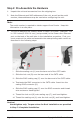
Step 2: Pre-Assemble the Hardware
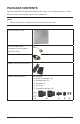
Unpack the unit and accessories from the shipping box.
Note the Ethernet and MAC addresses of the unit, as well as the serial
number; these addresses may be used when conguring the unit.
Note:
The serial number is required to obtain support from Proxim. Keep this
information in a safe place.
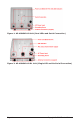
You will be attaching an outdoor-rated 24 AWG CAT5 cable (diameter .114
to .250 inches/2.9 to 6.4 mm) (not provided) to the Power-over-Ethernet
port on the back of the unit later in the installation procedure. First, you
must construct the cable and assemble the waterproong cable covers as
described in the following steps:
i. Slide the sealing nut (A) over the bare end of the CAT5 cable.
ii. Slide the lock nut (B) over the bare end of the CAT5 cable.
iii. Slide the RJ45 sealing cap (C) over the bare end of the CAT5 cable.
iv. Terminate the RJ45 connector to the CAT5 cable. Insert into the
mating RJ45 connector (D).
v. Slide the RJ45 sealing cap (C) over the RJ45 connector and thread
onto enclosure. Hand tighten.
vi. Thread the lock nut (B) onto sealing cap (C), and hand tighten.
vii. Thread the sealing nut (A) onto the lock nut (B), and hand tighten.
Caution!
Hand-tighten only. Torque values for nal installation are provided
in Step 7: Complete Installation.
1.
2.
3.