
User's Manual

8000 Series - Hardware Overview and Installation
Tsunami
®
800 and 8000 Series - Hardware Installation Guide 84
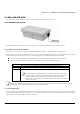
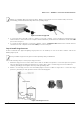
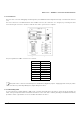
Figure 3-35 Pole-Mounting
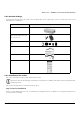
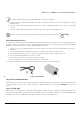
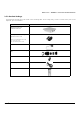
Step 6: Weatherproof RJ45 Connectors
The following steps explain how to weatherproof the RJ45 connector:
1. Use a straight-through cable (Cat5/5e or better) with one end bare.
2. Connect the crimped RJ45 connector end of the cable into the RJ45 Ethernet port inside the enclosure. The cable
connector should latch into the Ethernet port.
3. Slide the Flat Washer (A) into the Connector Body (B) to make it waterproof and onto the bare end of the cable. Next,
fasten the Connector Body into the Ethernet connector hole on the device.
4. Slide the tube-shaped Compression Washer (C) into the Compression Ring (D) and onto the cable from the bare end,
and insert into the fixed Connector Body.
5. Slide the Sealing Nut (E) over the bare end of the cable and fasten it on the fixed Connector Body.
6. Crimp the bare end of the cable with RJ45 connector and connect it to the LAN+DC port on the PoE Injector.
Figure 3-36 Weatherproofing RJ45 Connectors
Additional Weatherproofing Steps
To add an additional layer of protection to the connectors against the environment, see
.
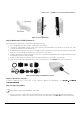
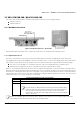
Step 7: Plug in the Cables
: Unscrew the sealing cap for installation of the cable.
1. Plug one end of the Cat5/5e cable into the Ethernet port of the device by following the Weatherproofing steps as
explained in Step 5. Connect the other end of the Cat5/5e or better cable to the LAN +DC port on the PoE Injector.