
System information


Using the Switch Dashboard
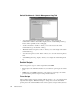
311
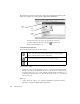
• “Switch script style” dropdown—allows you to select Telnet or SNMP. See “Switch
Scripts” on page 312.
• “Looping mode” dropdown—allows you to select Looping or Static.
• Looping is where the Probe samples each port checked in the “Switch Ports”
display.
• Static is where the Probe collects all data from the port or ports selected (if
supported by your switch).
• “Switch address” textbox—allows you to input the IP address or DNS name of the
switch to be managed by this Probe.
• “Number of switch ports” dropdown—allows you to define the number of total ports
your switch contains. This number is used by Observer for all timing and
configuration settings.
• “Monitoring port” dropdown—allows you to define the port where Observer or the
Observer Probe is connected. Observer excludes this port from all calculations.
SNMP Management Parameters:
• “Timeout (ms)” textbox—allows you to set the timeout (in milliseconds); only
enabled if you selected SNMP in the “Switch script style” dropdown.
• “Retries” textbox—allows you to set the number of retries; only enabled if you
selected SNMP in the “Switch script style” dropdown.
• “Write community name” textbox—allows you to enter the community name; only
enabled if you selected SNMP in the “Switch script style” dropdown.
• Check Selected button—checks the selected ports for monitoring or looping. You can
select ports using the standard Windows selection controls.
• Uncheck Selected button—unchecks the selected ports for monitoring or looping.
You can select ports using the standard Windows selection controls.
• “Switch Ports” checkboxes—allows you to select which switch ports will be included
in the looping cycle. The number of ports displayed reflects the entry in the “Number
or switch ports” edit box.