
System information

Configuring SNMP Agents
339
only SNMP Extension is to have access to this sort of SNMP agent, set the
IP address to the SNMP Extension’s console address.
The procedure may be different for each agent. Refer to the device’s
documentation for more information on configuring and enabling SNMP.
To have the SNMP agent send trap messages to SNMP Management Console, you must
add the SNMP Management Console’s IP address to the list of management stations that
can receive trap messages from the agent. This is a different issue from that of some
agents requiring an IP address for SNMP requests. Traps are sent in response to an event
on the device, and not in response to a request from SNMP Management Console; without
being told where to send the traps, the SNMP agent simply would not know where to send
them.
See the specific device’s manual for instructions on how to configure the
SNMP device.
Adding, Modifying, and Deleting SNMP Agents
To collect information from your SNMP-enabled network devices, you must add an agent
entry for each SNMP agent on your network.
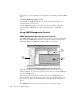
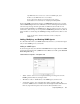
Adding an SNMP Agent
To add a new agent entry, select Actions > Add SNMP Device or right-click in the SNMP
Agents pane and select the A
DD_SNMP AGENT item. Either action will open the Network
Device Properties dialog.
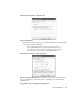
Network Device Properties – Description Tab
• “Name” textbox—the name that is displayed to the right of the agent icon in the
SNMP Agents list. Enter any descriptive name.
• “IP Address” textbox—the IP address of the SNMP agent you want to add.
• “Community” textbox—the community name. This is typically “public.” By
convention, SNMP uses the community name and management station IP address the
same way login name and password are used in a telnet (terminal) session.