Introduction Your Proxima Lightbook Projector The Proxima® Lightbook™ projector makes sharing data and presenting information as easy as connecting your computer to your monitor. 800 600 400 200 0 APR M AY JU N Figure i-1 JUL The Proxima Lightbook projector in use This manual covers the Proxima Lightbook family of light, portable projectors which provide images of unrivaled clarity and color accuracy.
WHAT’S IN THE BOX? After you’ve opened the box and removed the projector and accessory packs, make sure you have all of the items shown in Figure i-2. CAUTION! The Proxima Lightbook projector should be treated like any other precision optical instrument. Handle it carefully.
OPENING THE PROJECTOR 1 Press the gold buttons on both sides of the projector and pull the top assembly up. It will click into place. Figure i-3 Opening the projector NOTE: The and completely open. indicators will both flash if the projector is not 2 Lift the gold front door latch to pop the lens open.
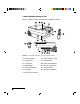
YOUR LIGHTBOOK PROJECTOR Before you begin, locate the main parts of the Lightbook projector. 3 4 1 2 1 MUTE –VOLUME+ /O 7 3 6 5 3 4 13 preview select source Serial Computer In Monitor Out O I S.
CONNECTOR PANEL All connections between the projector and computer or video source are made on the side connector panel. 1 2 3 Serial Computer In Monitor Out 4 5 S-Video Video In 6 7 L In–Audio–Out R O 10 A M P I 11 Figure i-6 8 10 9 The Connector Panel CONNECTOR DESCRIPTION 1 SERIAL Connects to your computer so you can use Cyclops F/X software. 2 COMPUTER IN Connects computer video to the projector. 3 MONITOR OUT Provides computer video output to a separate monitor.
CONTROL PANEL Use the Lightbook projector’s control panel keys to turn the projector on or off, adjust the projected image, and display and hide the menu. The and indicators provide status information about your projector. Over-Temperature 1 Replace Lamp 6 Source 2 7 Setup 3 Menu 5 Figure i-7 The Control Panel KEY 1 2 3 4 Introduction FUNCTION Controls the menu and adjusts screen position. Source Setup Menu Switches the video inputs. Activates the Setup menu.
LIGHT FUNCTION Glows red to warn of an over-temperature condition. Flashes quickly if the projector is not fully opened. Flashes slowly if the spare lamp burns out. Glows red when the active lamp burns out. Flashes quickly if the projector is not fully opened. QUICK START Follow the appropriate section below for the type of system that you have. Be sure to observe the indicator lights when you power up the projector.
Connecting Desktop PCs Serial Computer In Monitor Out S-Video Video In L R In Audio Out SERIAL VIDEO/VGA Figure i-9 AUDIO Connecting a Desktop PC 1 Turn the PC power off. Unplug the monitor cable from the computer. 2 Plug the end of the supplied VGA cable with the large round collar into the COMPUTER IN port on the projector. Plug the other end into the computer’s Monitor Out port. 3 Connect your audio source to the AUDIO IN port on the projector. 4 You can project without using the PC monitor.
Connecting Macintosh Computers Serial Computer In Monitor Out S.Video Video In L R In Audio Out SERIAL VIDEO/VGA AUDIO Figure i-10 Connecting a Macintosh 1 Unplug the existing monitor cable from your computer. 2 Plug the end of the supplied VGA video cable with the large round collar into the COMPUTER IN port on the projector. Attach the VGA end of the Mac - VGA cable adapter to the other end of the VGA video cable.
Connecting NTSC, PAL, SECAM, or S-Video Use the supplied AV cable to connect an NTSC, PAL, or SECAM source to the projector. Use the supplied S-Video cable to connect an S-Video source. Serial ComputerIn MonitorOut S.Video VideoIn L R InñAudioñOut S-Video Cable (Optional) S-VideoCable S.
CLOSING THE PROJECTOR 1 Close the lens door latch. Figure i-12 Closing the lens 2 Press both gold buttons to release the top assembly Figure i-13 Releasing the projector top 3 Gently press down and pull back on the assembly until it clicks into place.
Chapter 1 Setting Up the Lightbook Projector POSITIONING THE PROJECTOR Place the projector on a solid, flat surface at a right angle (perpendicular) to the projection screen and parallel to the floor. If you are using a media cart, make sure the wheels are locked to prevent it from moving.
TRANSPORTING AND MOVING THE PROJECTOR Always use the supplied carrying case to transport the projector. If you are moving the projector a short distance, grasp it securely at the sides by the lower parts of the housing to support the weight of the unit. Figure 1-2 Moving the projector Projector Cooling and Airflow Locate the air intake grills under the front of the projector and in the left rear corner, and the air exhaust grill in the right rear corner.
CONNECTOR PANEL All connections between the projector and your computer or video source are made on the side connector panel. 1 2 3 Serial Computer In Monitor Out 4 5 S-Video Video In 6 7 L In–Audio–Out R O 10 A M P I 11 Figure 1-4 8 10 9 The Connector Panel CONNECTOR DESCRIPTION 1 SERIAL Connects to your computer so you can use Cyclops F/X software. Use a serial connector for a PC, ADB connector for a Macintosh. 2 COMPUTER IN Connects computer video to the projector.
CONNECTING POWER TO THE PROJECTOR The power cord receptacle, AC POWER switch, and circuit breaker are located below the connector panel of the projector. Serial Computer In Monitor Out S-Video Video In O L R In–Audio–Out 10 A M P I AC Power Switch Circuit Breaker Power Receptacle Figure 1-5 Power receptacle, AC Power switch, and circuit breaker reset switch 1 Plug the appropriate power cord into the power receptacle on the side of the projector.
CONNECTING YOUR COMPUTER Connecting Notebook Computers Use the appropriate cable and adapter to connect your notebook computer to the projector. Video Output Port Computer In Monitor Out S-Video Video In L R In–Audio–Out MA CP C II U Serial MAC - VGA Adapter Computer In Port VGA Cable Figure 1-6 Notebook connections NOTE: If you are using an Apple PowerBook, attach the Mac - VGA cable adapter to the computer’s Video Output port (or video adapter cable).
Connecting PCs To Projector Figure 1-7 VGA VGA Use the included VGA video cable to connect your PC to the projector’s COMPUTER IN port. If you want to use your monitor and Lightbook projector at the same time, use your existing monitor cable to connect the projector to the monitor.
Connecting Macintosh Computers MAC Use the video adapters shown below to connect a Macintosh computer and monitor to the Lightbook projector. From Mac CPU To VGA Cable MAC Mac – VGA Cable Adapter To Mac Monitor Cable From Projector MONITOR OUT VGA– Mac Monitor Adapter Figure 1-9 The Macintosh adapters Use the cable adapters and supplied VGA video cable to connect the projector to your Macintosh computer.
1 Unplug the Macintosh monitor cable from the computer. 2 Plug the end of the supplied VGA video cable with the large, round collar into the COMPUTER IN port on the projector. Attach the VGA end of the Mac - VGA cable adapter to the other end of the VGA video cable. 3 Plug the Mac end of the Mac - VGA cable adapter into the Macintosh video port. 4 Connect the audio source to the AUDIO IN port.
CONNECTING COMPUTER AUDIO Use the composite audio cable to connect your audio source to the AUDIO IN port on the projector. R Figure 1-11 In–Audio–Out Audio In port 1 Insert one end of the computer audio cable into the Audio Out port of a Macintosh or the sound card of a PC. 2 Insert the other end into the projector’s AUDIO IN port. NOTE: Although both AUDIO and AUDIO IN may be connected at the same time, only one can be active. If computer video is selected, AUDIO IN is active.
CONNECTING AN S-VIDEO SOURCE To connect an S-Video source, use the supplied S-Video cable (see page i-2) instead of an RCA cable connection for the video source. The S-Video cable has identical, round, 4-pin mini-DIN connectors on both ends. S-Video Video In Figure 1-13 R L The S-Video port To connect an S-Video source: 1 Insert one end of the S-Video cable into the mini-DIN Video Out port on the video source. 2 Insert the other end of the S-Video cable into the projector’s S-Video port.
NOTE: Although both L-AUDIO-R and AUDIO IN may be connected at the same time, only one can be active. If computer video is selected, AUDIO IN is active. If NTSC/PAL/SECAM/S-Video is being viewed, the L-AUDIO-R ports are active. If your TV audio source outputs only monaural audio, your projector will provide simulated stereo audio. Connect the audio source to the left AUDIO port and set the stereo mode to mono using the Audio menu.
CONNECTING TO THE SERIAL/ADB PORT Use the SERIAL port to connect the projector and the computer in order to use the optional Cyclops F/X software. Serial Figure 1-16 Computer In The Serial port 1 Connect one end of the serial cable to the projector’s SERIAL port. 2 Connect the other end of the cable to the computer: • On a PC, connect the computer end to a serial port. • On a Macintosh, connect the computer end to an ADB connector.
Chapter 2 Using the Lightbook Projector OPENING THE PROJECTOR 1 Press both gold buttons on the projector’s sides. Figure 2-1 Opening the projector 2 Pull the top assembly up and forward. It will click into place. NOTE: The and completely open. indicators will both flash if the projector is not 3 Lift the gold lens door latch. The lens door will pop open and the lens will extend.
TURNING ON THE PROJECTOR 1 Move the AC POWER switch to the ON position. The keypad lights up and the lamp turns on. The projector will beep once. NOTE: Make sure to turn the projector on before you power up the computer. This allows the computer to sense the projector during its startup sequence. O I Figure 2-3 10 A M P Projector power switch 2 Next, turn on your computer. If you turn the projector off while the rest of your computer system is running, your external monitor will go blank.
CORRECTING A KEYSTONED IMAGE The image may become distorted when you elevate the front of the projector. 800 600 400 200 0 APR MAY Keystoned Images Figure 2-5 JUN JUL Correct Image Keystoned and square images 1 Move the keystone correction lever forward or back to adjust the shape of the image. Figure 2-6 Correcting the keystoned image TURNING OFF THE PROJECTOR 1 Press the key to turn the lamp off. 2 Let the projector cool until the fans turn off and then turn the AC POWER switch off.
CLOSING THE PROJECTOR 1 Close the lens door latch. Figure 2-7 Closing the lens 2 Press both gold buttons to release the top assembly. Figure 2-8 Releasing the projector top 3 Gently press down and pull back on the assembly until it clicks into place.
CONTROL PANEL KEYS Use the control panel keys to turn the lamp on or off, adjust the projected image, and to display and hide the menu. 1 6 Source 2 7 Setup 3 Menu 5 Figure 2-9 4 Control Panel keys KEY(S) 1 FUNCTION Controls the menu and adjusts screen position. 2 Source Switches through the video inputs. 3 Setup Activates the Setup menu. 4 Menu Displays or hides the menu. 5 Turns the lamp on or off. 6 Adjusts the volume up or down.
Lamp The key is used to turn the lamp on or off. Use this key when you want to present information without displaying the computer or video image, or to turn the lamp off to allow the projector to cool. When you turn the lamp on, the fans will run at a higher speed. NOTE: If the lamp is off, you can still use the VOLUME and MUTE keys to adjust the audio. Arrows The keys allow you to: • Make small adjustments in the position of the projected image.
Setup Setup Press the key to display a series of Setup menus. The projector will display the slide bars in sequence to help you adjust the image. For example, if you are connected to a computer source, the SETUP key will cycle through slide bar adjusters for Contrast, Sync, and Image Position. Setup NOTE: If no video source is present, the Help screen will appear when you press Setup. Contrast Contrast Figure 2-10 Sample Setup slide bar Press or to adjust the selected item.
CONTROL PANEL INDICATORS These indicators provide important status information about your projector. Over-Temperature Replace Lamp Source Setup Menu Figure 2-11 Lightbook projector’s control panel indicators INDICATOR FUNCTION Glows red to warn of an over-temperature condition. Flashes quickly if the projector is not completely open. Flashes slowly if the spare lamp burns out. Glows red when the active lamp burns out. Flashes quickly if the projector is not completely open.
After the projector returns to its normal operating temperature, turn the main power switch off and back on to clear the over-temperature indicator. NOTE: The remote control’s /O key will not function after an over-temperature condition until the main power switch is turned off and on. Projector Not Open Both the and indicators will flash quickly if the projector is not completely open. Make sure that the projector locks into the open position.
USING THE CYCLOPS REMOTE CONTROLS The Cyclops® Remote Control contains all the key functions available on the projector control panel as well as several additional features. The Cyclops Quick Remote allows you to control several of the projector’s most popular features. For best results, aim the remote control at the projection screen or at the projector’s front panel. Do not obstruct the red infrared eye located on the front of the projector.
Cyclops Remote Control KEY FUNCTION MUTE Turns audio on or off. – VOLUME + Decreases or increases the volume of internal and external speakers. /O Turns the lamp on or off. MENU Displays or hide the menu. SOURCE Switches between connected sources. SETUP Displays the Setup menu (see page 2-7). PROG1 Programmable key (see page 2-23). PROG2/ Programmable key (see page 2-23). Acts like an arrow key or mouse click. Press the edges to move the screen cursor.
OPERATING MODES The Lightbook projector can operate in Local or Host mode. Local Mode Any time you activate the projector’s menus or the drawing tools, the projector is in Local mode. In Local mode, the remote control can be used for projector menu and draw functions only. It does not communicate with the computer, even if it is attached through the SERIAL port. In Local mode, the remote control can be used to: • Select items in the projector menus. • Control the drawing cursor.
Using the Main Menu Press MENU to display the Main menu. To turn the menu off, press MENU again. Menus Tools Input Source Image Audio Fine Audio Preferences Advanced Help Figure 2-13 Main menu The menu displays only those items that are relevant to the current input source (computer, video, or S-Video). The following table lists the Main menu options: MENU ACTIONS Tools Selects a projector tool. Input Source Selects a video source and adjusts the settings of an incoming signal.
Selecting a Tool The Tools menu is used to set up and activate: • The LightBoard™, WhiteBoard and BlackBoard tools. • The Timer. • The Reveal function. Menus Tool Select Tools Cancel Select Input Source Menu Image LightBoard Audio WhiteBoard Fine Audio BlackBoard Preferences Timer Advanced Reveal Help Figure 2-14 Tool Select menu Use the ▲ and ▼ keys to select a tool. Press to select it or to cancel it.
Draw Tool Bar The Draw tool bar has four options: Pencil Click to select the Pencil tool. Eraser Click to select the Eraser. You can erase portions of your highlights. Clear All Click to erase all previous highlighting. New Color Click to select a new color. This button also shows the currently selected color. Choosing a Color 1 Click New Color or the down arrow in the upper right corner of the Draw tool bar to display the color palette.
4 To draw, click and hold the center of the MouseDisk at the desired starting point for about 2 seconds to lock it. Then, press the edges of the MouseDisk to move the Pencil tool and draw on the screen. 5 To exit Draw, click the small box in the upper left corner of the Draw tool bar. You can move the Draw tool bar to another location on the screen. With the remote control, click and hold the center of the MouseDisk with the cursor on the top of the tool bar.
Reveal Use this feature to slowly reveal a screen for greater audience impact. 1 Choose Reveal and press the 2 Use the ▲, ▼, Figure 2-18 or key to select it. keys to gradually display the image. Blue Screen Blue Screen Reveal Up Reveal Down Blue Screen Blue Screen Reveal Left Reveal Right Reveal patterns Input Source Menu The Source Mode box indicates which video source has been detected by the projector.
Changing the Input Video Source Your Lightbook projector will check the connections and automatically select a size, position, and sync setting for any connected device. 1 To change the input source, use the box. key to move to the Source Select 2 Press the ▲ and ▼ keys to select Computer or Video. NOTE: There will be a brief delay before the source changes. Changing the Source Mode Your Lightbook projector automatically senses the type of device connected to each input port.
Image Menu The Image menu displays a series of adjustment slide bars with the current settings. Use the ▲ and ▼ keys to move the bars up or down to adjust the settings. NOTE: The menus vary according to the current input source. Computer Source Menus Contrast Sync Pixel Skip Save To Tools Cancel Select Input Source None Selected Image Custom#1 Audio Custom#2 Fine Audio Custom#3 Preferences More...
The following table lists all of the available settings for the Image menu. Use the ▲ and ▼ keys to change them. ADJUSTMENT FUNCTION SOURCE Contrast Increases or decreases the contrast level All sources of the image. Sync Helps reduce uneven horizontal Computer features, such as lines of text, streaks or shimmering in the image, or vertical black lines that may appear on the screen. Pixel Skip Adjusts the image for text mode.
Audio Menu Use this menu to select an audio source, adjust the volume, or to select speakers. Menus Volume Mute Speaker Enable Tools Off Both Input Source On Ext. Only Image Audio Fine Audio Preferences Advanced Help Figure 2-21 Audio menu MENU ITEM SETTING Volume Raises or lowers the speaker volume for the selected source. Mute Mutes the speaker sound. Speaker Enable Selects internal and external (Both) or external speakers only (Ext. Only).
Fine Audio Menu Menus Balance Tools L Treble Bass Stereo Stereo Mono Input Source Image Audio Fine Audio Preferences Advanced Help R Figure 2-22 Fine Audio menu MENU ITEM SETTING Balance Adjusts the balance between the left and right speakers. Treble Adjusts the treble. Bass Adjusts the bass. Stereo Select stereo when playing a stereo source from both left and right audio inputs. Select Mono when using a monaural source for simulated stereo output.
Simulating Stereo While Using a Monaural Source 1 Open the Fine Audio menu. Select the Stereo menu, and then select Mono. 2 Press MENU to exit. NOTE: If you are using a monaural source, it must be connected to the L-AUDIO input. Preferences Menu Use this menu to tailor the projector to your personal presentation style. Menus Prog. Key1 Prog.
Advanced Menu Use the Advanced menu to adjust the projector settings to suit a particular presenter’s style and taste.
Help Menu Select Help from the Main menu to display connection diagrams for your PC, Macintosh, or video source. Help Topics PC Mac Video Figure 2-25 Help menu 1 Press ▲ or ▼ to select the item you want Help on. Press item, or to cancel.
Chapter 3 Cyclops F/X Your projector comes with Cyclops F/X — software effects that you can use to make your presentations more interesting and effective. For example, you can use the Spotlight to call attention to specific areas on the image, use the Zoom or Magnify effects to focus on important information in the image, or use See-it/Show-it to preview images on your computer without distracting your audience.
INSTALLING CYCLOPS F/X Follow these steps to install the Cyclops F/X software: 1 Insert the disk labeled Proxima Cyclops F/X into your computer’s floppy drive. 2 Do one of the following: • In Windows 95, choose Start, Run, then type a:\setup.exe (or the drive letter for your floppy drive). • In Windows 3.x, choose File, Run, then type a:\setup.exe (or the drive letter for your floppy drive).
The main screen of the F/X program appears: Figure 3-2 Cyclops F/X special effects On the left side of this window is a list of the special effects. The Assignments area in the middle of the window provides options that allow you to customize your remote and software. NOTE: If you open a menu, or if you're using the LightBoard tool, Cyclops F/X will be suspended. ASSIGNMENTS AREA The Assignments area displays the custom remote keys and their current assignments.
The Assignments area also contains five buttons: BUTTON FUNCTION Setup Remote Lets you switch the assignments display between the included Cyclops remote control and the optional Cyclops wand or laser pointer. Put Away Minimizes the F/X screen. Edit Effect Allows you to assign a shortcut key to the effect. You can also use this option to customize an effect. Projector Setting Allows you to adjust image, audio, and general settings on your projector.
NOTE: To access effects that are assigned to the Prog 1 and Prog 2 keys, assign the settings for those keys (in the projector's Preferences menu) to Host. USING THE CYCLOPS INTERACTIVE POINTER SYSTEM You can use the Cyclops interactive pointer system with Cyclops F/X. To set up the software, click Setup Remote in the Assignments area of the mains screen. Choose Cyclops Wand or Laser Pointer.
Click on the Edit Navigation Bar button. The following screen appears: Figure 3-4 Edit Cyclops Navigation screen Use this screen to assign different options to the navigation bar. To assign a new function to the navigation bar, click the Next or Previous areas and assign a function using the list boxes to the right. You can also use this screen to define where the navigation bar will appear on your display. The default is Lower Left.
SEE-IT/SHOW-IT See-it/Show-it is a feature of Cyclops F/X that previews the next slide in your presentation on your computer monitor—without switching from the slide your audience sees. The See-it/Show-it feature displays the image, along with a timer that counts down on your computer monitor until See-it/Show-it displays the next slide. You can use See-it/Show-it to preview slides so that you can interact with your audience, while preparing for the message on the next slide.
FREEZE The Freeze option freezes the image on your projector so you can use your remote to control your computer. This might be handy when you want to perform functions on your computer without distracting your audience from your presentation. To edit the Freeze key settings, click the Edit Freeze Key option in the Assignments area. The following screen appears: Figure 3-6 Edit Freeze Key screen To use Freeze: 1 Press PAUSE on your Cyclops remote. 2 Use any of the remote keys to control your computer.
STARTING AN EFFECT Once you’ve customized an effect, you’re ready to use it. 1 Before the presentation, start Cyclops F/X, then minimize the main screen. 2 During your presentation, press the key or button that you assigned to each effect to start the desired effect. THE PRESENTATION EFFECTS The following are the Presentation Effects. To end any of the effects, press the Esc key on your keyboard or the key on remote that you assigned for that effect.
Magnify enlarges a rectangular area around the mouse pointer. You can choose from three levels of magnification (200%, 400%, or 800%). NOTE: To enlarge the entire screen, use the Zoom effect. Next/Previous advances to the next or previous slide. Object allows you to draw rectangles, squares, ellipses, and circles. You can change the color and width of each shape. Refresh repaints the projected image. Use this feature to erase "remnants" of Stamp and Telestrator effects.
Title Screen projects an image from a .BMP file. You can use this effect to show a predefined image with transition effects during a presentation. You can also play an associated sound. Just specify which file to play and indicate whether to play it when the image appears or continuously. Zoom enlarges the entire image to 200%, 400%, or 800% of its original size. You choose whether to show the mouse pointer during a Zoom and indicate the level of magnification.
Options menu The Options menu offers commands that allow you to set up assignments on the remote, wand, or laser pointer, change the look and feel of the cursor, and change the COM port settings. MENU ITEM FUNCTION Setup Remote Allows you to display the assignments area for the Cyclops remote control or the optional Cyclops wand or laser pointer. Cursor Options Changes the look and feel of the cursor.
Chapter 4 Maintenance CHANGING THE LAMP Follow these steps to change the lamp when the primary bulb burns out: 1 Press the key to turn the lamp off. Allow the fans to cool the lamp until the fans stop. 2 Turn the projector on its back. 3 Lift the tab and pull the lamp assembly up and out. Rotate the assembly and place it back in the projector. Figure 4-1 Changing the lamp NOTE: Some lamps may fail without turning on the indicator.
REPLACING A BULB 1 Pull the lamp assembly out as shown in Figure 4-1. 2 Pull the bulb out. Insert a new bulb, being careful to avoid bending the pins. NOTE: Avoid touching the bulb with your fingers. Oils from your hands can shorten the bulb life. Use a soft cloth to handle the bulb. Figure 4-2 Removing a bulb 3 Replace the lamp assembly as shown in Figure 4-1. CLEANING THE LENS From time to time, you’ll need to clean the lens. 1 Take a piece of lens tissue and form it into a loose swab.
CLEANING THE FAN FILTER Clean the fan filter every 6 months. Clean it more often if the projector is used in dusty environments. 1 Turn the projector over. 2 Wipe the filter off, or use compressed air to blow off any dust that has accumulated on it. Figure 4-3 The Lightbook front filter CHANGING BATTERIES – CYCLOPS REMOTE To install or change the two AAA alkaline batteries in the remote control unit: 1 Locate the battery compartment at the lower rear of the case.
CHANGING BATTERIES – CYCLOPS QUICK REMOTE The Cyclops Quick Remote uses two 357A alkaline batteries. 1 Locate the battery compartment at the lower rear of the case. Press the corner down and slide it off. 2 Remove the old batteries and replace them with new ones. Make sure to align the batteries in the proper orientation. 3 Replace the battery cover.
Chapter 5 Troubleshooting PROBLEM LIKELY CAUSE POSSIBLE SOLUTION(S) No image projected No power to projector. Turn power ON. Check AC cord. Check power to electrical outlet. Lamp not on. Turn lamp ON. Lamp burned out. Replace lamp. Projector not completely Push top assembly up and open. forward. Circuit breaker tripped. Correct overload situation; press circuit breaker reset button. Over-temperature indication. Allow projector to cool; turn projector OFF and then ON.
PROBLEM LIKELY CAUSE POSSIBLE SOLUTION(S) Displayed image Projector not placed at a Adjust position of the not square proper angle to projection projector and the screen. (keystoning) screen. Use the Keystone Adjustment lever. Projected image Projection lens not focused. Adjust the focus. out of focus Projected image Projector too far from screen. Move projector closer to screen. larger than screen Projected image Projector too close to screen.
PROBLEM LIKELY CAUSE POSSIBLE SOLUTION(S) Getting excessive CONTRAST and/or Adjust CONTRAST and/or white or washout BRIGHTNESS too high. BRIGHTNESS. Black and white Video signal ambiguous. Adjust Tint or Saturation. Audio source(s). Make sure that the audio source image from color SECAM input No audio is turned on and functioning properly. Loose/improper cabling. Check and secure cabling between audio source(s) and projector. Over-Temperature Air vent(s) clogged.
WHERE TO GET HELP If you need help: 1 Check the Troubleshooting Chart. 2 Call your dealer’s technical support line and explain your problem. 3 Call Proxima at: USA. and Canada: (619) 457-5500. Press 1 for Customer Service. (619) 457-8542 (Fax) Outside USA and Canada: (619) 457-5500. Press 1 for Customer Service. (619) 622-0173 (Fax) Europe: +31 -43-358 5200 +31-43-358 5201 (Fax) Internet (WorldWide Web) http:\\www.prxm.
ORDERING PARTS Please order replacement and accessory parts through your local reseller, or call Proxima at: USA and Canada (800) 447-7694 or (619) 457-5500 Press 1 for Customer Service Fax: (619) 457-8542 Europe +31-43-358 5200 Fax: +31-43-358 5201 Outside USA and Canada (619) 457-5500 Press 1 for Customer Service Fax: (619) 622-0173 Troubleshooting 5-5
Appendix A Specifications Color 16.
Appendix B Accessories and Parts REPLACEMENT PARTS PART PART NUMBER Lamp L82 Cyclops Remote Control 080-01101-1 Cyclops Quick Remote Control A85 Power Cord - US C1002-10 Power Cord - Europe C1001-10 Power Cord - United Kingdom C1004-10 Power Cord - Italy C1003-10 VGA Video Cable C951-6 VGA - Mac Adapter C922 Mac - VGA Monitor Adapter C924 S-Video Cable C466-6 Computer Audio Cable C498-6 Serial Cable C936-6 Mini-jack to RCA Cable Adapter C5105 Macintosh ADB Cable C4070-6 Comp
OPTIONAL ACCESSORIES B-2 Appendix B OPTION PART NUMBER Deluxe Soft Carrying Case A261 Deluxe Soft Case for Laptop A262 Rolling Hard Case A263 MicroSaver® Security Cable K100
Index A AC Circuit Breaker i-5, 1-3 AC Plug i-5, 1-3 AC Power i-5, 1-3 AC Power Switch 1-4 Accessories B-2 ADB (Serial) Port i-5, 1-3 ADB (Serial) Port Connection 1-12 Advanced Menu 2-24 Arrow Keys i-6, 2-5, 2-6 Audio Connecting from a composite video sourc 1-10 Muting 2-22 Audio In Port i-5, 1-3, 1-9 Audio Menu 2-21 Audio Menus Using 2-22 Audio Out Port i-5, 1-3, 1-11 External Speaker System Connection 1-11 External Stereo System Connection 1-11 Audio Port Connecting the Source 1-9 Monaural or Stereo Sourc
Main Menu 2-13 Main Menu Options Table 2-13 Maintenance Changing Quick Remote Batteries 4-4 Changing Remote BatteriesControl Batteries 4-3 Fan Filter 4-3 Lamp Assembly Replacement 4-1 Lens Cleaning 4-2 Menu Key i-6, 2-5, 2-6 Remote Control 2-11 Menus 2-12 Monitor Out Port i-5, 1-3 Mouse Disk Remote Control 2-11 Mute Audio Menu 2-21 Mute Key Remote Control 2-11 N Notebook Connecting i-7 Video Connection 1-5 NTSC Connecting i-10 PC Help Screen 2-25 Pixel Skip 2-7 Power Cord Receptacle i-4 Power receptacle 1
T Timer Menu 2-16 Tint 2-7 Image Menu 2-20 Tool Select Menu 2-14 Tool Selection 2-14 Choosing a Color 2-15 Draw Tool Bar 2-15 Tool Selection Menu Timer 2-16 Treble Fine Audio Menu 2-22 Troubleshooting 5-1 Help 5-4 Returning for Repair 5-4 Turning off the Projector 2-3 V VGA Video Cable 1-6 Video Connection Macintosh 1-7 Notebook 1-5 PC 1-6 Special Configurations 1-8 Video In Port i-5, 1-3 Composite Video Connections 1-9 Volume Audio Menu 2-21 Volume Key 2-6 Remote Control 2-11 Volume Keys i-6, 2-5 W White