
Service manual


23
CP-SX1350(P5SX+)
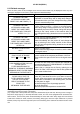
Replacing the Lens
1. Slide the lamp cover lock to unlock the lamp
cover and then grasp the projecting part of the
lamp cover to lift it open.
2. Remove the two screws on the bottom of the
projector and then pull off the front panel.
3. Loosen the screw on the lens door.
Lens door
4. Remove the lens.
(1) Open the lens door.
(2) Press the lens release lever.
(3)
Rotate the lens counterclockwise and pull it
out.
(1)
(2)
(3)
Detailed drawing
of the lever
Important instructions when removing the lens:
1.
Do not touch the prism area at the rear of the lens.
2. Do not touch the terminals.
3. Do not pull the wires.
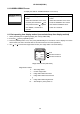
5. Mount the replacement lens.
(1) Align the red mark on the lens with the red
mark on the lens holder and insert the lens
into the holder.
(2) Turn the lens clockwise until a click is heard,
Attach the lens so that the red mark on the
lens and the green mark on the holder are
aligned.
(3) Confirm that the lens is securely locked.
(4) After replacing the lens, make sure that the
connector for the shift motor is firmly set in
place.
Connector for
the shift motor
(2)
(3)
6. Close the lens door and tighten its screw.
7. Reattach the front panel.
8. Reattach the lamp cover to complete the lens
replacement.
(1) Align the two tabs on the lamp cover with the
receiving areas on the projector.
(2) Press the lamp cover into place.