
Int'l. user's manual PCA-2 Preamplifier
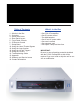

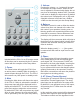

Quick Start Guide
1. Place the PCA-2 in a rack or on a shelf in the
audio/video system.
2. Turn off all associated components
3a. Connect the left and right analog audio out-
puts from all audio/video source equipment to
any of the inputs labeled 1-7 on the back of the
PCA-2. Use input 1 for XLR type connections
and inputs 2-7 for RCA type connections.
For a complete list of input names see appendix
A.
3b. Connect the left and right analog audio out-
puts from the back of the PCA-2 to the inputs of
an audio amplifier. Use XLR type connectors if
XLR inputs are available on the amplifier.
There are 2 pair of both XLR and RCA outputs.
There is no sonic difference between each pair
of outputs.
4. Plug the PCA-2 into the wall AC outlet. Use
the supplied AC power cable, or an aftermarket
power cable. For optimum results we recom-
mend the use of a PS Audio xStream Power
Cable.
5. Once the PCA-2 is connected to power, the
PCA-2 will initiate a countdown sequence from
30 seconds. During this time the PCA-2 is initial-
izing its internal circuitry.
6. The PCA-2 will default to the 1st input (1 XLR)
when it is ready for use.
7. Use the Input Up/Down buttons to select the
desired input and slowly raise the volume level
using the front panel knob or the included IR
remote control to a comfortable setting.
Default Settings
The PCA-2 comes from the factory with standard
default settings that should work well for most
situations. There are 25 custom setup param-
eters which can be adjusted by the user as well
as custom input names for all 7 inputs.
* The PCA-2 does not include a phono preampli-
fier stage. To connect a turntable, use a phono
peamplifier.
3