Owner’s Reference Stellar Strata Amplifier ™ ®
Table of Contents ® Safety Information Introduction Thank You Contact Information Symbols Found On the Stellar Strata Getting Started Included With the Stellar Strata The Remote Front Panel View Rear Panel View Installation Considerations Plugging In The Power Cable Country Specific AC Voltages Analog Inputs Analog Outputs Digital Inputs Digital Inputs (continued) Connecting the Speaker Cables Connecting a Subwoofer Powering on Your Stellar Strata Idle Mode Trigger Output Operation Guide Power up Transie
Table of Contents ® Stellar Strata Amplifier Menu Features 15 Balance Phase Filter 15 15 16 Version Audio Sub Menu Input Names Volume Trim Headphone Trim 17 17 17 18 18 Speaker Maximum Volume Analog 3 Fixed Volume System Sub Menu Trigger Delay Backlight 18 19 19 19 19 Display Timeout Display Metadata PS Audio Access Update Factory Reset 20 20 20 21 21 Network Sub Menu Network Status Wi-Fi Wi-Fi Wi-Fi Setup Network Select 21 21 22 22 22 22 Router Accept Screen Password Screen 21 23 Specificat
Safety Information Stellar Strata Amplifier ® Important Safety Instructions READ AND FOLLOW ALL INSTRUCTIONS HEED ALL WARNINGS WARNING: TO REDUCE THE RISK OF FIRE OR ELECTRICAL SHOCK, DO NOT EXPOSE THIS APPARATUS TO RAIN OR MOISTURE. OBJECTS FILLED WITH LIQUIDS, SUCH AS VASES, SHOULD NOT BE PLACED ON THE APPARATUS. THIS APPARATUS MUST BE CONNECTED TO A MAINS AC OUTLET WITH A PROTECTIVE GROUND CONNECTION. Clean only with a dry cloth. Do not place flammable material on top of or beneath the unit.
Introduction Stellar Strata Amplifier ® Thank You Thank you for purchasing PS Audio’s Stellar Strata Amplifier. This is your comprehensive Operator’s Guide, intended to provide a full overview of the Stellar Strata Amplifier’s functions and capabilities. It is our intention to provide you with full details about the Stellar Strata Amplifier and to answer any and all questions you may have.
Getting Started ® 5 Stellar Strata Amplifier
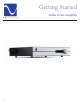
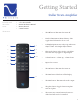
Getting Started Stellar Strata Amplifier ® Included With The Stellar Strata • • • • 6-foot Power Cable Owner’s Reference Manual Remote Control 2 AAA batteries The Remote 1 7 2 8 3 9 4 10 1 The Off button. This turns the Strata off. 2 Fixed Volume Button (Home Theater). This toggles Fixed Volume mode on or off. 3 Left/Right/Up/Down arrow keys. Up and Down adjust volume. Left / Right adjusts balance. 4 Filter mode button. Select F1, F2, or F3 filters.
Getting Started Stellar Strata Amplifier ® Front Panel View 1 Logo/ Power On/Off Button 2 Input Select and Menu Button 3 IR sensor 4 Display 5 Volume Knob 6 Headphone Output 1 2 3 7 4 5 6
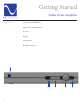
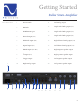
Getting Started Stellar Strata Amplifier ® Rear Panel View 1 1 Power switch 11 Left analog output 2 IEC inlet 12 Single ended analog input (# 3) 3 USB firmware port 13 Single ended analog input (# 2) 4 Network input (# 9) 14 Single ended analog input (# 1) 5 USB audio input (# 8) 15 Right balanced analog input (# 1) 6 Optical input (# 7) 16 Left balanced analog input (# 1) 7 COAX inputs (# 5 & 6) 17 Right negative speaker output 8 I2S input (# 4) 18 Right positive speaker
Getting Started ® Installation Considerations Stellar Strata Amplifier Location Once your new Stellar Integrated Amplifier is unpacked, you will need to find a convenient place to set it. A good locations in a cabinet or on a shelf at an easily accessible height. The IR (infrared) receiver for the remote is located to the left of the display screen. A direct line of sight will help with Stellar Strata Amplifier’s IR sensor.
Getting Started ® Analog Inputs Stellar Strata Amplifier Refer to the picture of the back panel on page eight. The Stellar Strata Amplifier has three stereo analog inputs that can be used to connect analog sources such as phono preamplifiers, tuners, and tape decks. Input #1 has both balanced (XLR) and unbalanced (RCA) connectors.
Getting Started ® Digital Inputs, Continued Stellar Strata Amplifier Inputs #5 and #6 are coaxial S/PDIF inputs. These inputs are compatible with a wide variety of sources. The coax inputs can accept up to 192KHz 24 bit PCM. The Stellar Strata Amplifier cannot accept DSD or DoP signals on the coax inputs. Input #7 is an optical S/PDIF input. This is similar to the coax inputs except the signal is delivered over an optical cable.
Getting Started ® Connecting The Speaker Cables Stellar Strata Amplifier The Stellar Strata Amplifier uses custom machined connectors. These connectors accept spade, banana, or wire connections. WARNING! Never connect speaker cables while the amp is on. Turn off the amplifier using the switch on the back panel before making the speaker connections. Connecting a Subwoofer The Stellar Strata Amplifier is a balanced amplifier.
Operation Guide ® Stellar Strata Amplifier Power Up Transient Upon startup, it’s common to hear a small sound from the connected speakers. This is normal and is not harmful to the loudspeakers. Activating the Unit The PS Audio logo in the upper left corner of the Stellar Strata Amplifier serves to activate and disable the unit. Press the logo/button to activate your amplifier. The button will illuminate and the display will show the PS Audio logo for a moment.
Operation Guide ® Using the Remote Stellar Strata Amplifier All of the most-used functions can be operated from the included IR remote control. Idle Mode Use the “Off ” button to put the unit in Idle mode. Use the “On” button to return it to the operating mode. Volume and Balance There are two sets of volume buttons on the remote, and you may use whichever are more comfortable or convenient for you. One set is the bar with “-“ and “+” symbols on it.
Operation Guide ® Menu Features Stellar Strata Amplifier The Stellar Strata Amplifier features a menu display system that is accessible using the small selector button and the large silver knob. It’s a good idea to familiarize yourself with the different functions in the Stellar Strata Amplifier’s menu. To access the menu, simply press and hold the menu button to the left of the display. A gear icon will appear in the upper right corner showing that you are in the Settings menu.
Operation Guide ® Menu Features (Continued) Stellar Strata Amplifier Filter The filter selection feature allows you to choose the properties of the digital filter in the Strata’s built-in DAC. The filter selection does not affect the analog sources. Digital filters generally have a trade-off between how sharp the filter is and how much ringing results. A sharp filter allows the most high-frequency signal to pass through, but at the expense of greater ringing.
Operation Guide ® Menu Features (Continued) Stellar Strata Amplifier Version This menu display shows the versions of the Strata’s firmware. If you need to contact our customer service team for help with your unit, please have this information ready. More Settings There are additional, less often used features in the Settings sub-menus. The features are divided into three groups: Audio, System, and Network. Sub-menus are displayed on the screen with a triangle pointing to the right.
Operation Guide ® Menu Features (Continued) Stellar Strata Amplifier Volume Trim sub-menu (double press to open) This feature allows you to adjust the relative volume level of each input. This is useful if you have sources that are especially louder or softer than others. You can trim their volume so that changing inputs does not require a large compensating change to the volume setting. Each input can be adjusted up to 10dB higher or lower.
Operation Guide ® Menu Features (Continued) Stellar Strata Amplifier Analog 3 Fixed Volume The Fixed Input feature allows you to configure Analog Input #3 to always have the same fixed volume setting. This is useful if you are using the Stellar Strata Amplifier to power the front channels in a surround sound system. In this configuration, the output of your surround receiver would be connected to Analog Input #3. Set the Fixed Input volume setting to match your other speakers.
Operation Guide ® Menu Features (Continued) Stellar Strata Amplifier Display Timeout The Display Timeout feature behaves like a screen saver on your computer. After a set amount of time of no activity, the display will go dark. The choices are: None (feature disabled), Auto, 10 seconds, 30 seconds, 1 minute, 5 minutes, or 10 minutes. In the Auto mode, the display will be activated by the music and the display will go dark after 3 minutes of nothing playing.
Operation Guide ® Menu Features (Continued) Stellar Strata Amplifier Update sub-menu (double click to open) This feature will automatically update the firmware in the Strata. The firmware will be downloaded over your network so the unit will need to be connected to the internet via Cat 5 or Wi-Fi. Factory Reset sub-menu (double click to open) This feature allows you to reset all of the configuration settings back to what they were when the Strata was shipped from the factory.
Operation Guide ® Menu Features (Continued) Stellar Strata Amplifier Wi-Fi Enable This feature allows you to enable/ disable the wireless (Wi-Fi) functionality. Rotate the volume knob to turn the Wi-Fi on or off. Wi-Fi WPS This feature is for using WPS, or Wi-Fi Protected Setup, to configure your Strata with your network without the need to enter passwords. Use this menu to activate the WPS feature, then press the corresponding WPS button on your router.
Operation Guide ® Menu Features (Continued) Stellar Strata Amplifier SSID accept screen Available network resources are identified by their SSID. Rotate the volume knob to Accept or Cancel the AP SSID selection Password screen Rotate the volume knob to find each character. Press the menu select button to select the character. Double-press the menu select button to backup one character. Once the last character is entered long press the menu select button to save the password.
Specifications ® Stellar Strata Amplifier 24
Specifications ® Stellar Strata Amplifier General Color Options Black Silver Voltage Options Japan 100V (+/-10%) North America 120V (+/-10%) Europe/Asia 230V (+/-10%) Mains Power Input IEC C14 Fuses T250V-250mAH (1/4A Slow Blow) Accessories Included Remote Control Line cord(s) US (NEMA 5-15P) (all versions) Schuko (CEE7/7) (230V version) UK (BS1363) (230V version) Australia (230V version) Analog Audio Inputs RCA 3 stereo pairs
Specifications Stellar Strata Amplifier ® Mechanical Width 17.0” Height 2.8” (not including feet) Depth 12.0” (chassis only) 13.
Specifications Stellar Strata Amplifier ® Performance Unless otherwise noted, all measurements are specified under the following conditions: • Mains voltage 120VAC • Balanced analog input • Both channels operating • Volume set to 76 (unity gain) • 2.8VRMS output, 4Ω load. Analog Inputs Input Separation >85dB Input Impedance Unbalanced 47KΩ Balanced 100KΩ Maximum Input Level >16 VRMS Analog Output Output Impedance Gain Line Out 100Ω Volume = 100 6dB +/-0.
Specifications ® Stellar Strata Amplifier Headphone Output Gain (relative to line output) 16.5dB Output Power 300Ω, 1KHz, 1%300mW 16Ω, 1KHz, 1% 3.25W Frequency Response +/-1dB 7Hz – 40KHz THD 1KHz, 1 VRMS 300Ω <0.02% 16Ω <0.
Warranty Information ® Registering Your Product Stellar Strata Amplifier By registering your product, you are validating the start date of your limited warranty. This limited warranty is in effect for 3 years from the date the unit was first purchased from PS Audio or its dealers and agents. If you do not register your product within 30 days of service, a copy of your purchase receipt from an authorized PS Audio dealer may be used as proof of purchase to establish the warranty start date.
Warranty Information ® Stellar Strata Amplifier Limitations Under This Warranty In no event will PS Audio’s liability to you exceed the original purchase price of your unit. This warranty does not cover the cost of custom installation, customer instruction, setup adjustments, or signal reception problems. Consequential and incidental damages are not covered under this warranty.
Service Information ® Warranty Service Within North America Stellar Strata Amplifier Please contact PS Audio customer support for service assistance, help with locating an authorized PS Audio repair center, help with the operation of a product, or for more information. Obtaining An RMA Number In order to receive warranty service, you must first obtain a Return Merchandise Authorization Number (RMA#) prior to returning any item.
32
Your Product ® Your Serial Number Your Purchase Information Date of Purchase 33 Stellar Strata Amplifier
34