
User's Manual


UANPA10 V5.1 PSI Audio User Manual 6
4 Quick Start
We recommend that you spend some time setting up your monitoring speaker system.
Setting up naturally takes a certain amount of time. However, in case you need to get started quickly,
please follow the quick set up guide. The rest of this manual will assist you in setting up your loudspeaker
system and calibrate it according to your listening environment.
• Check that the voltage value on the AC power selector is set correctly (according to your local AC
power supply). If this is not the case, it will be necessary to adjust the main power supply with the
following procedure. Carefully squeeze the two latches on either side of the fuse plug and pull the
fuse holder out of its socket. Now replace the fuse for the different voltage setting with the correct
value fuse according to the required voltage. The correct value of the fuse is printed next to the On-
Off switch of your loudspeaker. Pull out the grey plastic cap which holds the fuse and turn it 180°
so it shows the correct voltage setting through the outer window when placed back in its position.
Now you can carefully push the complete fuse holder back into its place above the mains
connector.
• Connect the live cable whilst paying attention to the warnings mentioned under the chapter safety
instructions.
• Verify that no audio signal is being sent to the loudspeaker and turn the power switch to ON. The
green led on the front panel will now illuminate.
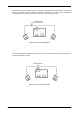
• Connect the audio source (line signal) from your mixer, preamplifier or other equipment to the XLR
connector at the rear.
• Turn the Level (input sensitivity) potentiometer fully clockwise.
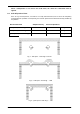
• Verify that the Roll-Off potentiometer is turned fully clockwise in order to provide a flat frequency
response to start with.
• Set the loudspeaker level potentiometer to the CAL position (CALIBRATED) and fade in the signal
source as required.
• Normal operating conditions will cause the red led to flash occasionally on peaks. We draw your
attention to the fact that this loudspeaker can produce pressure levels which may be harmful. PSI
Audio declines all responsibility for eventual hearing loss caused by the use of their loudspeakers.
5 Operation
5.1 Power ON LED (Green)
The green LED on the front panel shows that the loudspeaker is operational. In the event that this
LED does not light up, verify that the loudspeaker is connected to the AC power outlet and/or check
the fuse.
5.2 Overload / Overheat LED (Red)
The red LED indicates the operation of the internal limiter and during normal operation, the light
flashes when the modulation peak has reached a modulation peak of 1dB. If the LED flashes
regularly, this means that overload conditions are met and you should reduce the input level.
If the red LED stays continuously illuminated, this means that the amplifier is in overheated
conditions, and the components are at risk of being damaged. Turn off the AC power immediately.
Typical causes of overheat are lack of ventilation. Check that sufficient air flow is available around
your loudspeaker. Close proximity of overheated sources may also cause overheating.