
User Guide


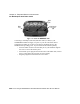

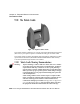

Table Of Contents
- WORKABOUT PRO Hand-Held Computer With Windows Mobile 2003 SE
- Program License Agreements
- Approvals And Safety Summary
- Introduction 1
- Basic Checkout 2
- Getting To Know The WORKABOUT PRO 3
- 3.1 Features Of The WORKABOUT PRO C
- 3.2 Features of the WORKABOUT PRO S
- 3.3 The Batteries
- 3.4 Switching The Hand-Held On And Off
- 3.5 The WORKABOUT PRO C Keyboard
- 3.6 The WORKABOUT PRO S Keyboard
- 3.7 The Display
- 3.8 Indicators
- 3.9 Monitoring The Battery And Maximizing Run Time
- 3.10 Uploading Data In A Docking Station
- 3.11 Bluetooth Radio
- 3.12 The SD/MMC Card-Adding Memory
- 3.13 General Maintenance
- Working With Windows Mobile 2003 SE 4
- 4.1 Navigating In Windows Mobile 2003 SE And Applications
- 4.2 Windows Mobile 2003 Desktop-Today Screen
- 4.3 Start Menu
- 4.4 New Menu
- 4.5 Managing Files And Folders
- 4.6 Using Menus
- 4.7 The Taskbar
- 4.8 Programs-Using Applications
- 4.9 Settings
- 4.10 Help
- 4.11 Entering Text
- Connecting To A LAN With 802.11b 5
- Settings 6
- 6.1 Personal Settings
- 6.2 Buttons Icon
- 6.3 Input
- 6.4 Menus
- 6.5 Owner Information
- 6.6 Password
- 6.7 Sound & Notifications
- 6.8 Today Screen
- 6.9 System Settings
- 6.10 About
- 6.11 About Device
- 6.12 Backlight
- 6.13 Certificates
- 6.14 Clock & Alarms
- 6.15 Memory
- 6.16 Power Icon
- 6.17 Regional Settings
- 6.18 Remove Programs
- 6.19 Screen Icon
- 6.20 Scanner Settings
- 6.20.1 Decoded (Internal) Scanners
- 6.20.1.1 Options - Decoded (Internal) Scanner
- 6.20.1.2 Data Options - Decoded (Internal) Scanner
- 6.20.1.3 Code 39
- 6.20.1.4 Code 128
- 6.20.1.5 EAN 13
- 6.20.1.6 EAN 8
- 6.20.1.7 UPC A
- 6.20.1.8 UPC E
- 6.20.1.9 UPC/EAN Shared Settings
- 6.20.1.10 Codabar
- 6.20.1.11 Code 93
- 6.20.1.12 Interleaved 2 of 5
- 6.20.1.13 MSI Plessey
- 6.20.1.14 Discrete 2 of 5
- 6.20.1.15 2D PDF-417 (not supported)
- 6.20.1.16 2D Micro PDF-417 (not supported)
- 6.20.1.17 2D RSS Code (not supported)
- 6.20.1.18 Composite (not supported)
- 6.20.2 Decoded (Intermec ISCP)
- 6.20.3 Imager
- 6.20.3.1 Options - Imager
- 6.20.3.2 Code 39 Settings
- 6.20.3.3 Code 128 Settings
- 6.20.3.4 UPC/EAN
- 6.20.3.5 Codabar
- 6.20.3.6 Code 93
- 6.20.3.7 Interleaved 2 of 5
- 6.20.3.8 Postal: Australian
- 6.20.3.9 Postal: Japanese
- 6.20.3.10 Postal: Korean
- 6.20.3.11 Postal: PlaNET
- 6.20.3.12 Postal: PostNET
- 6.20.3.13 Postal: Royal
- 6.20.3.14 2D DataMatrix
- 6.20.3.15 2D Maxicode
- 6.20.3.16 2D PDF-417
- 6.20.3.17 2D Micro PDF-417
- 6.20.3.18 2D QR Code
- 6.20.3.19 2D RSS Code
- 6.20.3.20 Aztec
- 6.20.3.21 Composite
- 6.20.4 Options Tab
- 6.20.5 Translations Tab
- 6.20.1 Decoded (Internal) Scanners
- 6.21 Wireless WAN
- 6.22 Total Recall
- 6.23 Connections
- 6.24 Setting Up A Network Card
- 6.25 Bluetooth Setup
- Programs 7
- 7.1 Games
- 7.2 ActiveSync®
- 7.3 Calculator
- 7.4 Calendar
- 7.5 Contacts
- 7.6 File Explorer
- 7.7 Find
- 7.8 Messaging-The Inbox
- 7.8.1 Folders
- 7.8.2 Synchronizing E-mail With Outlook
- 7.8.3 Changing Synchronization Settings
- 7.8.4 Mail Server Accounts-Creating, Editing & Deleting
- 7.8.5 Downloading Messages From A Remote Server
- 7.8.6 Replying And Forwarding Messages
- 7.8.7 Receiving Attachments
- 7.8.8 Creating And Sending A Message
- 7.8.9 Attaching A File
- 7.8.10 Deleting A Message
- 7.8.11 Storage Options
- 7.9 MSN Messenger
- 7.10 Notes
- 7.11 Pictures
- 7.11.1 Moving Photos To The WORKBOUT PRO
- 7.11.2 Opening A Photo
- 7.11.3 Deleting A Photo
- 7.11.4 Editing A Photo
- 7.11.5 Creating A Slide Show
- 7.11.6 Pocket Excel
- 7.11.7 Workbook Components
- 7.11.8 Moving Between Worksheets
- 7.11.9 Adding, Deleting And Renaming Worksheets
- 7.11.10 Entering Data In A Worksheet
- 7.11.11 Working With Cells, Rows and Columns
- 7.11.12 Creating Formulas
- 7.12 Pocket Word
- 7.13 Tasks
- 7.14 Terminal Services Client
- 7.15 Windows Media
- Expansion Modules 8
- Peripheral Devices & Accessories 9
- 9.1 Carrying Accessories
- 9.2 The Batteries
- 9.3 Chargers And Docking Stations
- 9.4 Desktop Docking Station
- 9.4.1 Charging A Battery Installed In The WORKABOUT PRO
- 9.4.2 Charging A Spare Battery
- 9.4.3 Battery Charge Duration
- 9.4.4 Charger LED Indicators
- 9.4.5 Troubleshooting The Charging Operation Of The Dock
- 9.4.6 Desktop Docking Station Ports
- 9.4.7 Linking A WORKABOUT PRO To A PC
- 9.4.8 Linking A WORKABOUT PRO To An Ethernet Network
- 9.4.9 Troubleshooting The Docking Station Operations
- 9.5 Single Battery Charger-Model #WA3001
- 9.6 Quad Battery Charger-Model #WA3004
- 9.7 Quad Docking Station-Model #WA4004
- 9.8 AC Wall Adaptor And Tether Cable
- 9.9 Cigarette Lighter Adaptor
- 9.10 The Vehicle Cradle
- 9.11 Bluetooth Peripherals
- Specifications 10
- Support Services And Worldwide Offices
- Port Pinouts

Chapter 9: Peripheral Devices & Accessories
Maintaining The Vehicle Cradle
300
Psion Teklogix WORKABOUT PRO With Windows Mobile 2003 SE User Manual
• To remove the unit, press firmly on the RELEASE button on the front face
of the unit until it releases from it latch. The hand-held will be slightly
raised so that it can be removed.
9.10.4 Maintaining The Vehicle Cradle
Two latches in the cradle hold the WORKABOUT PRO firmly in place. Although
these latches are designed for robustness and endurance, they will wear over time
and will no longer lock the hand-held securely in the cradle. For replacement parts
and instructions contact Psion Teklogix. Partial disassembly is required.
9.10.5 Powered Cradle Installation In High Voltage Vehicles
Warning: Voltages exceeding 60VDC are considered hazardous. For powered
cradle installations on vehicles with batteries above this voltage,
ensure the powered cradle power connector is mounted in a dry
location on the vehicle, or that the connector is insulated with an
appropriate waterproof material after installation. The connector
must also be installed out of the vehicle operator’s reach. Exposing
an accessible power connector to water or other liquids could create
a hazardous situation resulting in serious injury or death.
Installation of powered cradles in vehicles that operate above 60VDC require
special consideration.
Due to the hazardous voltages present on these vehicles, it is necessary to ensure
that the powered cradle power supply cable connector is not accessible to the
vehicle operator, and does not get exposed to water or other liquids. This can be
accomplished in one of the following ways:
• Ensure the power connector is installed in a dry location on the vehicle,
away from the vehicle operator’s reach (perhaps under a vehicle dash or in a
sealed housing).
• Cover the power connector with a waterproof heat shrink material.
• Wrap the connector securely with a waterproof electrical tape in an area out
of the vehicle operators reach.
All other installation requirements outlined in this document should also be
followed for High Voltage vehicles to insure safe installation and operation of the
powered cradle.