
Product Manual

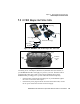
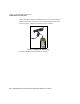

Table Of Contents
- WORKABOUT PRO Hand-Held Computer With Windows Mobile 5.0
- TABLE OF CONTENTS
- Program License Agreements
- Approvals And Safety Summary
- Introduction 1
- Basic Checkout 2
- Getting To Know The WORKABOUT PRO 3
- 3.1 Features Of The WORKABOUT PRO C
- 3.2 Features of the WORKABOUT PRO S
- 3.3 The Batteries
- 3.4 Switching The Hand-Held On And Off
- 3.5 The Keyboards
- 3.6 The Display
- 3.7 Indicators
- 3.8 Monitoring The Battery And Maximizing Run Time
- 3.9 Uploading Data In A Docking Station
- 3.10 Bluetooth Radio
- 3.11 The SD/MMC Card-Adding Memory
- 3.12 General Maintenance
- Working With Windows Mobile 5.0 4
- 4.1 Navigating In Windows Mobile 5.0 And Applications
- 4.2 Windows Mobile 5.0 Desktop-Today Screen
- 4.3 Start Menu
- 4.4 Managing Files And Folders
- 4.5 Using Menus
- 4.6 The Softkey Bar
- 4.7 Programs-Using Applications
- 4.8 Settings
- 4.9 Help
- 4.10 Entering Text
- Connecting To A LAN With 802.11 5
- Settings 6
- 6.1 Personal Settings
- 6.2 App Launch Keys
- 6.3 Buttons Icon
- 6.4 Input
- 6.5 Lock
- 6.6 Menus
- 6.7 Owner Information
- 6.8 Sound & Notifications
- 6.9 Today Screen
- 6.10 System Tab Settings
- 6.11 About
- 6.12 About Device
- 6.13 Backlight
- 6.14 Certificates
- 6.15 Clock & Alarms
- 6.16 COM Port Manager
- 6.17 Error Reporting
- 6.18 GPS - Global Positioning System
- 6.19 Manage Triggers
- 6.20 Memory
- 6.21 Power Icon
- 6.22 Regional Settings
- 6.23 Remove Programs
- 6.24 Screen Icon
- 6.25 Scanner Settings
- 6.25.1 Decoded (Internal) Scanners
- 6.25.1.1 Options - Decoded (Internal) Scanner
- 6.25.1.2 Decoded (Internal) Advanced Options
- 6.25.1.3 Decoded (Internal) 2D Scanning Options
- 6.25.1.4 Data Options - Decoded (Internal) Scanner
- 6.25.1.5 Code 39
- 6.25.1.6 Code 128
- 6.25.1.7 EAN 13
- 6.25.1.8 EAN 8
- 6.25.1.9 UPC A
- 6.25.1.10 UPC E
- 6.25.1.11 UPC/EAN Shared Settings
- 6.25.1.12 Code 93
- 6.25.1.13 Codabar
- 6.25.1.14 MSI Plessey
- 6.25.1.15 Interleaved 2 of 5
- 6.25.1.16 Discrete 2 of 5
- 6.25.1.17 RSS Code
- 6.25.1.18 Composite
- 6.25.1.19 PDF-417
- 6.25.1.20 Micro PDF-417
- 6.25.2 Decoded (HHP)
- 6.25.2.1 Options - Decoded (HHP) Scanner
- 6.25.2.2 Decoded (HHP) Advanced Options
- 6.25.2.3 Code 39
- 6.25.2.4 Trioptic Code
- 6.25.2.5 Code 128
- 6.25.2.6 EAN 13 Settings
- 6.25.2.7 EAN 8
- 6.25.2.8 UPC A Settings
- 6.25.2.9 UPC E Settings
- 6.25.2.10 UPC/EAN Shared Settings
- 6.25.2.11 Code 93
- 6.25.2.12 Codabar
- 6.25.2.13 MSI Plessey
- 6.25.2.14 Code 11
- 6.25.2.15 Interleaved 2 of 5
- 6.25.2.16 Matrix 2 of 5
- 6.25.2.17 IATA 2 of 5
- 6.25.2.18 Discrete 2 of 5
- 6.25.2.19 Telepen
- 6.25.2.20 RSS Code (Reduced Space Symbology)
- 6.25.2.21 PosiCode (Reduced Space Symbology)
- 6.25.2.22 Composite
- 6.25.2.23 TLC-39
- 6.25.2.24 PDF-417
- 6.25.2.25 Micro PDF-417
- 6.25.2.26 Code 16K
- 6.25.2.27 Code 49
- 6.25.2.28 Codablock
- 6.25.2.29 2D Data Matrix
- 6.25.2.30 2D QR Code
- 6.25.2.31 2D Maxicode
- 6.25.2.32 2D Aztec
- 6.25.2.33 Postal: PlaNET
- 6.25.2.34 Postal: PostNET
- 6.25.2.35 Postal: Australian
- 6.25.2.36 Postal: Canadian
- 6.25.2.37 Postal: China
- 6.25.2.38 Postal: Japanese
- 6.25.2.39 Postal: Kix
- 6.25.2.40 Postal: Korean
- 6.25.2.41 Postal: Royal
- 6.25.3 Decoded (Intermec ISCP)
- 6.25.3.1 Options - Decoded (Intermec ISCP) Scanner
- 6.25.3.2 Advanced Options - Decoded (Intermec ISCP) Scanner
- 6.25.3.3 Code 39
- 6.25.3.4 Code 128
- 6.25.3.5 EAN 13 Settings
- 6.25.3.6 EAN 8
- 6.25.3.7 UPC A Settings
- 6.25.3.8 UPC E Settings
- 6.25.3.9 UPC/EAN Shared Settings
- 6.25.3.10 Code 93
- 6.25.3.11 Codabar
- 6.25.3.12 MSI Plessey
- 6.25.3.13 Code 11
- 6.25.3.14 Interleaved 2 of 5
- 6.25.3.15 Matrix 2 of 5
- 6.25.3.16 Discrete 2 of 5
- 6.25.3.17 Telepen
- 6.25.3.18 RSS Code (Reduced Space Symbology)
- 6.25.3.19 PDF-417
- 6.25.3.20 Micro PDF-417
- 6.25.3.21 Codablock
- 6.25.4 Imager
- 6.25.4.1 Options - Imager
- 6.25.4.2 Advanced Options - Imager
- 6.25.4.3 Code 39 Settings
- 6.25.4.4 Code 128 Settings
- 6.25.4.5 EAN 13
- 6.25.4.6 EAN 8
- 6.25.4.7 UPC A
- 6.25.4.8 UPC E
- 6.25.4.9 Code 93
- 6.25.4.10 Codabar
- 6.25.4.11 Interleaved 2 of 5
- 6.25.4.12 RSS Code (Reduced Space Symbology)
- 6.25.4.13 Composite
- 6.25.4.14 PDF-417
- 6.25.4.15 Micro PDF-417
- 6.25.4.16 2D Data Matrix
- 6.25.4.17 2D QR Code
- 6.25.4.18 2D Maxicode
- 6.25.4.19 2D Aztec
- 6.25.4.20 Postal: PlaNET
- 6.25.4.21 Postal: PostNET
- 6.25.4.22 Postal: Australian
- 6.25.4.23 Postal: Japanese
- 6.25.4.24 Postal: Korean
- 6.25.4.25 Postal: Royal
- 6.25.5 Options Tab
- 6.25.6 Translations Tab
- 6.25.7 Ports
- 6.25.1 Decoded (Internal) Scanners
- 6.26 Total Recall
- 6.27 Connections Tab
- 6.28 Beam
- 6.29 Bluetooth Setup
- 6.30 Connections - Connecting To The Internet
- 6.31 Wireless Power Icon
- 6.32 Wireless Statistics
- 6.33 Wireless WAN
- Programs 7
- 7.1 Games
- 7.2 ActiveSync®
- 7.3 Calculator
- 7.4 Demo Imager
- 7.5 Demo Scanner
- 7.6 Download Agent
- 7.7 Excel Mobile
- 7.8 File Explorer
- 7.9 Internet Sharing
- 7.10 Notes
- 7.11 Pictures & Videos
- 7.12 Pocket MSN
- 7.13 Summit Client Utility
- 7.14 Search
- 7.15 Messaging-The Inbox
- 7.16 Tasks
- 7.17 Terminal Services Client
- 7.18 Word Mobile
- Expansion Modules 8
- Peripheral Devices & Accessories 9
- 9.1 Carrying Accessories
- 9.2 The Batteries
- 9.3 Chargers And Docking Stations
- 9.4 Desktop Docking Station
- 9.4.1 Charging A Battery Installed In The WORKABOUT PRO
- 9.4.2 Charging A Spare Battery
- 9.4.3 Battery Charge Duration
- 9.4.4 Charger LED Indicators
- 9.4.5 Troubleshooting The Charging Operation Of The Dock
- 9.4.6 Desktop Docking Station Ports
- 9.4.7 Linking A WORKABOUT PRO To A PC
- 9.4.8 Linking A WORKABOUT PRO To An Ethernet Network
- 9.4.9 Troubleshooting The Docking Station Operations
- 9.5 Single Battery Charger-Model #WA3001-G1
- 9.6 Quad Battery Charger-Model #WA3004-G1
- 9.7 Quad Docking Station-Model #WA4004-G1
- 9.8 AC Wall Adaptor And Tether Cable
- 9.9 Automotive Power Adaptor
- 9.10 The Vehicle Cradle
- 9.11 Bluetooth Peripherals
- Specifications 10
- 10.1 Hand-Held Computer Specifications
- 10.2 Radio Specifications
- 10.3 Scanner Specifications
- 10.4 Battery Test Specifications
- Support Services And Worldwide Offices
- Port Pinouts
- Index

Chapter 9: Peripheral Devices & Accessories
Vehicle Cradle Mounting Recommendations
322 WORKABOUT PRO Hand-Held Computer With Windows Mobile 5.0 User Manual
Depending on the type of hand-held unit you are use, you can choose from the
following powered vehicle cradle models:
• Vehicle Cradle for WORKABOUT PRO C – WA1010-G1
• Vehicle Cradle for WORKABOUT PRO S – WA1110-G1
A port replicator option is available for powered vehicle cradles. Refer to “The Port
Replicator” on page 325 for details.
9.10.1 Vehicle Cradle Mounting Recommendations
Warning: Before mounting a vehicle cradle in a vehicle, there are a number
of operator safety issues that require careful attention. An improp-
erly mounted cradle may result in one or more of the following:
operator injury, operator visibility obstruction, operator distraction
and/or poor ease of egress for the operator. Psion Teklogix strongly
recommends that you seek professional mounting advice from the
vehicle manufacturer.
Cable routing within a vehicle cab also requires careful consider-
ation, especially for separately tethered scanners and other devices
with loose cables. If you are unable to obtain suitable advice,
contact Psion Teklogix for assistance (see Appendix A: Support Ser-
vices And Worldwide Offices). Note also that for better protection,
the equipment should be mounted inside the vehicle roll cage.
Pedestal mounts are recommended for all fixed mount locations because they offer
optimal operator access. In addition, for safety reasons, only pedestal mounts with
fully locking joints should be used in vehicles. Always adjust the pedestal for the
optimum viewing angle, and securely tighten the hex and wing screws.
The most effective way to mount the vehicle cradle is to use the four #8-32 threaded inserts
on the rear of the unit. Bolts must not extend more than 10mm (3/8") into the cradle.
To accommodate the service loop of the connector cable, leave a 4" clearance at the
bottom of the cradle. Leave a 7" (minimum) clearance at the top of the cradle to
allow easy removal of the hand-held. Also remember to leave at least a 3" clearance
at the sides of the cradle to allow activation of the release knobs. Refer to the
detailed assembly instructions that are packaged with the cradle when selecting a
mounting location.
9.10.1.1 Mounting Template
The vehicle cradle is shipped with detailed mounting instructions including a drill template.