
User's Manual Part 2

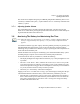

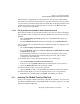


Table Of Contents
- 7505 User Manual 76.pdf
- 7505 User Manual 77.pdf
- 7505 User Manual 78.pdf
- 7505 User Manual 79.pdf
- 7505 User Manual 80.pdf
- 7505 User Manual 81.pdf
- 7505 User Manual 82.pdf
- 7505 User Manual 83.pdf
- 7505 User Manual 84.pdf
- 7505 User Manual 85.pdf
- 7505 User Manual 86.pdf
- 7505 User Manual 87.pdf
- 7505 User Manual 88.pdf
- 7505 User Manual 89.pdf
- 7505 User Manual 90.pdf
- 7505 User Manual 91.pdf
- 7505 User Manual 92.pdf
- 7505 User Manual 93.pdf
- 7505 User Manual 94.pdf
- 7505 User Manual 95.pdf
- 7505 User Manual 96.pdf
- 7505 User Manual 97.pdf
- 7505 User Manual 98.pdf
- 7505 User Manual 99.pdf
- 7505 User Manual 100.pdf
- 7505 User Manual 101.pdf
- 7505 User Manual 102.pdf
- 7505 User Manual 103.pdf
- 7505 User Manual 104.pdf
- 7505 User Manual 105.pdf
- 7505 User Manual 106.pdf
- 7505 User Manual 107.pdf
- 7505 User Manual 108.pdf
- 7505 User Manual 109.pdf
- 7505 User Manual 110.pdf
- 7505 User Manual 111.pdf
- 7505 User Manual 112.pdf
- 7505 User Manual 113.pdf
- 7505 User Manual 114.pdf
- 7505 User Manual 115.pdf
- 7505 User Manual 116.pdf
- 7505 User Manual 117.pdf
- 7505 User Manual 118.pdf
- 7505 User Manual 119.pdf
- 7505 User Manual 120.pdf
- 7505 User Manual 121.pdf
- 7505 User Manual 122.pdf
- 7505 User Manual 123.pdf
- 7505 User Manual 124.pdf
- 7505 User Manual 125.pdf
- 7505 User Manual 126.pdf
- 7505 User Manual 127.pdf
- 7505 User Manual 128.pdf
- 7505 User Manual 129.pdf
- 7505 User Manual 130.pdf
- 7505 User Manual 131.pdf
- 7505 User Manual 132.pdf
- 7505 User Manual 133.pdf
- 7505 User Manual 134.pdf
- 7505 User Manual 135.pdf
- 7505 User Manual 136.pdf
- 7505 User Manual 137.pdf
- 7505 User Manual 138.pdf
- 7505 User Manual 139.pdf
- 7505 User Manual 140.pdf
- 7505 User Manual 141.pdf
- 7505 User Manual 142.pdf
- 7505 User Manual 143.pdf
- 7505 User Manual 144.pdf
- 7505 User Manual 145.pdf
- 7505 User Manual 146.pdf
- 7505 User Manual 147.pdf
- 7505 User Manual 148.pdf
- 7505 User Manual 149.pdf
- 7505 User Manual 150.pdf

Chapter 3: Get To Know The iKôn PDA
Adjusting Speaker Volume
iKôn Rugged PDA (Windows Mobile 6) User Manual 43
The volume can be adjusted using the [UP ARROW] and [DOWN ARROW]. The increase
volume key is labelled with a plus (+) symbol and the decrease volume key is labelled with
a minus (-) symbol.
3.7.1 Adjusting Speaker Volume
The [VOLUME] button is located on the left side of the PDA, just below the [SCAN]
button. It is a rocker button; pressing the top half of the button increases volume while press-
ing the bottom half of the button decreases it.
3.8 Monitoring The Battery And Maximizing Run Time
As Lithium-Ion batteries age, their capacity decreases gradually, and they are generally con-
sidered depleted after approximately 2 years of use (less than 60% of original capacity
remaining). Keep in mind however that heavy usage or operating the unit at temperature ex-
tremes will shorten the battery life.
Lithium-Ion batteries do not require conditioning cycles and the iKôn PDA battery system
(including chargers) requires no user interaction to maintain peak performance.
To maximize the run time of your batteries, consider the following:
• The display backlight is the largest drain on the battery. Try to keep its brightness as low
as possible.
• The unit is ‘event’ driven—that is, when the unit is not in use, it reverts to sleep mode
(even when it appears to be running), saving battery power. Events include a key press,
touchscreen taps and scan triggers. Power consumption is reduced if you avoid unneces-
sary events, and allow the unit to sleep as much as possible.
• The battery is a ‘smart battery’ with built-in intelligence.
Tapping on the Power icon under Start>Settings>System tab displays a dialog box that pro-
vides detailed information about the battery status of the battery installed in your unit.
• When the unit is switched off, it goes into a low-power, suspend state but continues to
draw a small amount of power from the battery. This should not be an issue unless the
unit is left in suspend state for more than a week—for long-term storage, the battery
should be removed from the unit.
Note: When the battery is at 50% capacity, a ‘low battery’ warning is displayed. When the
battery is at approximately 10% capacity, a ‘very low battery’ notification bubble
appears.