
User's Manual Part 2


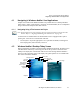
Table Of Contents
- 7505 User Manual 76.pdf
- 7505 User Manual 77.pdf
- 7505 User Manual 78.pdf
- 7505 User Manual 79.pdf
- 7505 User Manual 80.pdf
- 7505 User Manual 81.pdf
- 7505 User Manual 82.pdf
- 7505 User Manual 83.pdf
- 7505 User Manual 84.pdf
- 7505 User Manual 85.pdf
- 7505 User Manual 86.pdf
- 7505 User Manual 87.pdf
- 7505 User Manual 88.pdf
- 7505 User Manual 89.pdf
- 7505 User Manual 90.pdf
- 7505 User Manual 91.pdf
- 7505 User Manual 92.pdf
- 7505 User Manual 93.pdf
- 7505 User Manual 94.pdf
- 7505 User Manual 95.pdf
- 7505 User Manual 96.pdf
- 7505 User Manual 97.pdf
- 7505 User Manual 98.pdf
- 7505 User Manual 99.pdf
- 7505 User Manual 100.pdf
- 7505 User Manual 101.pdf
- 7505 User Manual 102.pdf
- 7505 User Manual 103.pdf
- 7505 User Manual 104.pdf
- 7505 User Manual 105.pdf
- 7505 User Manual 106.pdf
- 7505 User Manual 107.pdf
- 7505 User Manual 108.pdf
- 7505 User Manual 109.pdf
- 7505 User Manual 110.pdf
- 7505 User Manual 111.pdf
- 7505 User Manual 112.pdf
- 7505 User Manual 113.pdf
- 7505 User Manual 114.pdf
- 7505 User Manual 115.pdf
- 7505 User Manual 116.pdf
- 7505 User Manual 117.pdf
- 7505 User Manual 118.pdf
- 7505 User Manual 119.pdf
- 7505 User Manual 120.pdf
- 7505 User Manual 121.pdf
- 7505 User Manual 122.pdf
- 7505 User Manual 123.pdf
- 7505 User Manual 124.pdf
- 7505 User Manual 125.pdf
- 7505 User Manual 126.pdf
- 7505 User Manual 127.pdf
- 7505 User Manual 128.pdf
- 7505 User Manual 129.pdf
- 7505 User Manual 130.pdf
- 7505 User Manual 131.pdf
- 7505 User Manual 132.pdf
- 7505 User Manual 133.pdf
- 7505 User Manual 134.pdf
- 7505 User Manual 135.pdf
- 7505 User Manual 136.pdf
- 7505 User Manual 137.pdf
- 7505 User Manual 138.pdf
- 7505 User Manual 139.pdf
- 7505 User Manual 140.pdf
- 7505 User Manual 141.pdf
- 7505 User Manual 142.pdf
- 7505 User Manual 143.pdf
- 7505 User Manual 144.pdf
- 7505 User Manual 145.pdf
- 7505 User Manual 146.pdf
- 7505 User Manual 147.pdf
- 7505 User Manual 148.pdf
- 7505 User Manual 149.pdf
- 7505 User Manual 150.pdf
Chapter 3: Get To Know The iKôn PDA
Inserting The Card ??
46 iKôn Rugged PDA (Windows Mobile 6) User Manual
SD/MMC cards provide additional non-volatile memory to your PDA. SIM cards provide
access to the PDA’s voice option, the Internet, and so on.
3.11.1 Inserting The Card ??
• Switch off the iKôn PDA.
• Remove the battery cover and the battery.
A hinged door in the battery compartment protects the connectors. It is hinged on the left
side.
• Pull the hinged SD door down as the arrow icon on the door indicates.
• Orient the SD/MMC or SIM card according to the legend stamped into the battery well
plastic.
• For SD/MMC cards, slide the card into the lower slot, pushing it inward until it latches
into place.
• For a SIM card, slide the card into the upper slot, pushing it inward until it latches into
place.
• Swing the hinged door back into place, and gently snap it shut.
To remove the card:
• Gently press the card inward until it unlatches, and the card is expelled from the slot.
3.12 General Maintenance
3.12.1 Caring For The Touchscreen
The top of the touchscreen is a thin, flexible polyester plastic sheet with a conductive
coating on the inside. The polyester can be permanently damaged by harsh chemicals and is
susceptible to abrasions and scratches. Using sharp objects on the touchscreen can scratch or
cut the plastic, or crack the internal conductive coating.
The chemicals listed below must not come into contact with the touchscreen:
• sodium hydroxide,
• concentrated caustic solutions,
• benzyl alcohol, and
• concentrated acids.
If the touchscreen is used in harsh environments, consider applying a disposable screen pro-
tector (model number ??). These covers reduce the clarity of the display slightly but will