WORKABOUT PRO Hand-Held Computer With Windows Mobile 2003 SE Quick Reference Guide August 29, 2006 ISO 9001 Certified Quality Management System PN 8000091.
© Copyright 2006 by Psion Teklogix Inc., Mississauga, Ontario, Canada This document and the information it contains is the property of Psion Teklogix Inc., is issued in strict confidence, and is not to be reproduced or copied, in whole or in part, except for the sole purpose of promoting the sale of Psion Teklogix manufactured goods and services.
Return-To-Factory Warranty Psion Teklogix provides a return to factory warranty on this product for a period of twelve (12) months in accordance with the Statement of Limited Warranty and Limitation of Liability provided at www.psionteklogix.com/ warranty. (If you are not already a member of Teknet and you attempt to view this warranty, you will be asked to register. As a member of Teknet, you’ll have access to helpful information about your Psion Teklogix products at no charge to you.
Restriction On Hazardous Substances (RoHS) Directive 2002/95/EC What is RoHS? The European Union has mandated that high environmental standards be met in the design and manufacture of electronic and electrical products sold in Europe, to reduce hazardous substances from entering the environment. The “Restriction on Hazardous Substances Directive (RoHS)” prescribes the maximum trace levels of lead, cadmium, mercury, hexavalent chromium, and flame retardants PBB and PBDE that may be contained in a product.
Table Of Contents Approvals & Safety Summary . . . . . . . . . . . . . . . . . . . . . . . . . 3 1. Basic Preparation . . . . . . . . . . . . . . . . . . . . . . . . . . . . . . . . . 11 1.1 Charging The Battery . . . . . . . . . . . . . . . . . . . . . . . . . . 11 1.2 Installing The Battery . . . . . . . . . . . . . . . . . . . . . . . . . . 11 1.3 Switching The Unit On. . . . . . . . . . . . . . . . . . . . . . . . . 12 1.4 Switching The Unit Off (Suspend). . . . . . . . . . . . . . . . 12 2.
3.5 3.6 3.7 3.8 Email Notification . . . . . . . . . . . . . . . . . . . . . . . . . . . . 28 Task Notification . . . . . . . . . . . . . . . . . . . . . . . . . . . . . 28 Using The Calendar . . . . . . . . . . . . . . . . . . . . . . . . . . . 29 Start Menu . . . . . . . . . . . . . . . . . . . . . . . . . . . . . . . . . . 30 3.8.1 Customizing The Start Menu . . . . . . . . . . . . . . . 30 3.9 Managing Files And Folders . . . . . . . . . . . . . . . . . . . . 31 3.9.1 Creating A New Folder. . . . . . .
Approvals & Safety Summary FCC DECLARATION OF CONFORMITY (DoC) Applicant’s Name & Address: PSION TEKLOGIX Inc. 2100 Meadowvale Blvd. Mississauga, Ontario Canada L5N 7J9 Contact Person: Iain Roy Telephone No.: (905) 813-9900 US Representative’s Name & Address: PSION TEKLOGIX Inc. 1810 Airport Exchange Blvd., Suite 500 Erlanger, KY, 41018, USA Contact Person: Kyle Day Telephone No.: (859) 372-4329 Equipment Type/Environment: Computing Devices Trade Name / Model No.
CE Marking When used in a residential, commercial or light industrial environment the product and its approved UK and European peripherals fulfil all requirements for CE marking. R&TTE Directive 1999/5/EC This equipment complies with the essential requirements of EU Directive 1999/5/EC (Declaration available: www.psionteklogix.com). Cet équipement est conforme aux principales caractéristiques définies dans la Directive européenne RTTE 1999/5/CE. (Déclaration disponible sur le site: www.psionteklogix.com).
Utrustningen uppfyller kraven för EU-direktivet 1999/5/EC om ansluten teleutrustning och ömsesidigt erkännande av utrustningens överensstämmelse (R&TTE). (Förklaringen finns att läsa på: www.psionteklogix.com). Tämä laite vastaa EU:n radio- ja telepäätelaitedirektiivin (EU R&TTE Directive 1999/5/EC) vaatimuksia. (Julkilausuma nähtävillä osoitteessa: www.psionteklogix.com).
user is encouraged to try to correct the interference by one of the following measures: • Reorient or relocate the receiving antenna. • Increase the separation between the equipment and receiver. • Connect the equipment into an outlet on a circuit different from that to which the receiver is connected. • Consult the dealer or an experienced radio/TV technician for help. This device complies with Part 15 of the FCC Rules.
Note: To maintain compliance with the FCC RF exposure guidelines, if you wear the WORKABOUT PRO M-E, C & S on your body, use the Psion Teklogix approved carrying case. Use of non-approved accessories may violate FCC RF exposure guidelines. Emissions Information For Canada This Class B digital apparatus meets all requirements of the Canadian Interference-Causing Equipment Regulations. When using the 802.
Caution! Do not look into the laser/LED beam or point the beam at people or animals. Aperture This label is affixed below the aperture. Caution! Using controls or adjustments, or performing procedures other than those specified herein may result in hazardous radiation exposure. Caution! The use of optical instruments with this product will increase eye hazard. Do Not Operate In An Explosive Atmosphere Operating Psion Teklogix equipment where explosive gas is present may result in an explosion.
Vorsicht! Explosiongefahr bei unsachgemäßem Austausch der Batterie Ersatz nur durch denselben oder einen vom Hersteller empfohlenen gleichwertigen Typ. Entsorgung gebrauchter Batterien nach Angaben des Herstellers.
Caution! To reduce risk of electric shock, unplug the AC adapter from the outlet before attempting any cleaning. Caution! An extension cord should not be used unless absolutely necessary. Use of an improper extension cord could result in fire or electric shock.
1. Basic Preparation Important: All approval and safety information is outlined in the ‘WORKABOUT PRO Hand-Held Computer With Windows Mobile 2003 SE User Manual’ – part number 8000058. This manual is available on our web site www.psionteklogix.com. It is important that you review all safety guidelines before charging a battery or operating a scanner.
• Insert the charged battery. Replace the battery cover, and turn the fasteners at the base of the battery cover clockwise to lock the battery in place. Note: If you are using a docking station, you can insert an uncharged battery, dock the unit and switch it on. 1.3 Switching The Unit On • Press and hold down the [ENTER/ON] key for at least one second to switch the unit on. • When the LED flashes green, release [ENTER/ON]. The desktop ‘Today’ screen is displayed.
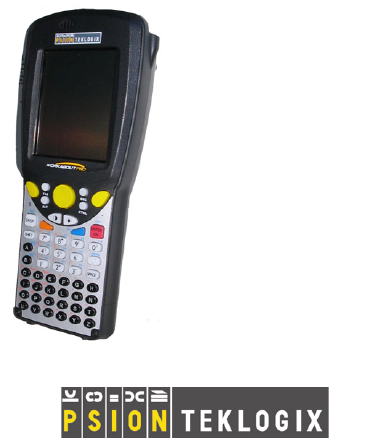
2. The WORKABOUT PRO 2.
2.
End Cap Back Cover – optional scanner module fits here Battery Cover Battery Cover Fasteners Tether Port Low Insertion Force (LIF) Port Audio Jack Psion Teklogix WORKABOUT PRO With Windows Mobile 2003 SE Quick Reference Guide 15
2.3 The Battery The WORKABOUT PRO C operates with a Standard Capacity Lithium Ion battery pack, a High Capacity Lithium-Ion battery pack or three AA alkaline batteries. If you are using a Lithium Ion battery pack, the battery pack must first be charged. The WORKABOUT PRO S operates with either a Standard Capacity or a High Capacity Lithium-Ion battery pack. It does not support AA alkaline batteries.
• • • • • • • • • • • Do not directly solder the battery. Do not connect the battery to an electrical outlet, vehicle cigarette lighter, etc. Do not put battery into a microwave oven or pressurized container. Do not use the battery in combination with primary batteries (such as dry-cell batteries) or batteries of different capacities or brands.
2.4 The Keyboard Note: Any differences between the WORKABOUT PRO C and S keys are clearly indicated. 2.4.
2.4.2 WORKABOUT PRO S Keyboard Scan Key Scan Key Arrow Keys Scan Key Scan Key FN/Blue Key ALPHA/Orange Key Display Backlight Key The keyboard is equipped with a set of standard keys along with an [ORANGE] and a [BLUE] modifier key to provide access to additional keys and system functions. These additional keys are colour coded in orange and blue print above the standard keys. 2.4.3 Modifier Keys The [SHIFT], [CTRL], [ALT], [ORANGE] and [BLUE] keys are modifier keys.
printed in orange print above the [4] key. Pressing the [ORANGE] key followed by the [4] key displays a square bracket rather than the number 4. The [SHIFT], [CTRL] and [ALT] keys operate much like a desktop keyboard except that they are not chorded–two keys cannot be held down simultaneously. The modifier key must be pressed first followed by the key whose function you want modified.
The [BKSP/DEL] Key Moves the cursor one character to the left, erasing the incorrectly entered key stroke. [DEL] key ([BLUE] [BKSP]) erases the character at the cursor position. The [CTRL] And [ALT] Key Modify the function of the next key pressed and are application dependent. The [TAB] Key Usually moves the cursor to the next field to the right or downward. Pressing [ORANGE] [TAB] move the cursor backward.
The Macro Keys [M1] to [M3] (WORKABOUT PRO C Only) Contain up to 20 programmable characters (“positions”) and executable keys. These keys are accessed by pressing [ORANGE] followed by alpha keys [O], [P] or [Q]. When pressed, a macro key executes a customdefined string of characters, including executable keys. 2.5 The Display & Keypad Backlight Adjusting The Display Backlight From The Keyboard • Press the Backlight key [ ] to cycle through from light to dark, and then back to lightest.
• Tap on Start>Settings. Tap on the System tab to display the Screen icon. • Tap on the Screen icon to display the Alignment tab. • Tap on the Align Screen button and follow the directions. 2.6 Indicators WORKABOUT PROs use an LED (Light Emitting Diode), onscreen messages and audio tones as indicators.
2.6.1 The LED A single, two-coloured LED is located on the left side of the unit, just above the [BKSP] key. When you press [ENTER/ON], the LED flashes green to indicate that the unit has been powered up. The LED table below outlines the behaviour of the LED while the unit is docked in a charger. Keep in mind that the application running on the WORKABOUT PRO can dictate how the LED operates. Review the documentation provided with the application to determine LED behaviour.
• Press the increase volume [RIGHT] arrow key or the decrease volume [LEFT] arrow key until the volume meets your needs. • Press the [FN/BLUE] key again to ‘unlock’ it. On WORKABOUT PROs, the ‘point and click’ action of a PC mouse is accomplished by tapping a stylus on the touchscreen. 3. Navigating In Windows Mobile 3.1 Navigating A Touchscreen All WORKABOUT PROs are equipped with a touchscreen and a stylus.
3.2.1 The Navigation Bar Start Button Volume Control Connectivity Indicator Date & Time Battery Capacity Upcoming Appts. Note: When a peripheral is attached to the tether or LIF port of the WORKABOUT PRO, an associated icon is displayed briefly in the navigation bar to indicate that the hand-held has recognized the connection. Tapping an icon in the navigation bar produces the following results: Start Button Displays the Start menu.
3.3 Today’s Date, Clock And Alarm In the Today screen, tap the stylus on today’s date to display the Clocks & Alarms screen. Tap the stylus on the dropdown menu arrows to adjust the GMT, time and date displayed in the Today screen. Note: To warn you of an upcoming meeting or appointment, tap on the Alarms tab, and tap in the checkbox to enable an alarm. Choose the day & time of the alarm. 3.4 Ownership In the Today screen, tap the stylus on Owner: to display this screen.
3.5 Email Notification If you have any email, it will be indicated next to the email notification listing in the Today screen. Refer to ‘Messaging – The Inbox’ in the WORKABOUT PRO Hand-Held Computer with Windows Mobile 2003 SE User Manual (PN 8000058) for details about synchronizing your email. 3.6 Task Notification In the Today screen, tap the stylus on the Task Notification icon to display this screen. Tap here, and type a task description using the soft keyboard or the hand-held keyboard.
3.7 Using The Calendar In the Today screen, tap the stylus on the Calendar icon to display this screen listing your appointments. To create a new calendar entry, tap on the New menu option in the taskbar. Tap on one of these icons to change the format of the calendar – Today icon to view today’s agenda, Day icon to view today’s hourly schedule, Week icon to view the entire week and Month or Year icons to view long-term schedules.
3.8 Start Menu • Tap on the Start button in the upper-left corner of the navigation bar to display the menu. Start Navigation Bar 7 custom-chosen programs 5 most recently used programs Windows Mobile command centre • Tap on the item with which you want to work. 3.8.1 Customizing The Start Menu Tap in the checkbox next to the item(s) you want to appear in the Start menu. Note: Keep in mind that you are limited to a maximum of 7 program choices at one time.
3.9 Managing Files And Folders • Tap on Start>File Explorer. If this option is not available in the Start menu, tap on Start>Programs. Tap on the File Explorer icon. Documents are automatically stored here. Tap on a folder to open it Menus contain applicationspecific commands Internal File Storage Shared Network Files Storage Card 3.9.1 Creating A New Folder • • • • Tap Start>File Explorer. Tap Edit in the menu bar. Tap New Folder.
• • Press and hold the stylus in a blank area of the screen—away from other icons—until a pop-up menu is displayed. Tap Paste to copy the file to the new location. 3.9.4 Deleting A File • • Press and hold the stylus on the file or folder you want to delete until a pop-up menu is displayed. Tap Delete to remove the file. 3.10 Using Menus Menus in Windows Mobile 2003 SE are available at the bottom of the application screen. 3.10.
3.11 Programs Tap on Start, Programs to display the programs installed on your unit. Tap on the icon representing the program you want to launch. To minimize a program screen, tap on the X in the upperright corner. Keep in mind that this will minimize rather than close the program. 3.11.1 Closing An Application • • Tap on Start>Settings. Tap on the System tab and then the Memory icon the Memory screen is opened. Tap on the Running Program tab to view a list of running applications.
3.12 Settings Tap on Start, Settings to display the options installed on your unit. Tap on the tab containing the setting icon you want to launch. Tap on the icon representing the setting you want to launch. 3.13 Help Tap on Start, Help to display the Help screen. Tap on the topic about which you want additional information. 3.14 Entering Text You can enter text using the onscreen, soft keyboard or using the WORKABOUT PRO keyboard.
3.14.1 The Soft Keyboard If the soft keyboard is not displayed, tap on the arrow on the right side of the taskbar. Choose Keyboard from the popup menu. Tap on the letters in the soft keyboard that you want to appear in your document. To switch to the numeric keypad, tap on the ‘123’ key in the upper-left corner of the soft keyboard. Tap on ‘123’ again to return to the standard keypad.
5. General Maintenance 5.1 Caring For The Touchscreen The touchscreen can be permanently damaged by harsh chemicals and is susceptible to abrasions and scratches. Using sharp objects on the touchscreen can scratch or cut the plastic or crack the internal conductive coating. Protect the touchscreen from the following chemicals: • mustard, ketchup, • sodium hydroxide, • concentrated caustic solutions, • benzyl alcohol, and • concentrated acids.
Direct Dial:+1 905 813 9900Ext. 1999Option 3 For technical support in EMEA (Europe, Middle East and Africa), please contact the local office listed in the website below: http://www.psionteklogix.com/EMEASupport For technical support in Asia, please contact the local office listed in the website below: http://www.psionteklogix.com Technical Support for Mobile Computing Products is provided via email through the Psion Teklogix customer and partner extranets. To reach the website, go to www.psionteklogix.
CANADIAN SERVICE CENTRE Psion Teklogix Inc. 7170 West Credit Ave., Unit #1 Mississauga, Ontario Canada L5N 7J9 Tel: +1 800 387 8898Option 2 - or Direct: + 1 905 813 9900Ext. 1999 Option 2 Fax: + 1 905 812 6304 Web: www.psionteklogix.com NORTH AMERICAN HEADQUARTERS AND U.S. SERVICE CENTRE Psion Teklogix Corp. 1810 Airport Exchange Boulevard Suite 500 Erlanger, Kentucky USA 41018 Tel: +1 859 371 6006 Fax: +1 859 371 6422 Email: salesusa@psion.com INTERNATIONAL SUBSIDIARIES (SEE ALSO WWW.PSIONTEKLOGIX.
WARE is licensed, not sold. All rights reserved. • IF YOU DO NOT AGREE TO THIS END USER LICENSE AGREEMENT (“EULA”), DO NOT USE THE DEVICE OR COPY THE SOFTWARE. INSTEAD, PROMPTLY CONTACT Psion Teklogix FOR INSTRUCTIONS ON RETURN OF THE UNUSED DEVICE(S) FOR A REFUND. ANY USE OF THE SOFTWARE, INCLUDING BUT NOT LIMITED TO USE ON THE DEVICE, WILL CONSTITUTE YOUR AGREEMENT TO THIS EULA (OR RATIFICATION OF ANY PREVIOUS CONSENT).
Microsoft Outlook 2002 is between Psion Teklogix and the end user - not between the PC manufacturer and end user. DESCRIPTION OF OTHER RIGHTS AND LIMITATIONS • Speech/Handwriting Recognition. If the DEVICE Software includes speech and/or handwriting recognition component(s), you should understand that speech and handwriting recognition are inherently statistical processes and that errors can occur in the component's recognition of your handwriting, and the final conversion into text.
If you have questions regarding this Notice, please contact MPEG LA, L.L.C., 250 Steele Street, Suite 300, Denver, Colorado 80206; Telephone 303 331.1880; FAX 303 331.1879 • • • • Rental. You may not rent, lease or lend the DEVICE SOFTWARE. SOFTWARE Transfer.
• • • • enable an affected DEVICE to play Secure Content. This action does not alter the DRM Software's ability to play unprotected content. A list of revoked DRM Software is sent to your DEVICE whenever you download a license for Secure Content from the Internet or from your personal computer. You therefore agree that MS may, in conjunction with such license, also download revocation lists onto your DEVICE on behalf of Secure Content Owners.
DEVICE Software. The third party sites are not under the control of MS, Microsoft Corporation, their affiliates and/or their designated agent. Neither MS nor Microsoft Corporation nor their affiliates nor their designated agent are responsible for (i) the contents of any third party sites, any links contained in third party sites, or any changes or updates to third party sites; or (ii) webcasting or any other form of transmission received from any third party sites.
existing DEVICE Software, and use it in accordance with this EULA, including any additional EULA terms accompanying the upgrade DEVICE Software. • COMPANION CD.
ATES SHALL HAVE NO LIABILITY FOR ANY INDIRECT, SPECIAL, CONSEQUENTIAL OR INCIDENTAL DAMAGES ARISING FROM OR IN CONNECTION WITH THE USE OR PERFORMANCE OF THE SOFTWARE. THIS LIMITATION SHALL APPLY EVEN IF ANY REMEDY FAILS OF ITS ESSENTIAL PURPOSE. FOR APPLICABLE LIMITED WARRANTIES AND SPECIAL PROVISIONS PERTAINING TO YOUR PARTICULAR JURISDICTION, PLEASE REFER TO YOUR WARRANTY BOOKLET INCLUDED WITH THIS PACKAGE OR PROVIDED WITH THE SOFTWARE PRINTED MATERIALS. 7.2 Psion Teklogix Inc.
trademarks, intellectual property or any other ownership rights with respect to the Software. 2. DESCRIPTION OF REQUIREMENTS, RESTRICTIONS, RIGHTS AND LIMITATIONS a. Copy. The right and license granted to you shall be limited to installation and use of the Software up to but not exceeding the number of copies you have licensed. However, you may make a copy of the Software for backup or archival purposes. You shall not remove any copyright notice or proprietary notices, labels or marks in or on the Software.
3.
strict liability or any other legal theory related to the Software. This limitation applies whether you are entitled to claim damages from us or our third party suppliers as a matter of contract or tort. 6. COPYRIGHTS, OWNERSHIP AND PROPRIETARY RIGHTS All title and copyrights in and to the Software, and any copies thereof, are owned by Psion Teklogix Inc. or its suppliers.
No modifications of this Agreement shall be effective unless in writing and approved by us. You acknowledge that you have read this Agreement, understand it, and that it is the complete agreement between you and Psion Teklogix with respect to the subject matter hereof and supersedes all prior agreements, oral or written.