
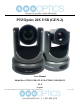
User's Manual


Page 3 of 58
Rev 1.4 7/19
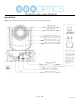
Step 2. Set the system select (rotary) switch for your desired USB and HDMI video output resolution and frame rate.
For many applications, setting 0 (1080p-60) will provide the best overall performance.
For highest possible resolution, use setting 0 (1080p-60) or 6 (1080p-30), however your actual realized frame rate may
be limited to a lower value than 30 fps by your software and/or network connection.
NOTE: After changing this dial, you need to restart the camera to see the effect. Turn the camera off.
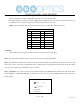
VIDEO SYSTEM
0
1080p60
8
720p30
1
1080p50
9
720p25
2
1080i60
A
-
3
1080i50
B
-
4
720p60
C
-
5
720p50
D
576i
6
1080p30
E
480i
7
1080p25
F
-
CAUTION:
a. After changing the system (rotary) switch, you need to restart the camera to take effect.
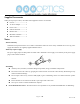
Step 3. Press the Switch ON button on the rear of the camera, the power lamp will illuminate.
Step 4. The Pan-Tilt mechanism will rotate the lens to the maximum position of top right after the camera starts, then it will
return to the “center”. The process of initialization is now complete. (Note: If the position preset 0 has been stored, the position
preset 0 will be called up after initialization in lieu of “center”)
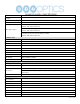
Step 5. (Optional) If you want to restore the factory default settings, press [MENU] button to display the OSD menu. Select
the item [MENU] -> [RESTORE DEFAULT] -> [Restore]. Set the value [Yes], press [HOME] button to restore the factory
default settings.
RESTORE DEFAULT
Restore Yes
Change Value
[Home] OK
[Menu] Back