
Instructions / Assembly


- 6 -
4. Tree Lighting Instructions
Getting your tree lit is as easy as 1-2-3. You may also follow the tags attached
to each section of the tree.
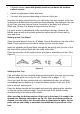
Connecting the Wiring Harnesses
Now that the bottom section of the tree is shaped, plugged in and lit, you will
now need to plug in and shape the next section above it. For your easy
handling, the plugs and cord connectors are marked with round labels marked
as ①②③④ (See Figures 2 & 3). Make sure that the labels on the plugs and
cord connectors match each other. Figure 4 shows you how to connect the
plugs and cord connectors. There is only 1 connection between any 2 tree
sections. For your safety and to avoid an electrical overload, trees with over
550 lights include an extension cord (See Figure 5).
Labeled Plug Labeled Cord Connector Connect the Plug Extension Cord
(Figure 2) (Figure 3) & Cord Connector (Figure 5)
(Figure 4)
The plugs, cord connectors and extension cord receptacles are fixed at the
bottom or top layer of branches on each tree section so that they can be easily
seen and connected.
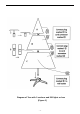
Please refer to pages 7 - 11 for light set connection diagrams for trees
with different light counts and number of sections.