
Instruction manual

Page 16
Configuring the TM-1327GE Camera
TM-1327GE Software
Note: Configurations such as grabber settings, pulse generator, GPIO, and image setting must be saved
into the XML file. Refer to Section 3.4.1, “Check the Current Camera Setting,” on page 11 for more
information.
3.4.8 Free-Running Mode
The camera must be in “Manual Shutter” or “Direct Shutter” mode. In the example below, there is no
partial scan.
1. Connect to the camera.
2. Under the “Device Features” tab, set the GPIO look-up table to Q5=1.
3. Under the “GigE Software” tab, change the manual shutter or direct shutter values.
4. Click Start.
You should now see a free-running video stream.
3.4.9 Externally Triggered
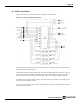
The external trigger is sent through pin 6 of the 12-pin Hirose connector. To use the software to enable
the external trigger, use the following steps:
1. Change the GigE camera software shutter mode to Async. Shutter.
2. Set the GPIO look-up table to Q4 = I0 and Q5 = 1.
3.4.10 Internally Triggered
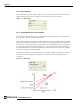
The camera-control software includes pulse generators that you can use to trigger the camera internally.
To do this, use the following steps:
1. Select “Pulse Generator 0” under the “Device Features” tab. Set the pulse width and delay and
check the “Periodic” option if needed.
2. Set the GPIO look-up table to Q5=1 and Q4=I7.
3. Set the shutter mode in the GigE camera software page to async shutter. For more information, refer
to Section , “Mode,” on page 13.
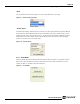
3.4.11 Save/Restore Settings to Your Hard Disk
To save your current settings into the XML file, go to the main menu, select “File” and click Save As.
The XML file saves all your configurations, such as grabber settings, pulse generator, GPIO and
language settings.
The XML file will not, however, save camera parameters such as shutter mode, shutter speed, gain
settings, offset level, scan mode, and LUT. For more information about saving these camera parameters,
refer to Section 3.4.7, “Memory Pages,” on page 15.