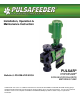
Installation, Operation & Maintenance Instruction ® PULSAR Bulletin #: PS-IOM-HYP-0203-I HYPOPUMP® SODIUM HYPOCHLORITE METERING PUMP USER NOTE: This serves as additional information for Pulsafeeder PULSAR® and PULSAR Shadow® metering pumps equipped with the Automatic Valve Assembly for purging trapped gasses from the reagent head. You must also reference the latest revision of the complete PULSAR® or PULSAR Shadow® pump IOM for critical safety and operational information.
FACTORY SERVICE POLICY If you are experiencing a problem with your Pulsafeeder pump, first review the IOM, and consult the troubleshooting guide. If the problem is not covered or cannot be solved, please contact your local PULSA Series Sales Representative or our Technical Service Department at (585) 292-8000 for further assistance. Trained individuals are available to diagnose your problem and arrange a solution.
Table of Contents 1. CONVENTIONS ...................................................................................................................................... IV 2. GENERAL SAFETY ................................................................................................................................ 1 2.1 Explosive Atmosphere Safety ................................................................................................ 1 2.2 Electrical Safety ....................................
1. Conventions For the remainder of this bulletin, the following Conventions are in effect. A WARNING DEFINES A CONDITION THAT COULD CAUSE DAMAGE TO BOTH THE EQUIPMENT AND THE PERSONNEL OPERATING IT. PAY CLOSE ATTENTION TO ANY WARNING. Notes are general information meant to make operating the equipment easier. Tips have been included within this bulletin to help the operator run the equipment in the most efficient manner possible.
2. General Safety The Automatic Valve Assembly (AVA) was designed as a gas handling/priming aid for operation solely with Pulsafeeder PULSAR® and PULSAR Shadow® metering pumps. Use for any other application is considered un-safe and voids all certification markings and warranties. 2.1 Explosive Atmosphere Safety Explosion Hazard -- Do not perform installation or maintenance of any kind on this device while circuit is live and/or the area is known to be hazardous.
3. Equipment Inspection When you receive your order, check all equipment for: Completeness against the shipping document / purchase order Evidence of shipping damage. Shortages or damage should be reported immediately to the carrier and your PULSAFEEDER representative. 4. Storage The AVA can be successfully stored for extended periods. The key to this success is temperature and humidity control.
5.
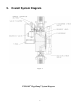
6. Installation 6.1 Location Review the Safety section prior to installing the pump with AVA. It contains information required to properly install and operate the AVA in an industrial environment. Review the PULSAR® or PULSAR Shadow® Installation Operation Maintenance manual provided with your metering pump. It details system related issues that are important to proper operation of the pump and also the AVA. The AVA should be mounted in an area where the operator has access to the front of the unit.
AVOID LOCATIONS WHERE THE AVA WOULD BE SUBJECTED TO EXTREME COLD OR HEAT OR DIRECT SUNLIGHT. FAILURE TO OBSERVE THIS WARNING COULD DAMAGE THE AVA AND VOID ITS WARRANTY MINIMUM OPERATING TEMPERATURE 0 CELSIUS / 32 FAHRENHEIT MAXIMUM (PVC CONSTRUCTION) 49 CELSIUS / 120 FAHRENHEIT MAXIMUM (PVDF CONSTRUCTION) 65 CELSIUS / 150 FAHRENHEIT 6.2 Installation Notes 1. Do not make any electrical connections without adequate grounding. 2.
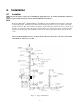
7. Description and Operation 7.1 Principle of Operation Reciprocating metering pumps are used with a wide variety of chemicals, such as sodium hypochlorite, that produce gas within the piping and pump systems. This gas can accumulate in the pump reagent head, causing the pump to “air bind” and lose prime.
8. Maintenance NOTE: This section only refers to models purchased and installed prior to [date] and is for reference only. Replacement parts are no longer available to retrofit. Converting from the HypoPump® to the HypoPump®2 does not have any port-to-port changes. Consult the HypoPump2® Addendum for replacement instructions. 8.1 Automatic Valve Assembly Removal 1. Disconnect the power source to the pump drive motor. If you plan to maintain the AVA itself, remove power from the AVA unit.
8.2 Flapper Valve Replacement 1. Remove automatic valve assembly completely from pump, as per the instructions in the previous section. 2. Remove enclosure cover. 3. Lift the timer up from the bottom of the enclosure and then pull it straight out of the enclosure. 4. Remove the four socket head screws holding the solenoid bracket inside the enclosure. Note that the check valve body will come off the outside of the enclosure also. Make sure that the o-ring is in the groove in the check valve body. 5.
9. Troubleshooting Guide Symptom Probable Cause Possible Solution Pump does not prime (product side) Purge relay not operational Verify power is present at timing relay. Valve flapper not actuating Remove cover from valve assembly and verify that solenoid is actuating valve flapper. Check valves fouled or damaged Clean or replace suction and/or discharge check valves as per pump IOM. Power interruption Check that power is connected to the AVA Flapper worn or damaged.
10. Wiring Diagrams Figure 7 It is recommended that the AVA be powered from a Ground Fault Circuit Interrupter (GFCI) protected electrical circuit.
PULSAR® HYPOPUMP® SODIUM HYPOCHOLORITE METERING PUMP Bulletin #: PS-IOM-HYP-0203-I A unit of IDEX Corporation 2883 Brighton Henrietta Town Line Road Rochester NY 14623 +1 (585) 292-8000 www.pulsa.com pulsa@idexcorp.