
User guide


8
8.2 Flapper Valve Replacement
1. Remove automatic valve assembly completely from pump, as per the instructions in the previous
section.
2. Remove enclosure cover.
3. Lift the timer up from the bottom of the enclosure and then pull it straight out of the enclosure.
4. Remove the four socket head screws holding the solenoid bracket inside the enclosure. Note that the
check valve body will come off the outside of the enclosure also. Make sure that the o-ring is in the
groove in the check valve body.
5. Lift the solenoid/bracket assembly out of the enclosure. The valve flapper will slide away from the
solenoid shaft. Be careful not to lose the spring at the bottom of the solenoid shaft.
6. Discard the green Viton valve flapper and place a new one in the rectangular counterbore in the check
valve body. Locate the boss on the check valve body in the rectangular cutout in the enclosure, making
sure that the body o-ring is in its groove.
7. Slide the solenoid/bracket assembly over the two spring pins in the check valve body, making sure that
the two tangs on the valve flapper slide into the groove at the end of the solenoid shaft. Reassemble the
four socket head screws.
8. Torque screws to 15 in lbs. Do not overtighten.
9. Check to see that the valve flapper moves freely, and then reassemble the cover to the enclosure.
10. Replace the check valve in the body making sure that it is oriented correctly.
11. Reinstall the valve assembly on the pump head per the instructions in the previous section.
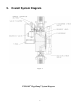
Figure 5
Flapper
Solenoid
Mounting
Screws