Model: PTG1220D5 Gasoline Powered Lawn Mower OPERATOR’S MANUAL support@pulsar-products.
You may contact Pulsar directly at 1-866-591-8921 for product and accessory information and help finding a dealer. To register your product please register online at: pulsar-products.com Note Propsition 65 Warning The engine exhaust from this product contains chemicals known to the State of California to cause cancer, birth defects, or other reproductive harm.
• Do not operate this machine while under the influence of alcohol or drugs. Uneven terrain could cause a slip or fall resulting in severe injury. Poor footing could cause a slip or fall. the engine Disconnect the spark plug wire and ground the center electrode to a metal part of the engine.
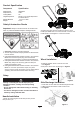
Product Specification Component Specification Rated Speed Displacement Cutting Width Height Adjustment 2800RPM 150cc 20” Single Lever Height Adjustment For Each Wheel 7” Front 7” Rear 61 lbs Wheels Machine Weight Safety & Instruction Decals Important: Safety & instruction decals are located near areas of potential DANGER. Replace damaged decals. Figure 1 2.Position the upper mower handle to match the lower handle pre-drilled holes. Insert the bolt with a washer and handle knobs.
Filling the Fuel Tank Product Overview WARNING! Gasoline is extremely flammable with explosive vapors. A fire or explosion from gasoline can burn you or others. • To prevent a static charge from igniting the gasoline, place the container and/or mower directly on the ground before filling, not in a vehicle or on an object. • Fill the tank outdoors when the engine is cold; wipe up spills.
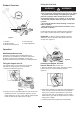
Cutting Height Adjustment Adjusting the cutting height may bring you into contact with the moving blade, causing serious injury. • Stop the engine and wait for all the moving parts to stop. • Do not put your fingers under the housing when adjusting the cutting height. Figure 11 If the engine has been running, the muffler will be hot and can severely burn you. Keep away from the hot muffler. Adjust the cutting height as desired. Set all four wheels to the same height. TO ADJUST CUTTING HEIGHT (See Fig.
• Alternate the mowing direction. This helps disperse the clippings over the lawn for even fertilization. • If the finished lawn is unsatisfactory, try one or more of the following. • Replace the blade or have it sharpened. • Walk at a slower pace while mowing. • Raise the cutting height on your mower. • Cut the grass more frequently. • Overlap cutting swaths instead of cutting a full swath with each pass. • Set the cutting height on the front wheel one notch lower than the rear wheels.
Spark Plug Maintenance 1. Once the engine has cooled, remove the spark plug wire. 2. Remove the spark plug using a spark plug wrench. 3. Clean the spark plug with a wire brush (not supplied). 4. Using a feeler gauge set the gap to 0.75mm. 5. Install the spark plug carefully by hand, to avoid cross-threading. 6. After the spark plug is seated, tighten with the spanner to compress the washer.
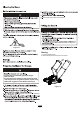
Replacing the Blade Replacing the Air Filter Service Interval: Yearly Service Interval: 25 Hours Important: You will need a torque wrench to install the blade properly. If you do not have a torque wrench or are uncomfortable performing this procedure, contact an Authorized Service Center. 1. Lift the right-side tab to open the air filter cover.(Figure 14) Examine the blade whenever the mower runs out of fuel. If the blade is damaged or cracked, replace it immediately.
Leave spark plug cable disconnected. 18 Figure 18 19 Storing 1. Loosen handle knobs. 2. Move handle forward and fold it as shown. • Do not store untreated gasoline longer than 30 days. • Do not store the mower in an enclosed area, near any source of ignition (flame, spark, etc) • Allow the engine to cool before storing it. to the fuel as directed by the fuel stabilizer manufacturer. engine stops from fuel starvation.
WARRANTY PULSAR PRODUCTS Limited 1 Year Warranty: From the date of original purchase, Pulsar Products Inc. warrants to the original purchase, that each Lawn Mower sold, shall be free from defect in material and workmanship for a period of 1-year on all components. Pulsar Products Inc., at its discretion, agrees to repair or replace any defective part that upon examination, inspection, and testing by a Pulsar Products Inc.
WARRANTY What this Warranty Does Not Cover: • Normal wear: This warranty excludes normal wear items unless under normal use, the original equipment is defective in material or workmanship and needs to be replaced prior to the first replacement interval. • • Maintenance: This warranty does not apply to routine maintenance and does not cover any adjustments or repairs not performed by an authorized repair facility.