
User Instructions

www.pulsar.pl RCB48V RACK POWER
6
2.2. Installation procedure.
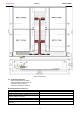
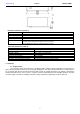
1. Mount the battery controller inside a RACK 19"cabinet as shown in the figure below:
Fig. 3 Mounting the controller in a RACK cabinet.
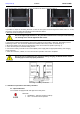
Fig. 4 The battery mounting method.
Is possible to adjust the mounting brackets so that the front panel extends beyond the RACK rails. To do this,
remove the cover and adjust the handles that are inside the cabinet.
2. Remove screws securing the front panel.
Due to the high weight of batteries, they should be mounted in the front part of the housing.
The housing cover must be tightened with screws.
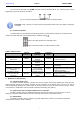
3. Connect the batteries with the battery wires paying attention to the polarity (+ BAT red, -BAT black) and the
numbering of wires. The connections between the batteries were factory made, as shown in Fig. 5.
4. Mount the batteries (see Fig.4) paying attention to the correct order and position (See Fig. 2).
5. Close the front panel, screw the locking screws.
6. Connect the battery controller to the uninterruptible power supply with the appropriate battery and charging
circuit protection.
7. Close the enclosure, cabinet, etc. once the tests and operation control are completed.
Due to the risk of combustible gas generation during charging, the RACK cabinet and the
mounting space must be properly ventilated.
Fig. 5. Battery connection.
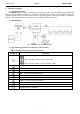
3. Indication of operation of the battery controller.
3.1. Optical indication.
The controller is equipped with LED light at the front panel:
RED LED:
ON/blinking – Indicates a failure (Table 6)
OFF – No errors/normal operation